ProActive Quickstart -Model as A Service for Machine Learning (MaaS_ML)
Once a predictive model is built, tested and validated, you can easily deploy and use any machine learning model using MaaS_ML as a REST Web Service on a physical or a virtual compute host on which there is an available Proactive Node. This will be particularly useful for engineering or business teams that want to take advantage of this model. The life cycle of any MaaS_ML instance (i.e., from starting the generic service instance, deploying a machine learning model to pausing or deleting the instance) can be managed in three different ways in ProActive AI Orchestration PAIO that will be described in this tutorial.
In this tutorial, you will get introduced to managing MaaS_ML instances in PAIO via:
- The Studio Portal and more specifically the bucket model-as-a-service where specific generic tasks are provided to process all the possible actions (i.e. Start_MaaS_ML_Service, Deploy_ML_Model, Call_Predicition_Service, MaaS_ML_Actions).
- The Service Automation Portal by executing the different actions associated to MaaS_ML (i.e. Deploy_ML_Model, Update_MaaS_ML_Parameters and Finish).
- The Workflow Execution Portal by executing the different actions associated to MaaS_ML (i.e. Deploy_ML_Model, Update_MaaS_ML_Parameters and Finish).
- The Swagger UI which is accessible once the PSA service is up and running.
1 Management of a MaaS_ML Instance Using the Studio Portal
Using the Studio Portal of ProActive, we are able to manage the life cycle of a MaaS_ML instance i.e. starting a generic service instance, deploying a ML model to pausing or deleting the instance.
- Open your workflow in ProActive Workflow Studio home page.
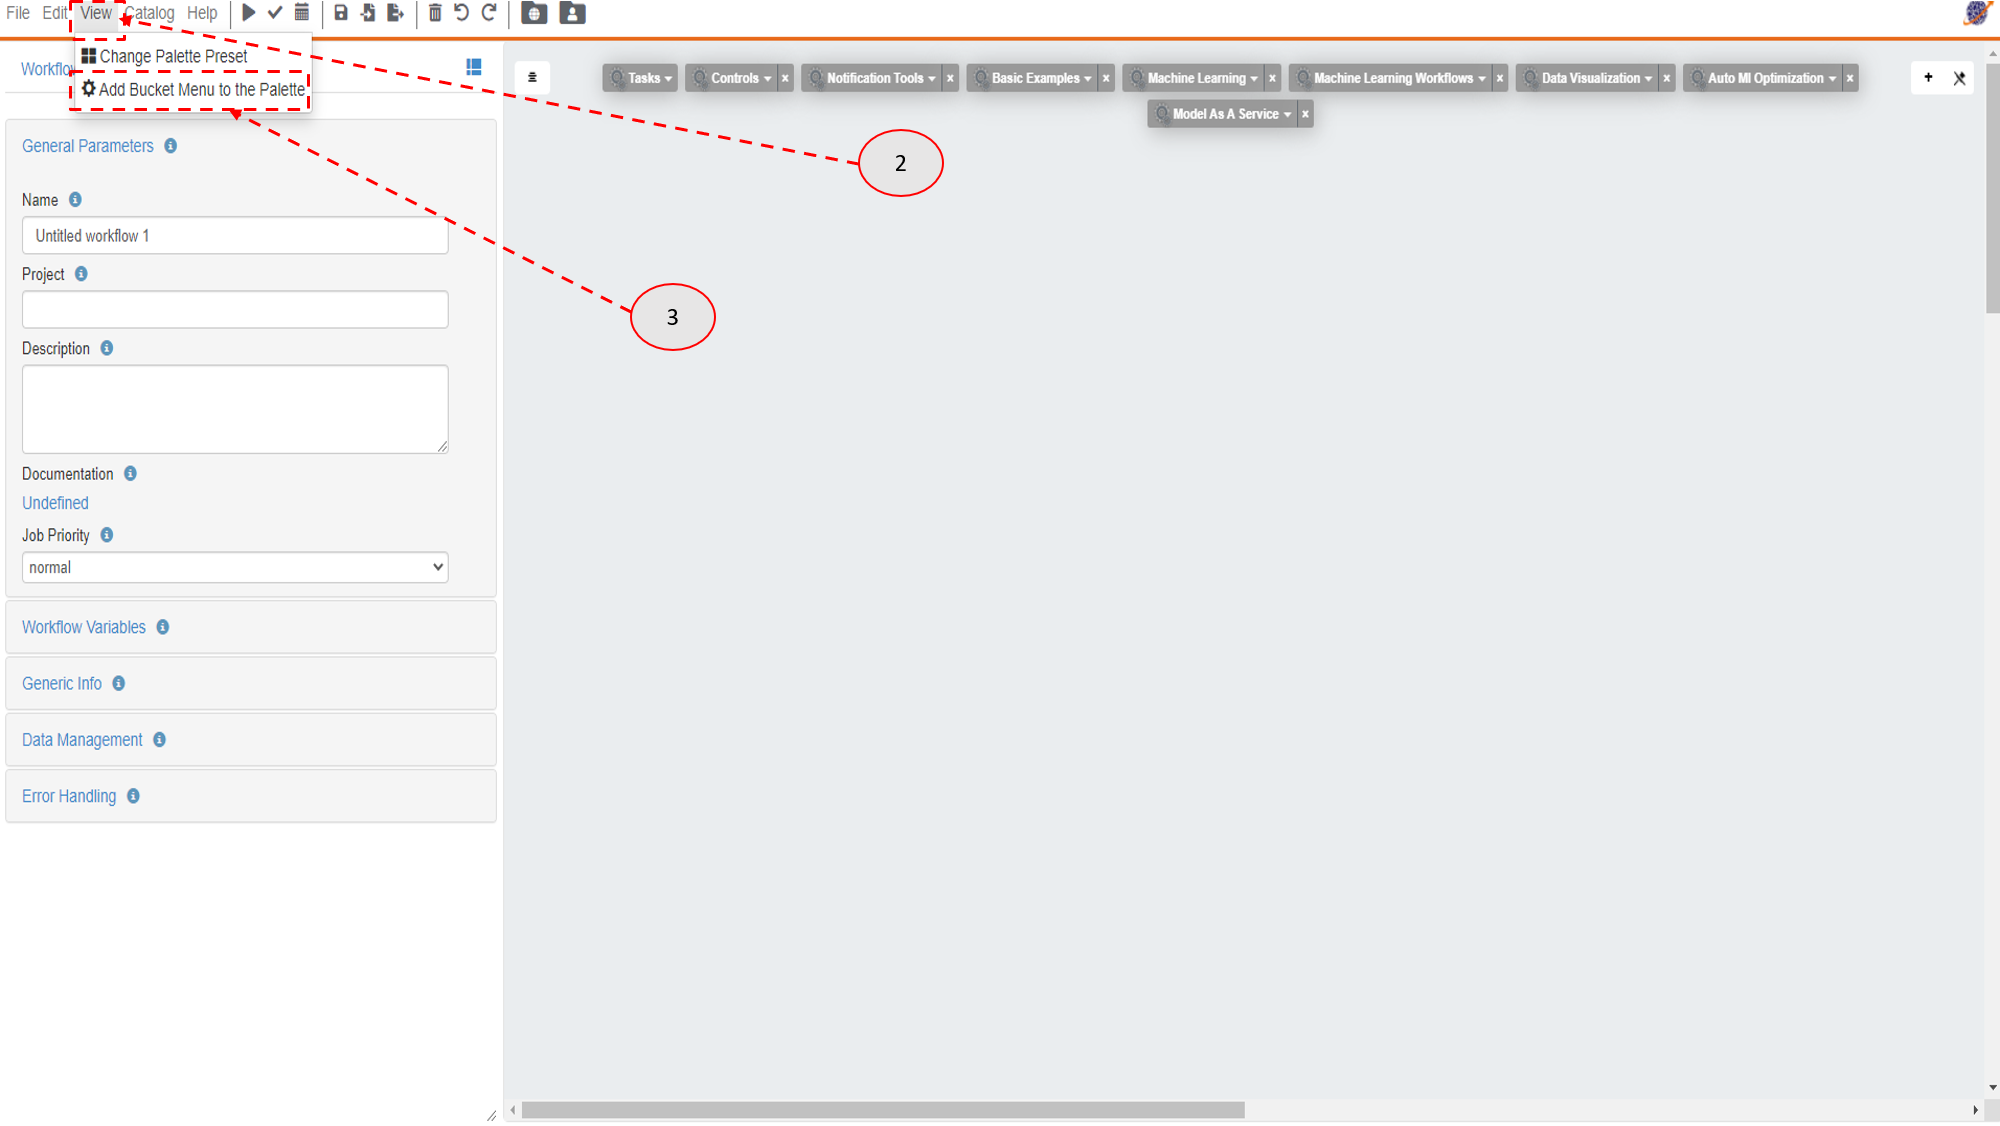
- Click in the View menu field.
- Click on Add Bucket Menu to the Palette.
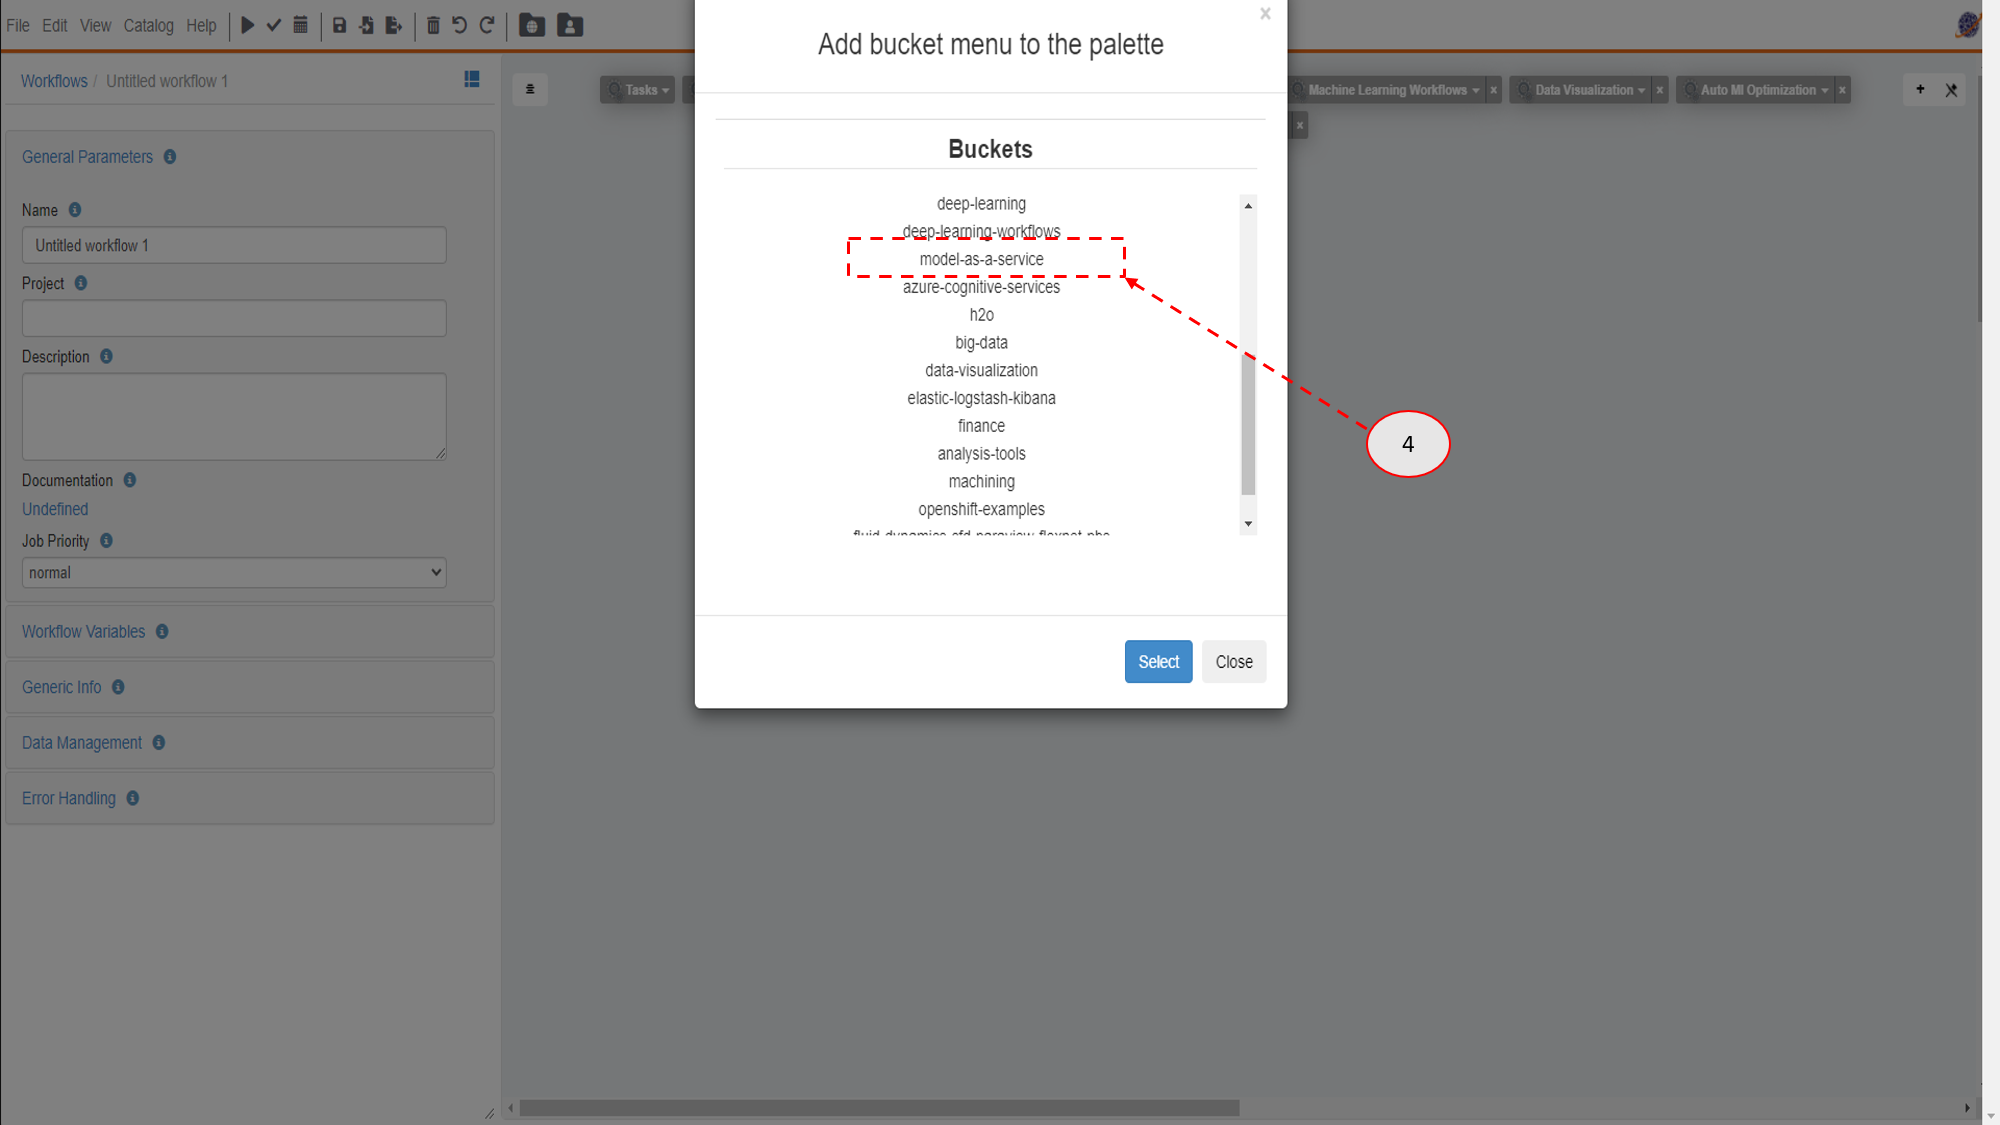
- Choose model_as_a_service.
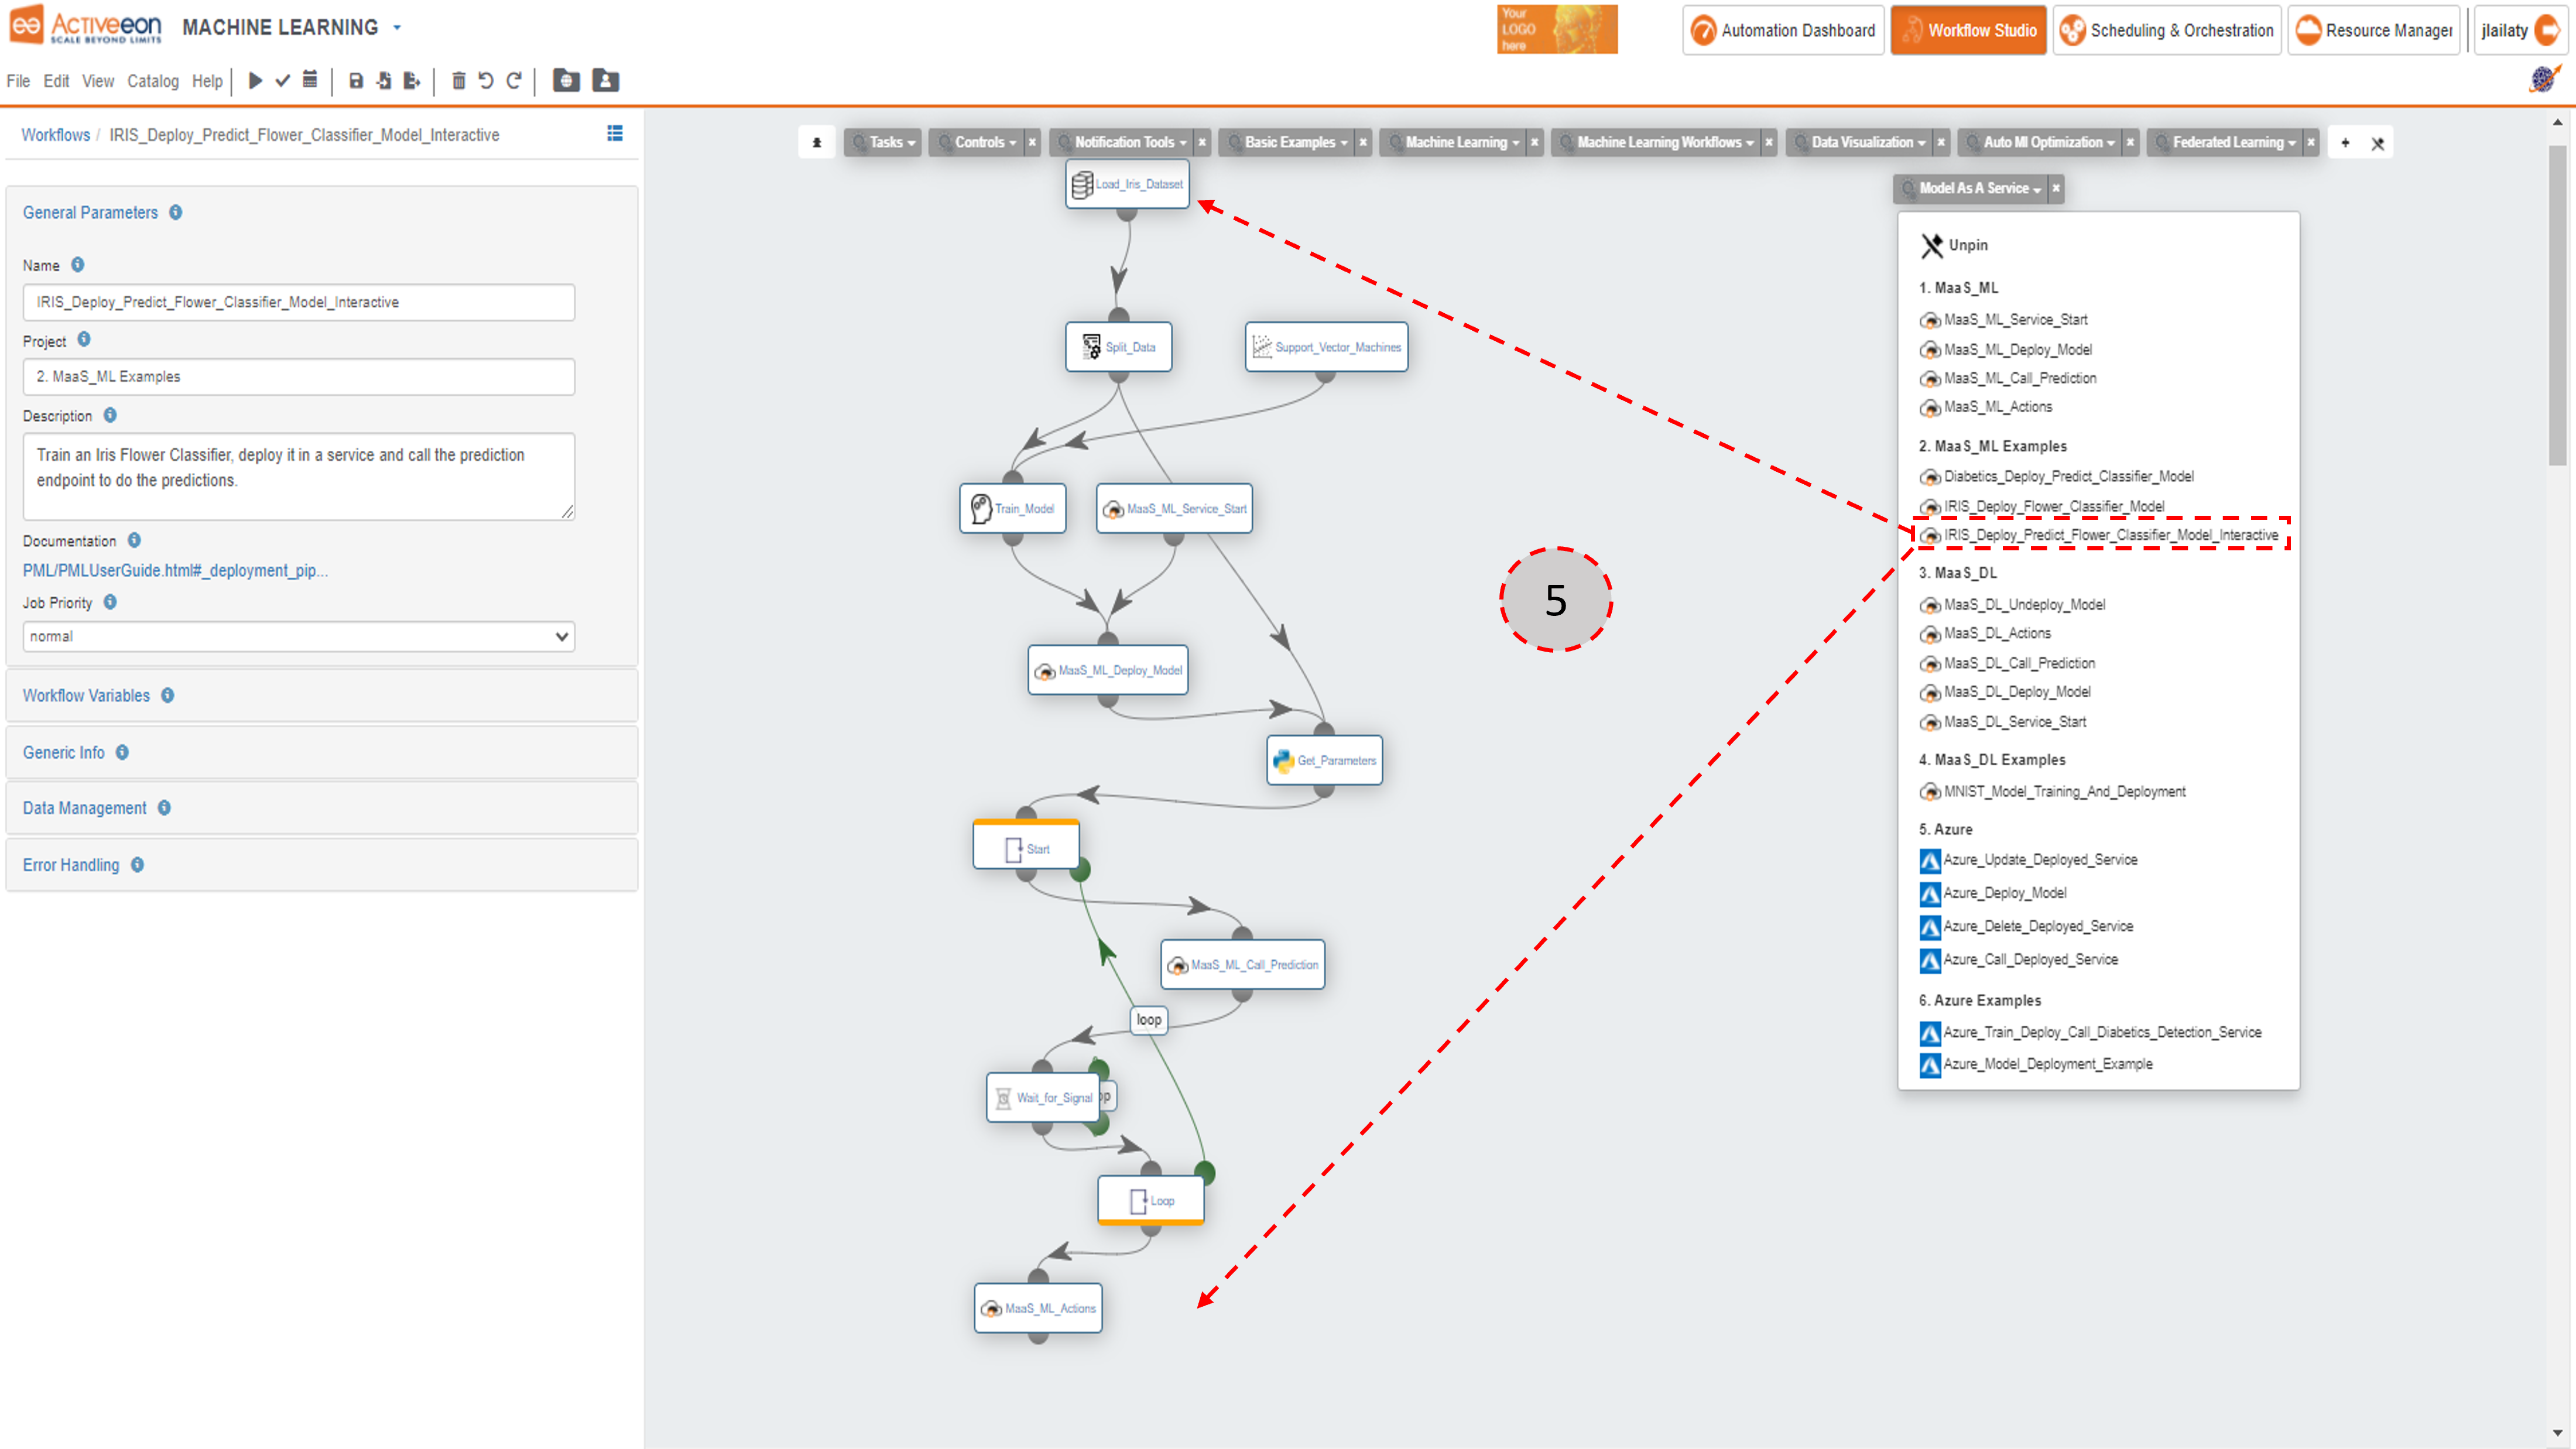
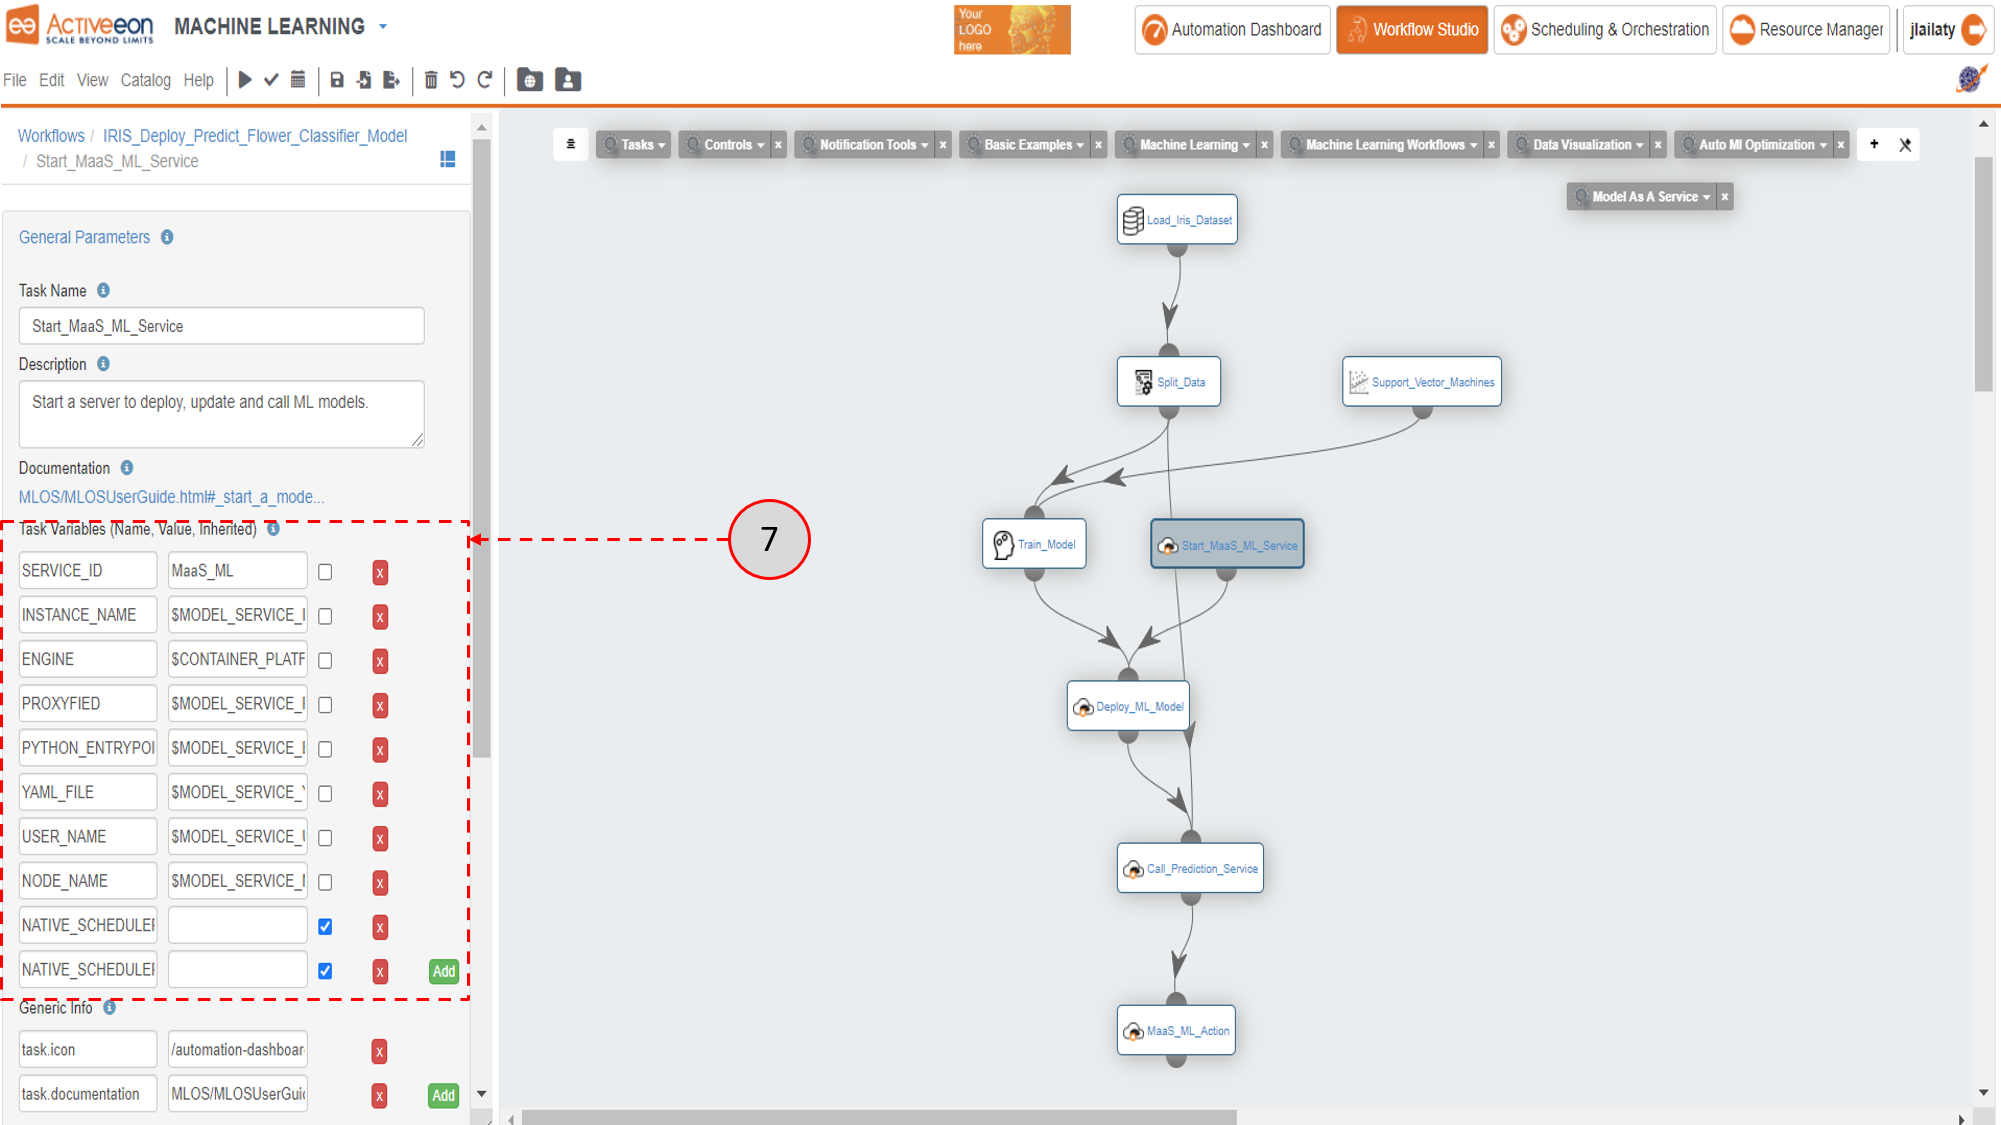
- Once the Model As A Service bucket appears, click on it then drag and drop the IRIS_Deploy_Predict_Flower_Classifier_Model_Interactive found under MaaS_ML Examples. This workflow contains a pre-built model trainer, that starts from loading the IRIS dataset for flowers, splitting it into training and testing datasets and training the model using one of the classification techniques (in this case: Support Vector Machines). The workflow also includes 4 MaaS_ML tasks representing its life cycle: Start_MaaS_ML_Service, Deploy_ML_Model, Call_Prediction_Service, MaaS_ML_Actions. For more information about the characteristics and features of the MaaS_ML instance tasks and their variables, please check the MaaS_ML (Via Studio Portal) documentation web page.
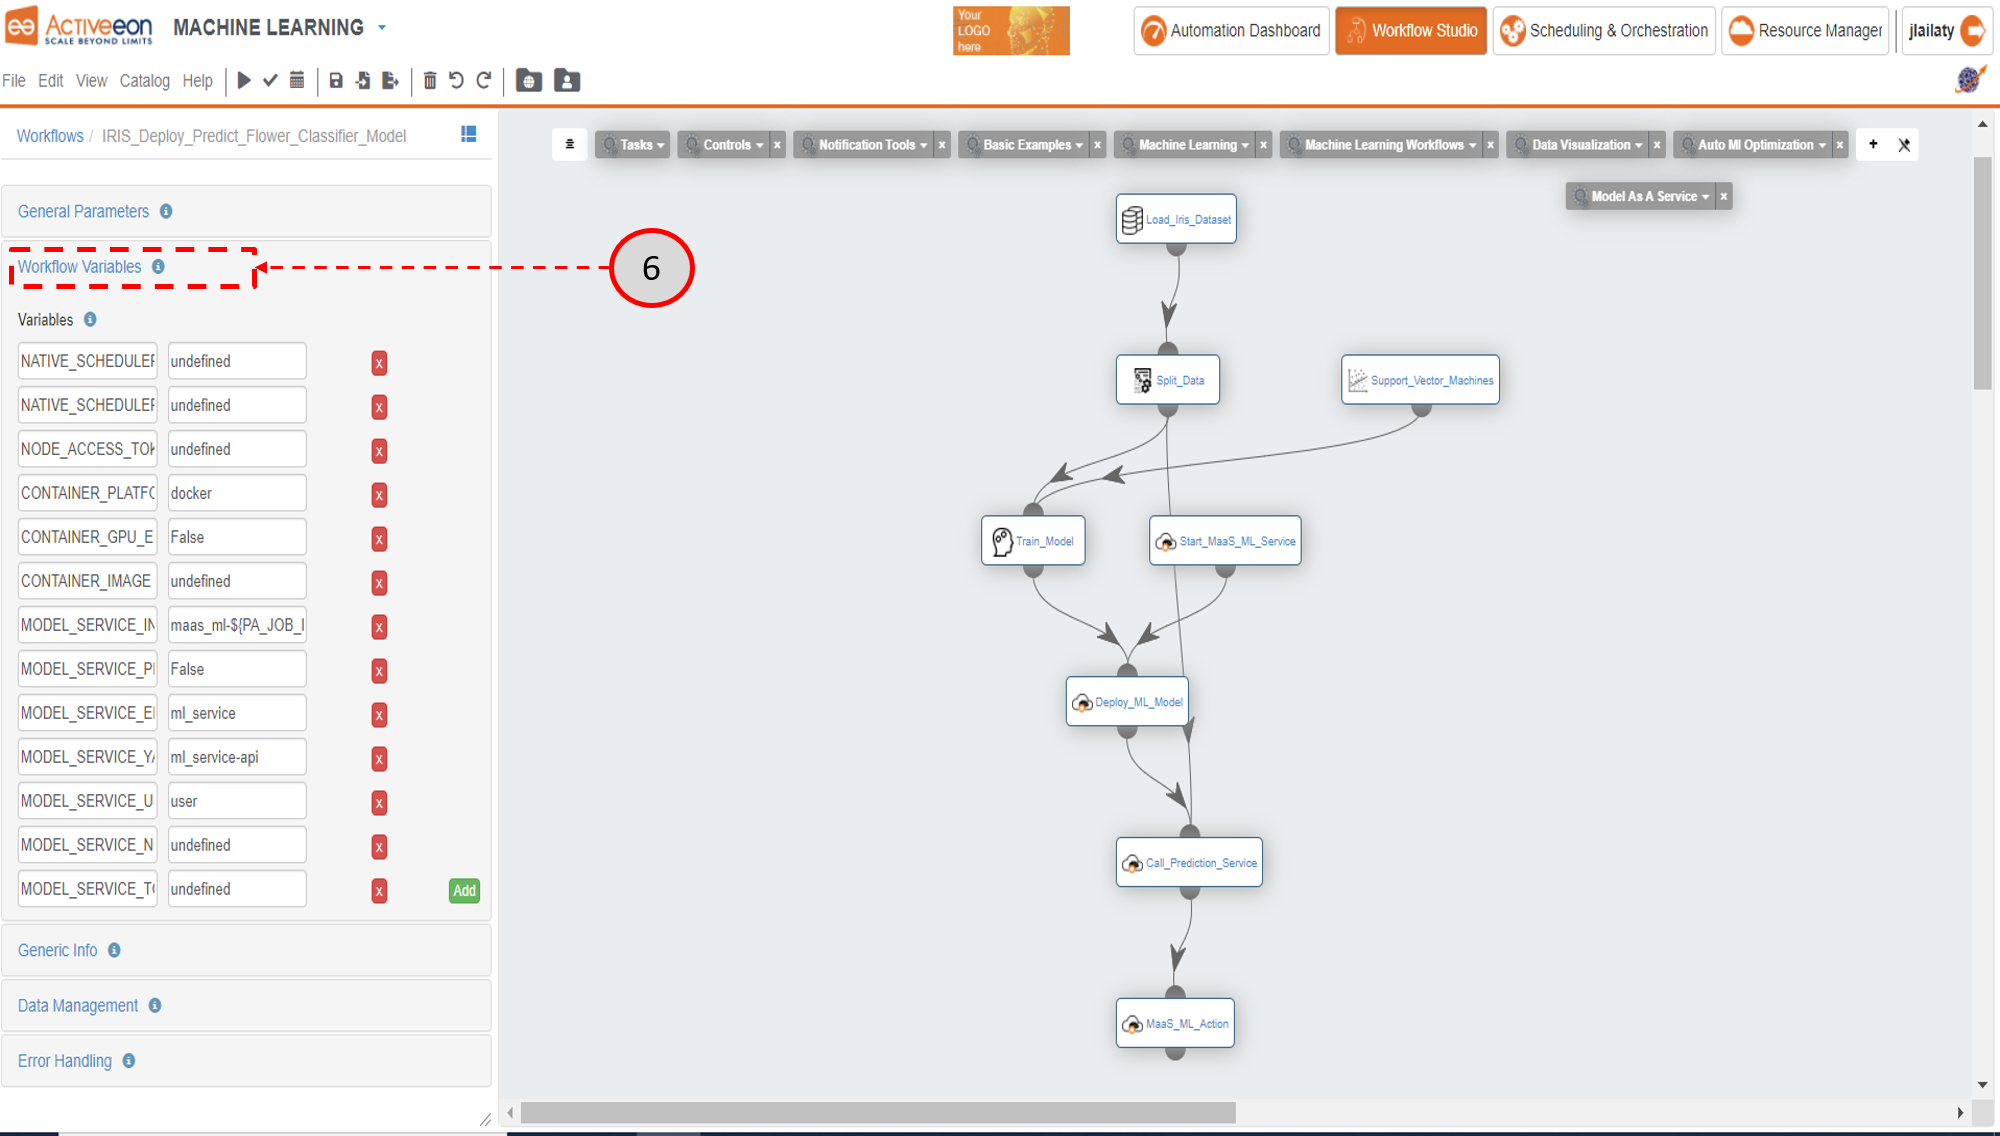
- Click on the Workflow Variables to check the different variables characterizing the overall workflow.
- Click on one of the tasks and then click on Task Variables to check the different variables characterizing the chosen task.
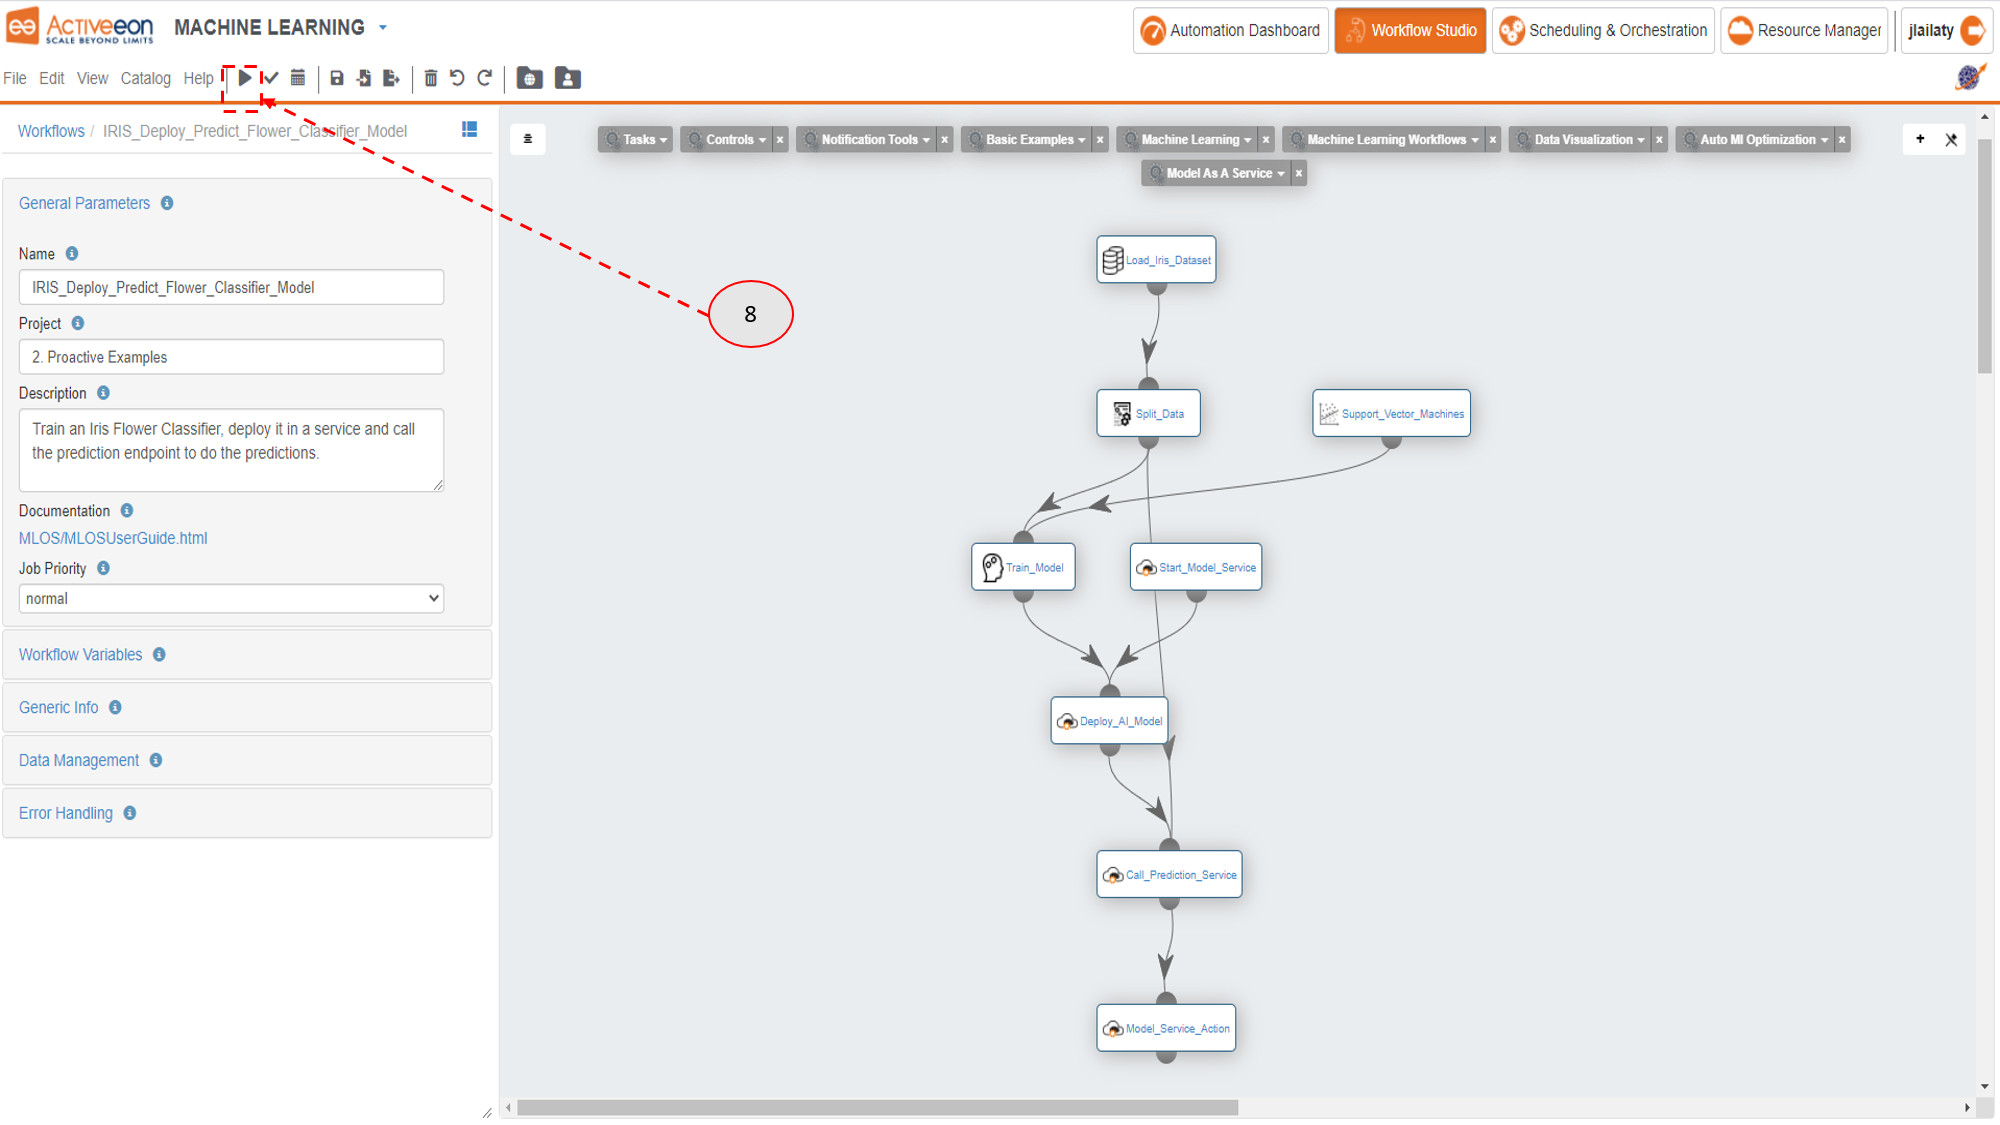
- Click on the Execute button.
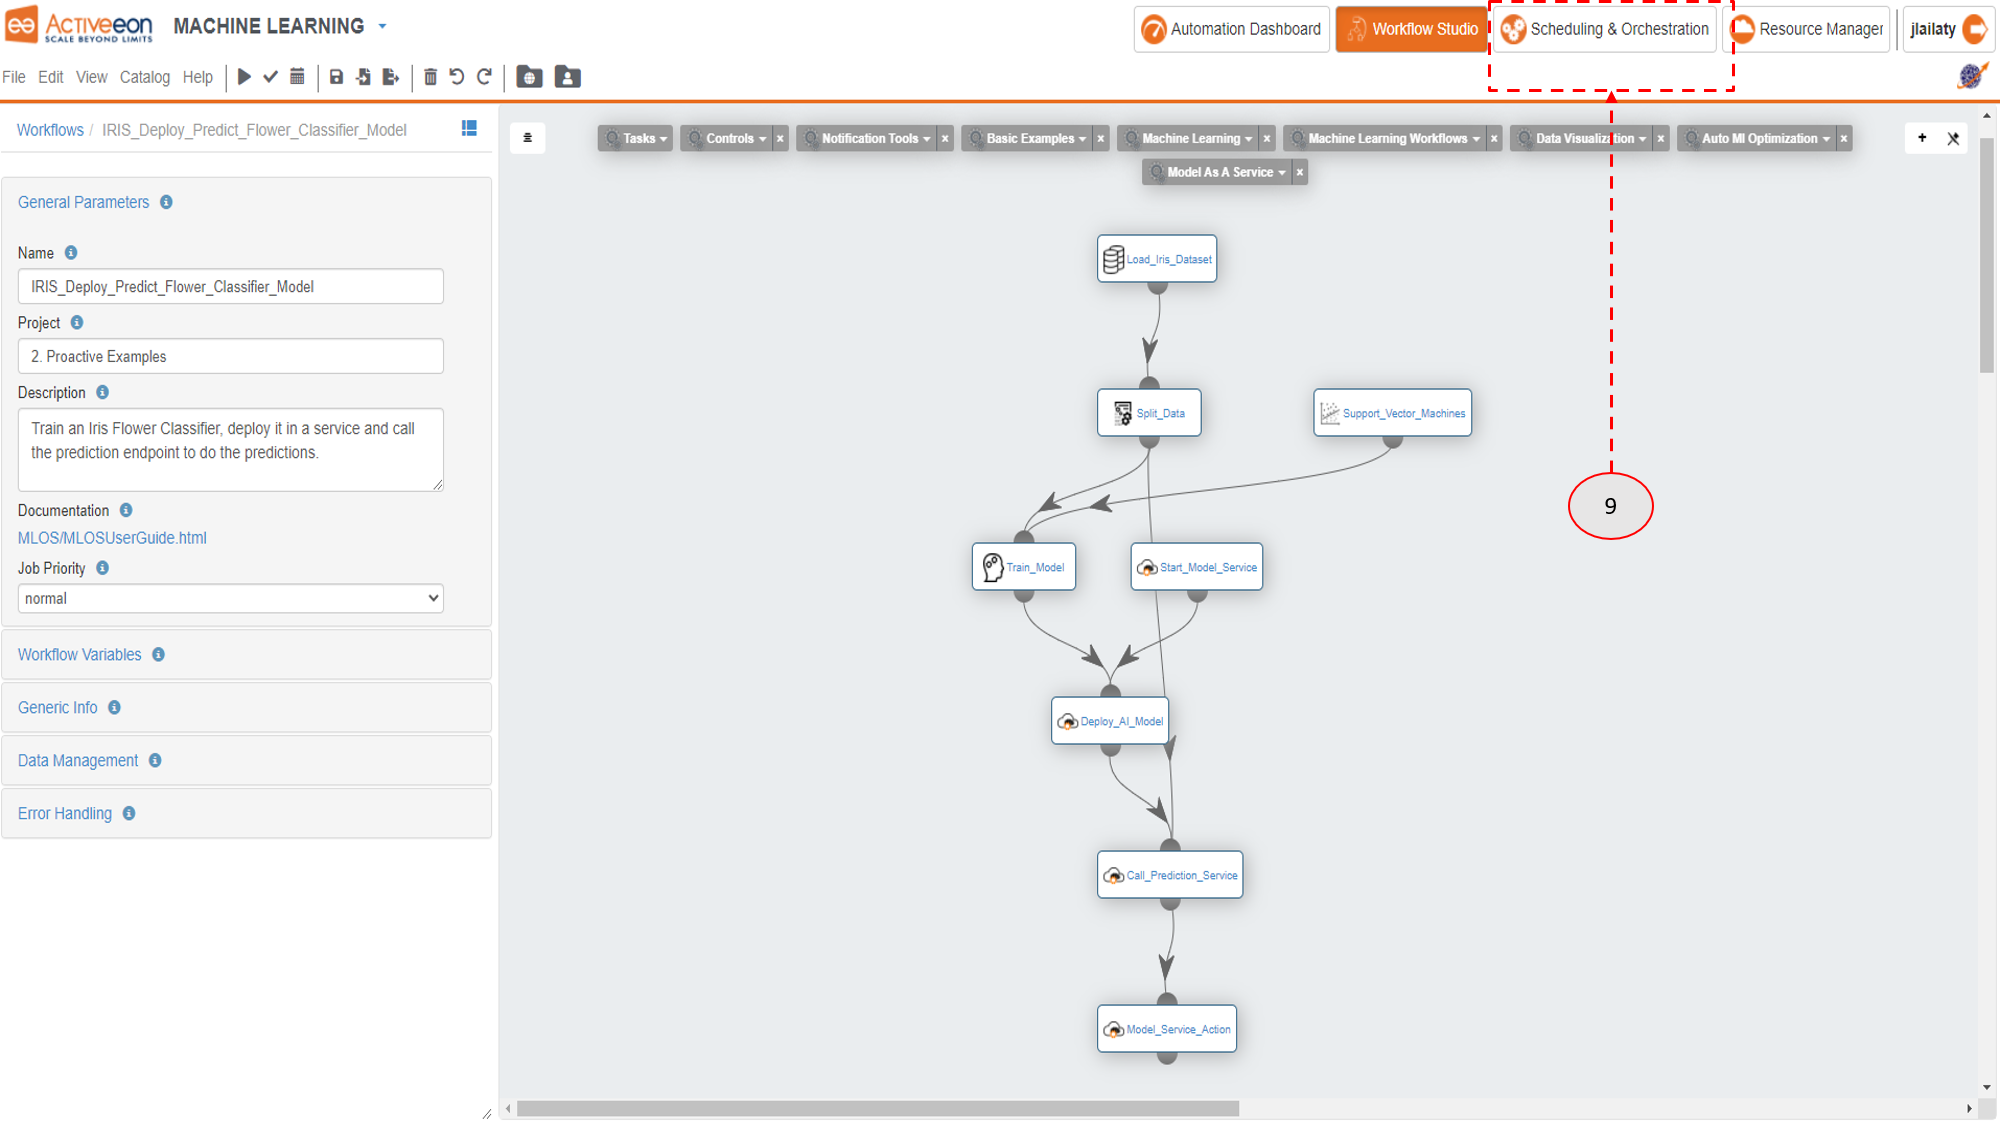
- Click on the Secheduling & Orchestration portal.
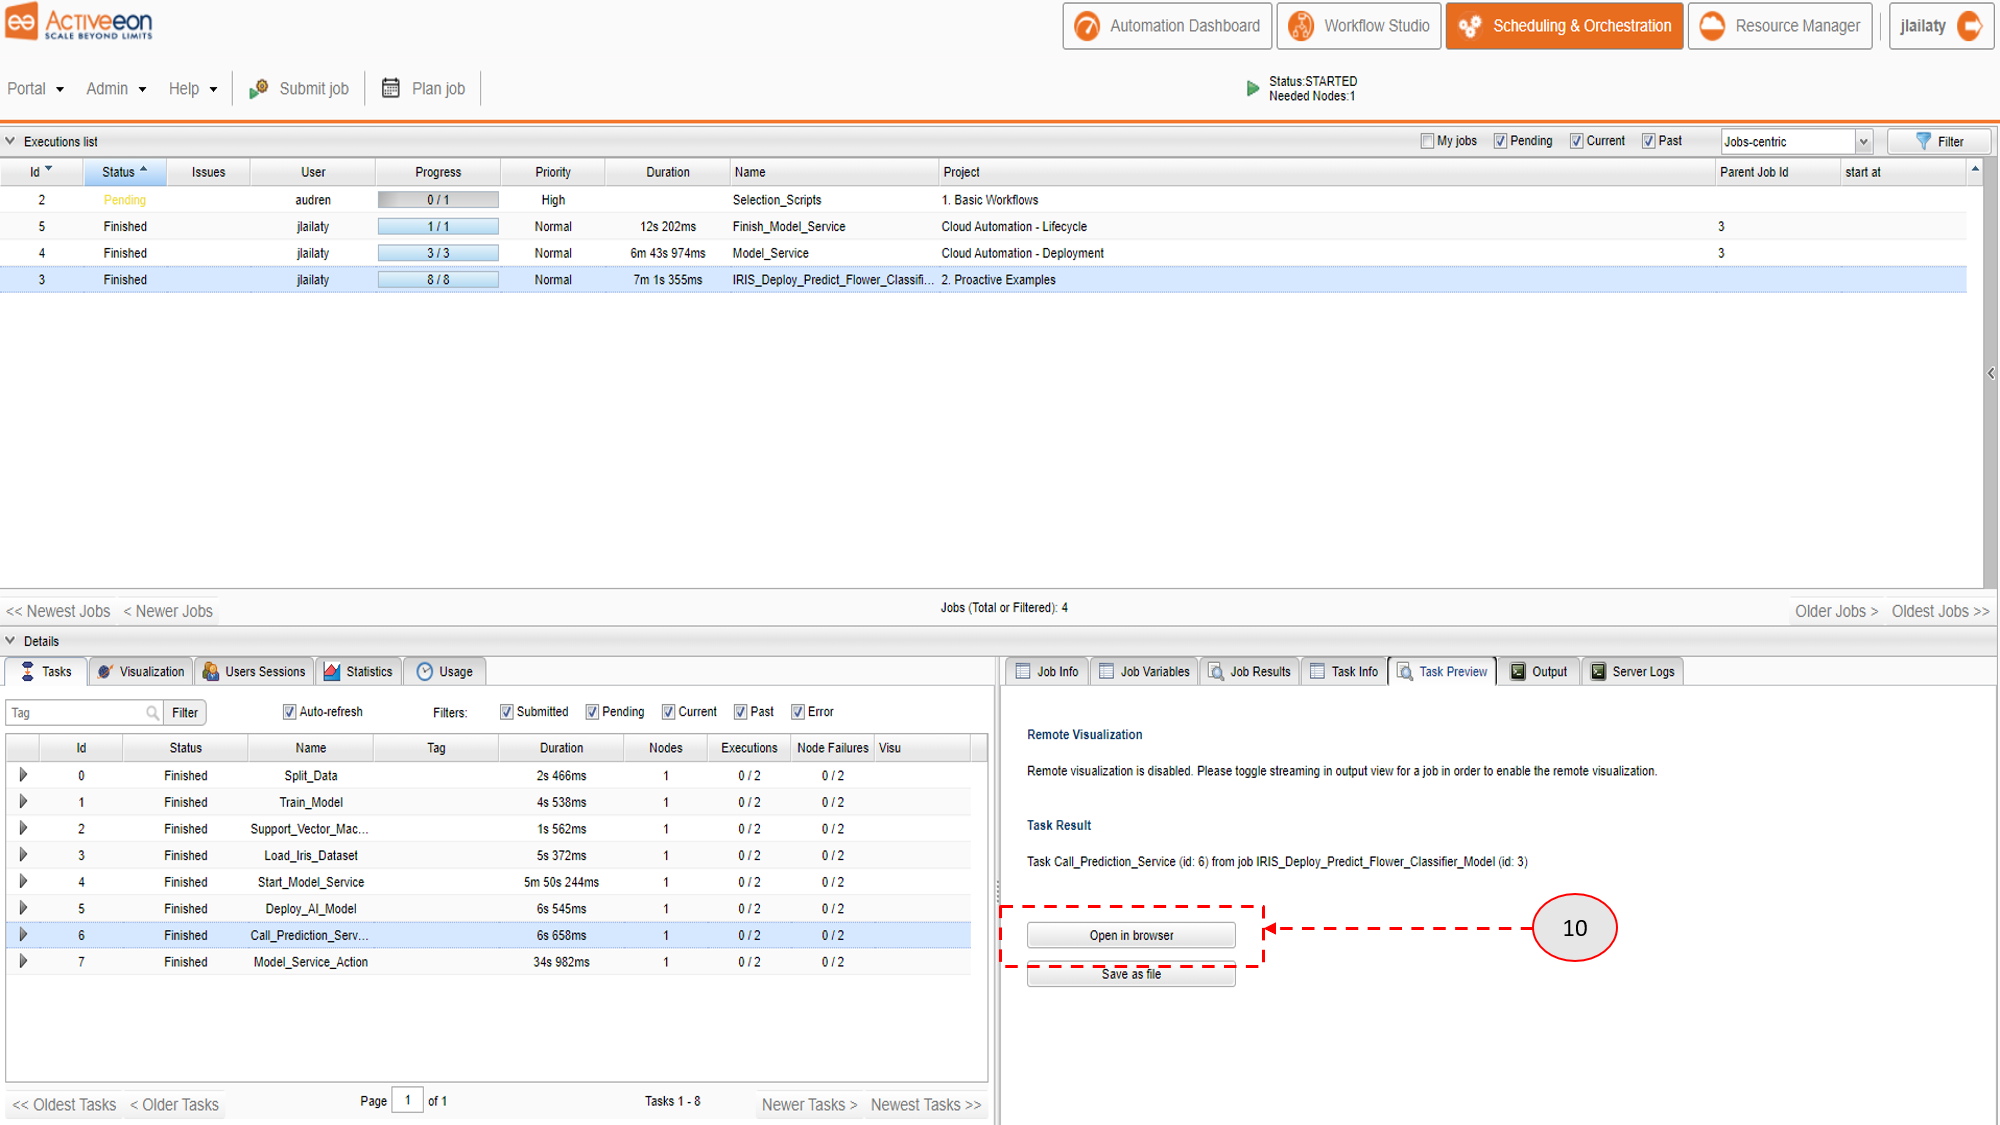
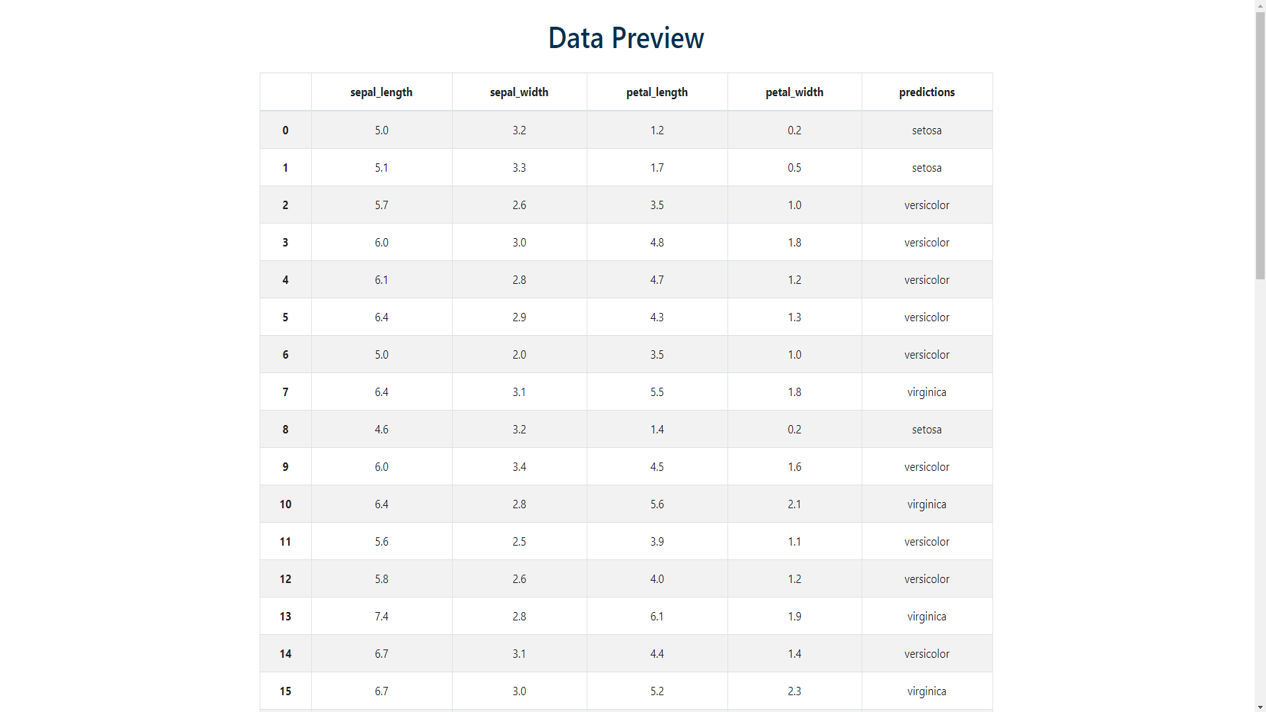
- You can monitor the execution of the workflow and check the output of each task by clicking on the Output tab below. Click on the Call_Predicition_Service task and then on Open in browser in the Task Preview tab to preview the obtained predictions.
2 Management of a MaaS_ML Instance Using the Service Automation Portal
MaaS_ML instance lifecycle can be also managed using the Service Automation portal by following the steps below:
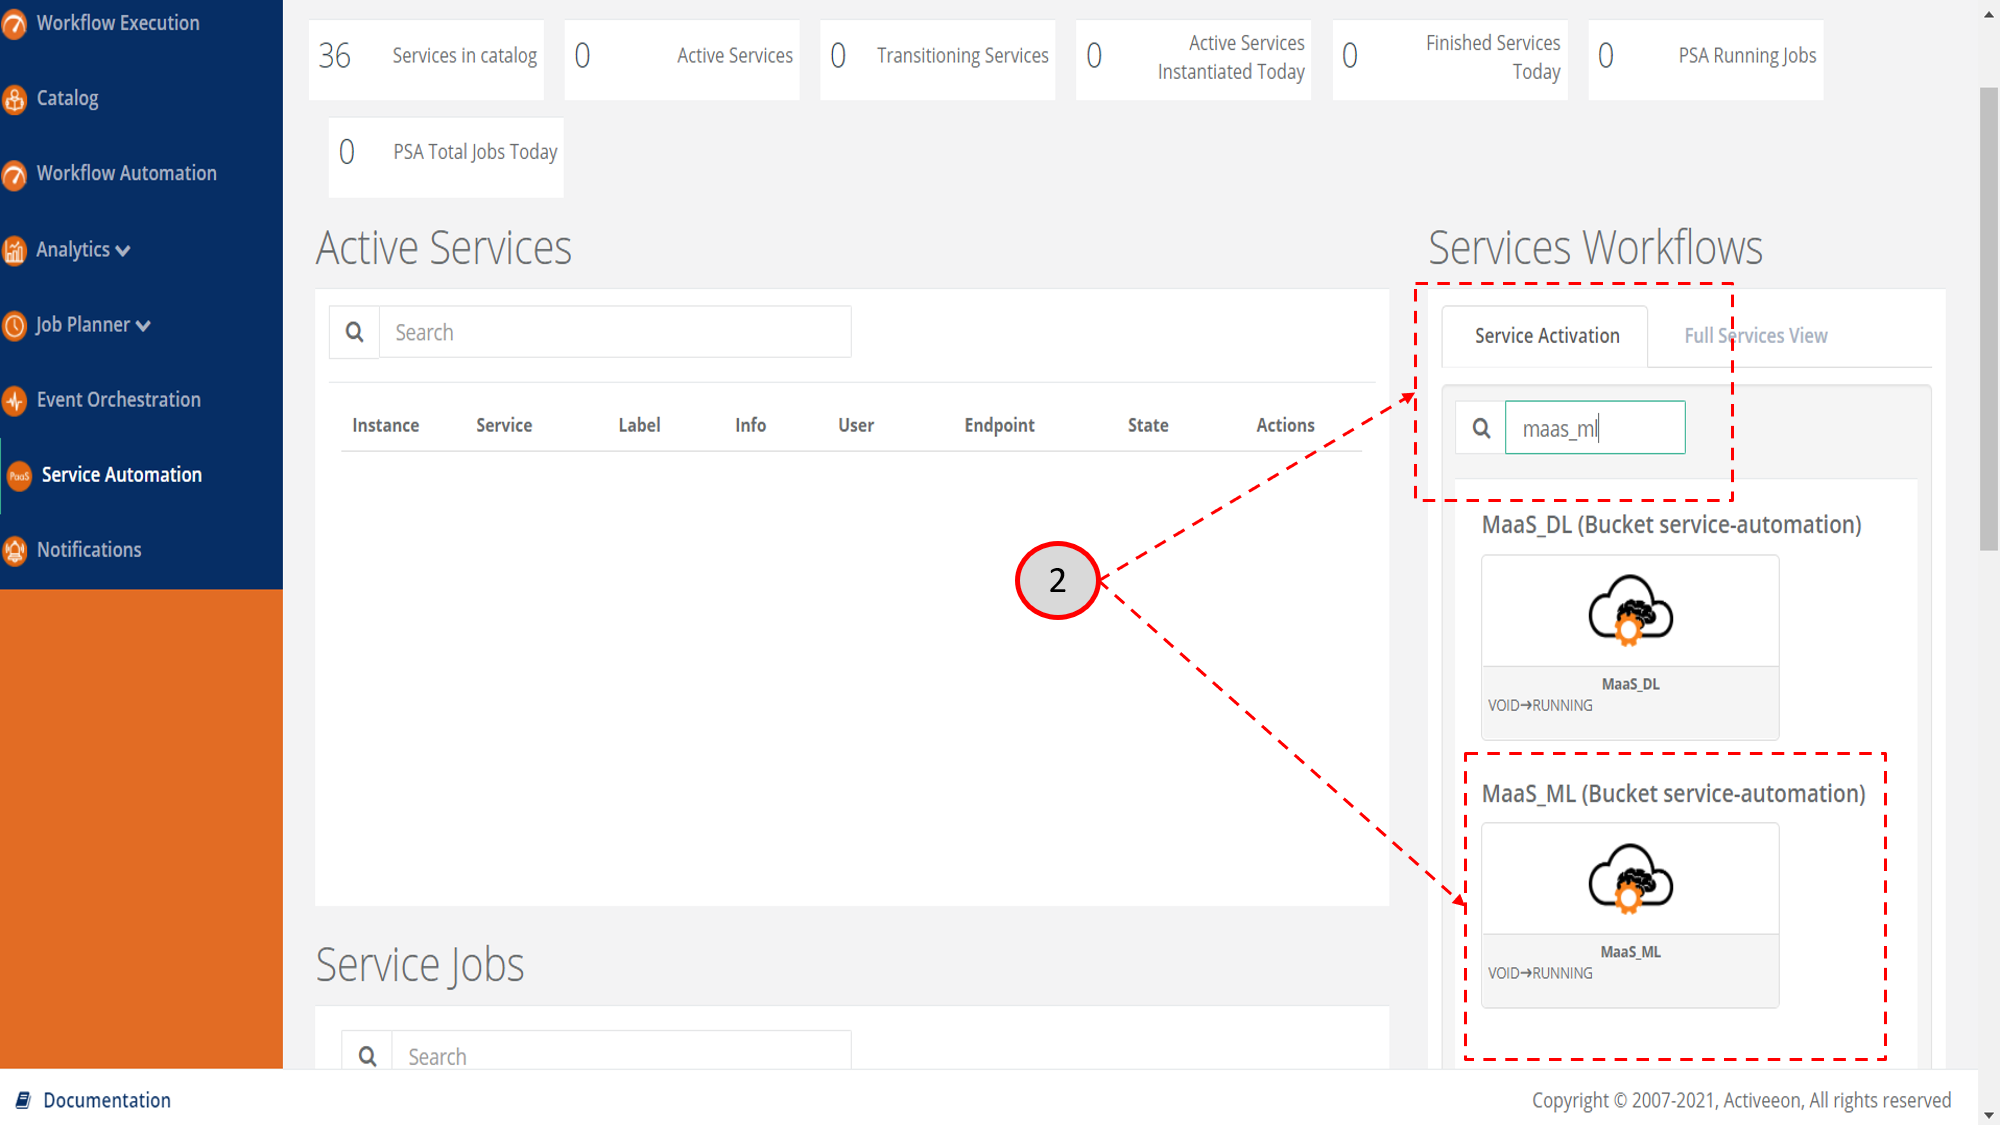
- Open ProActive Service Automation home page.
- In the Service Activation tab under Services Workflows, search for MaaS_ML and click on it.
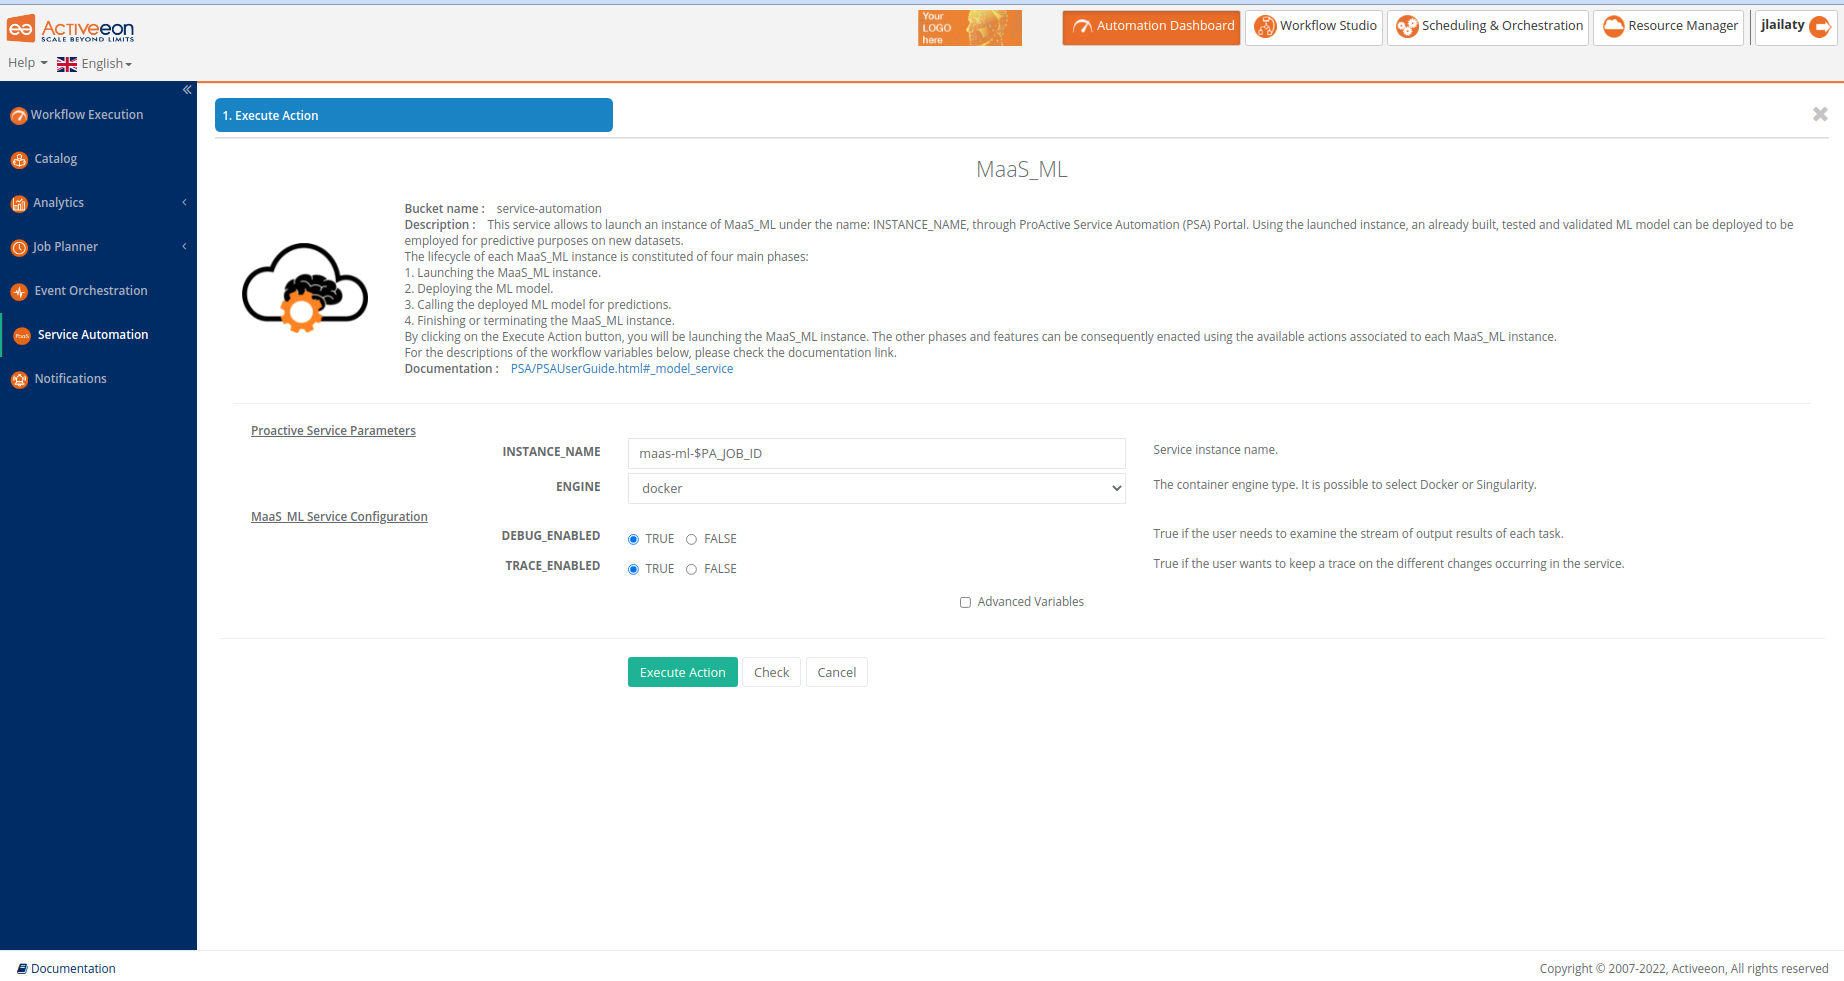
- A window with several variables will appear. In order to run the service, you need to set some variables as follows:
For example:- INSTANCE_NAME: In this variable, you provide a name for the instance to be launched
- TRACE_ENABLED: If True, you will be able to track the MaaS_ML instance information and applied operations.
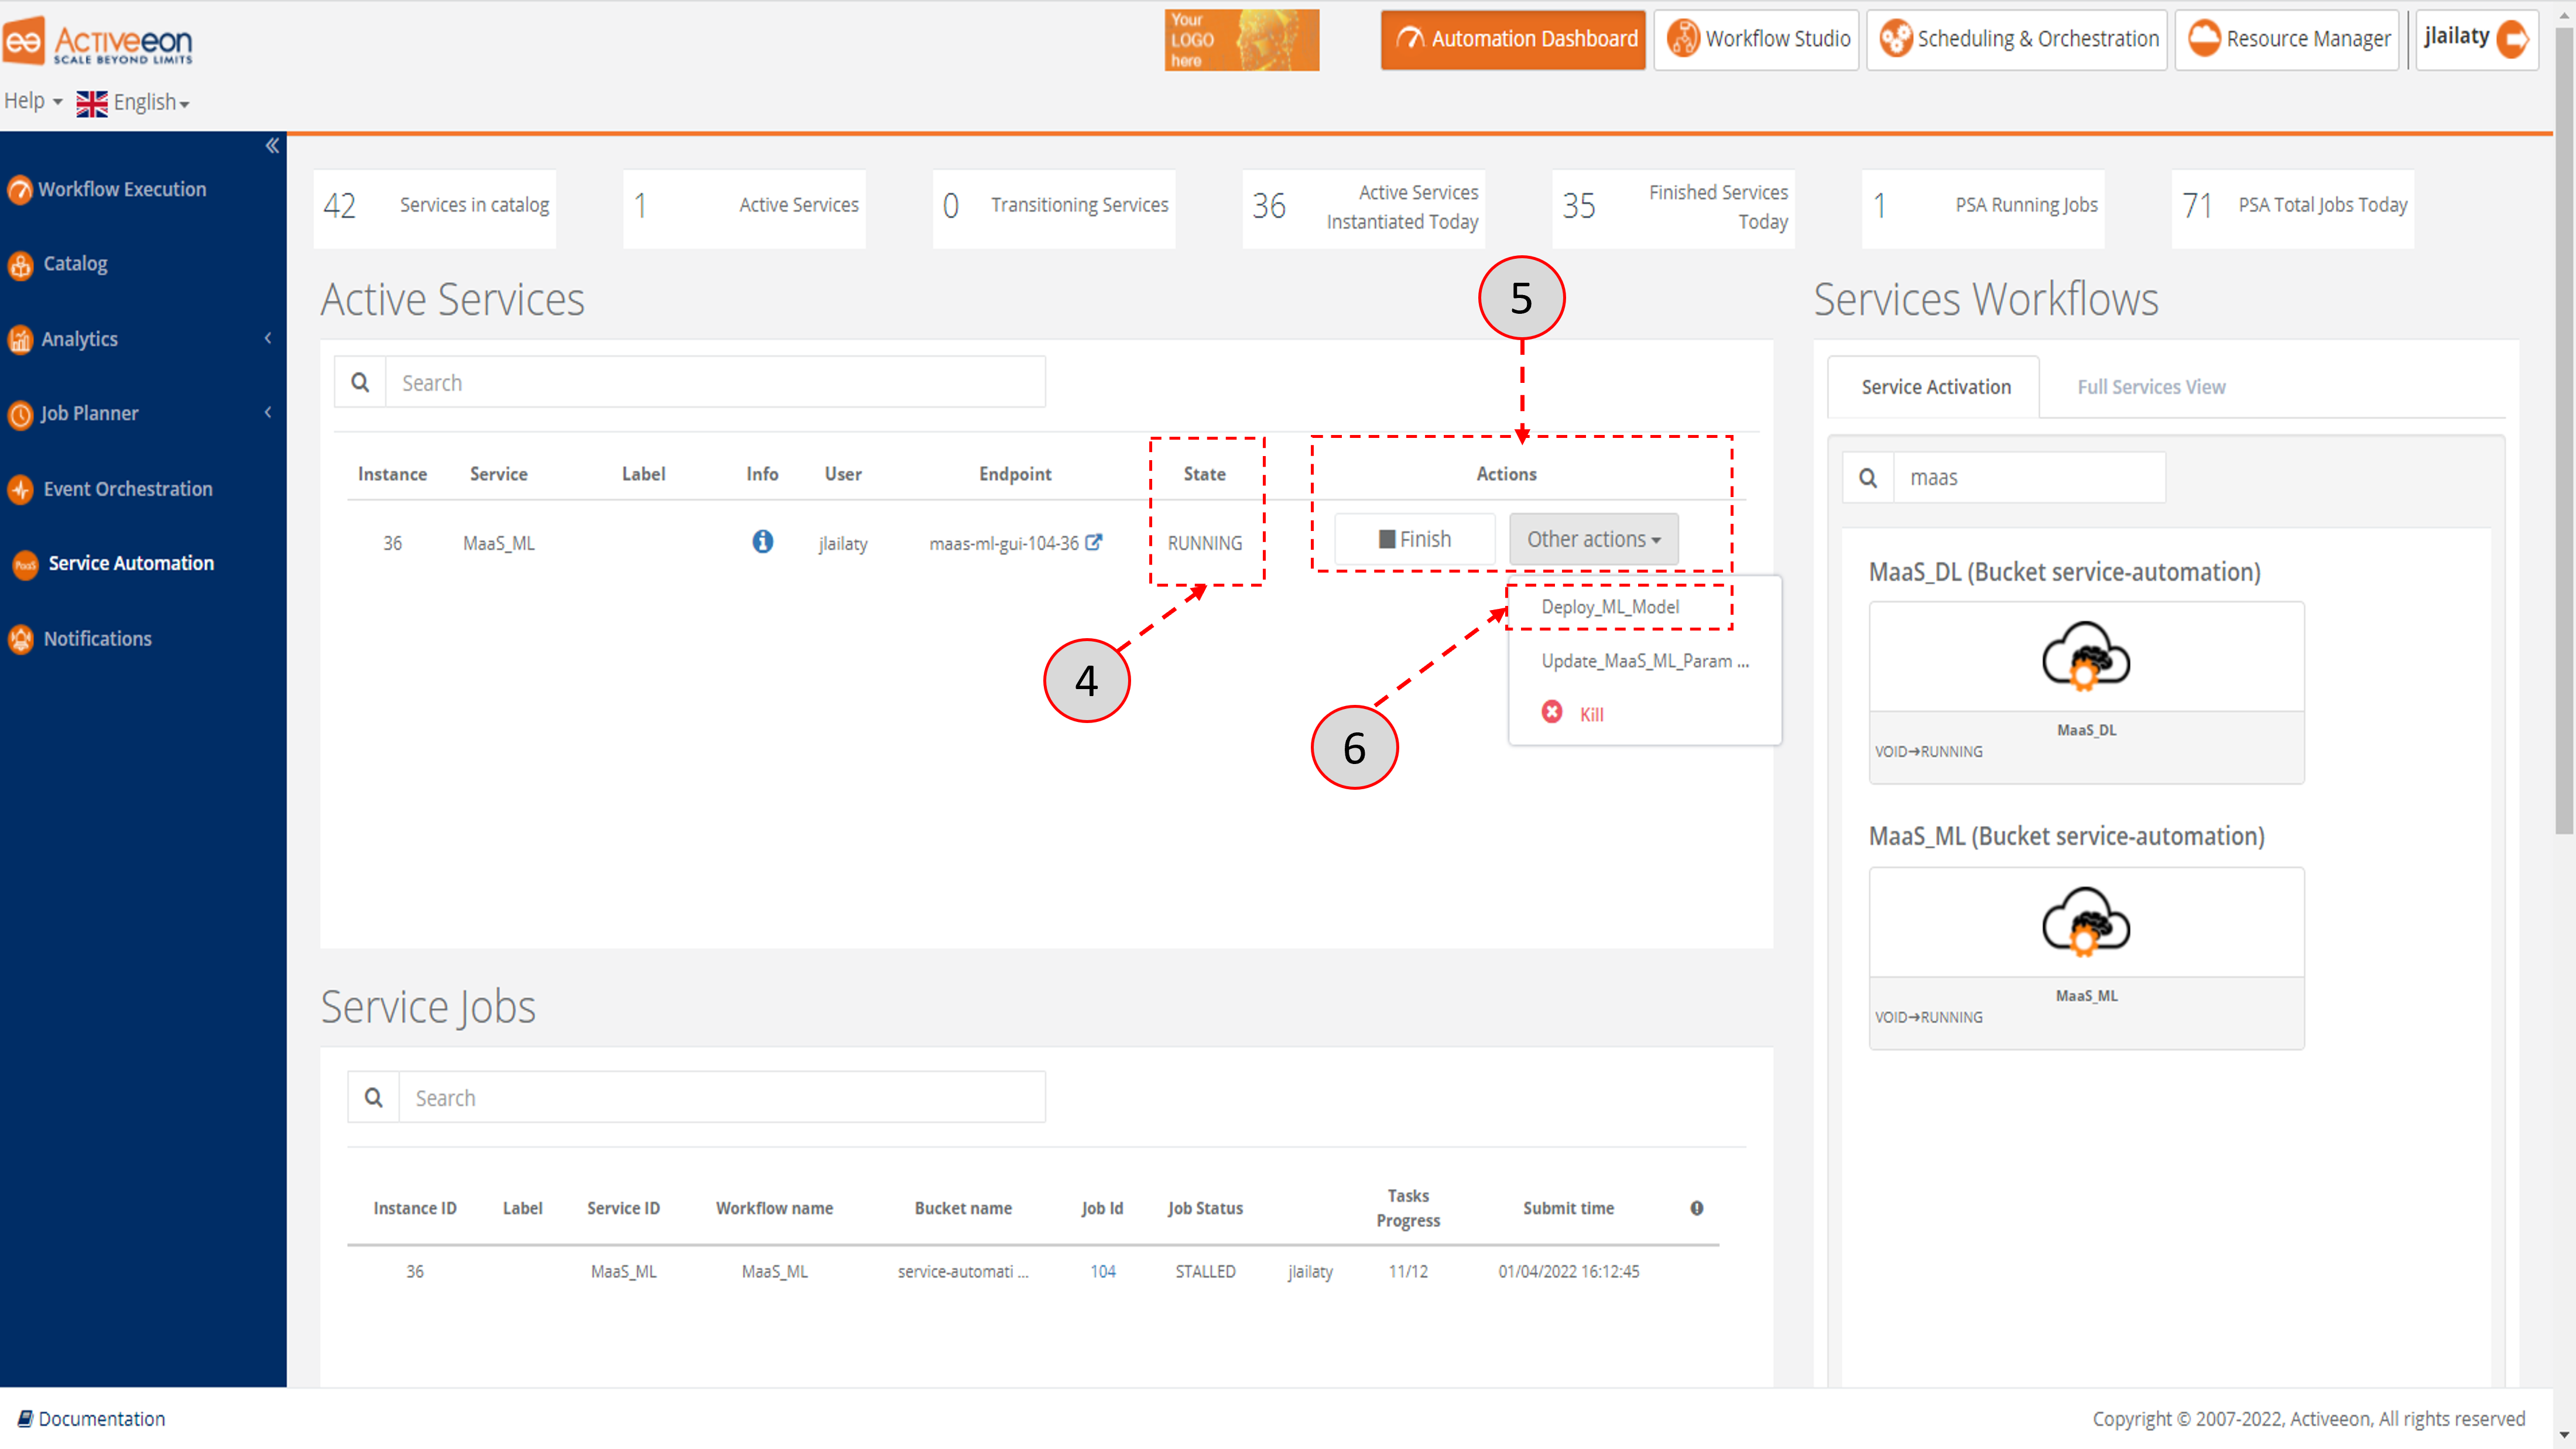
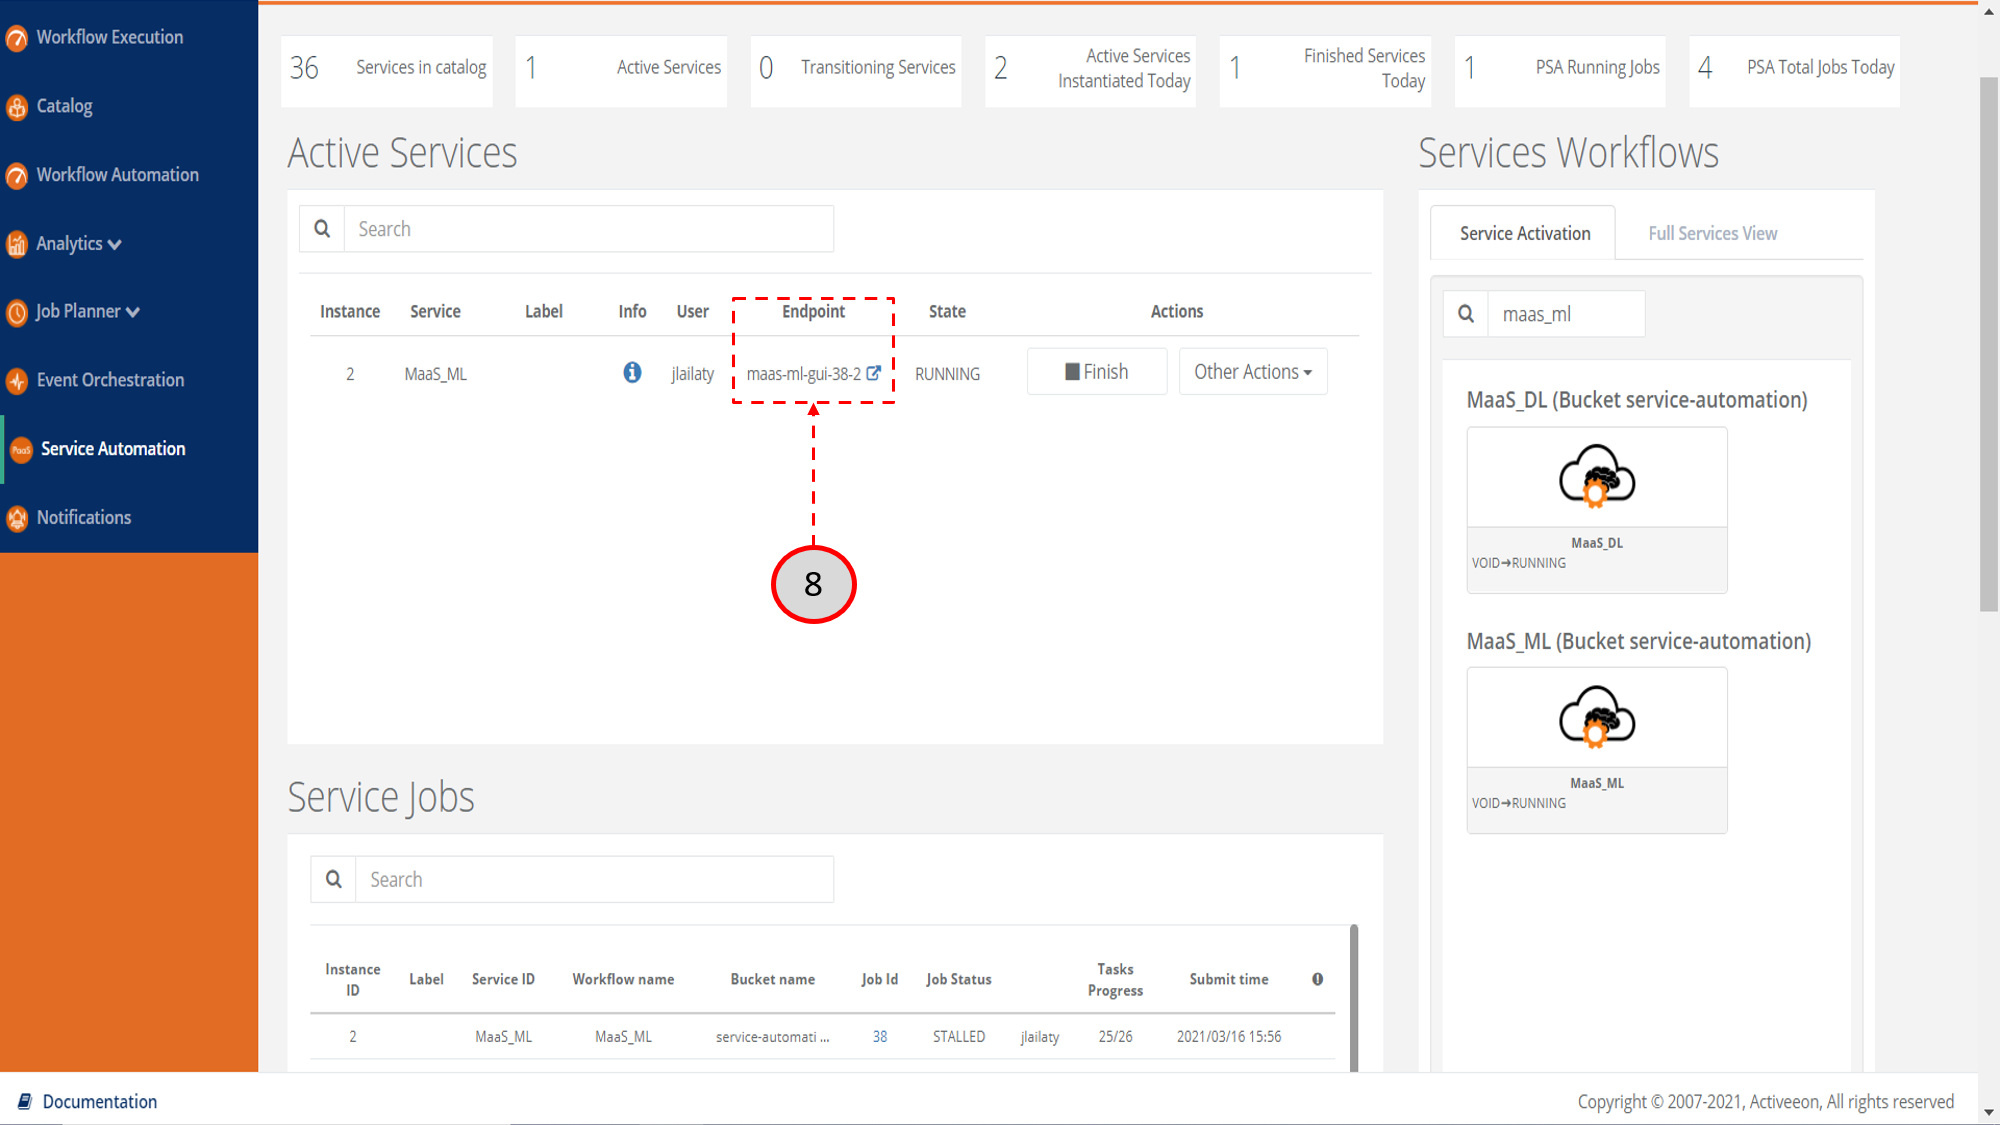
Click on the Execute Action button to start the service. - The started MaaS_ML instance will appear in the Activated Services with a Current State as Running.
- Under Actions, you will find a drop list of actions that can be applied on the running MaaS_ML instance.
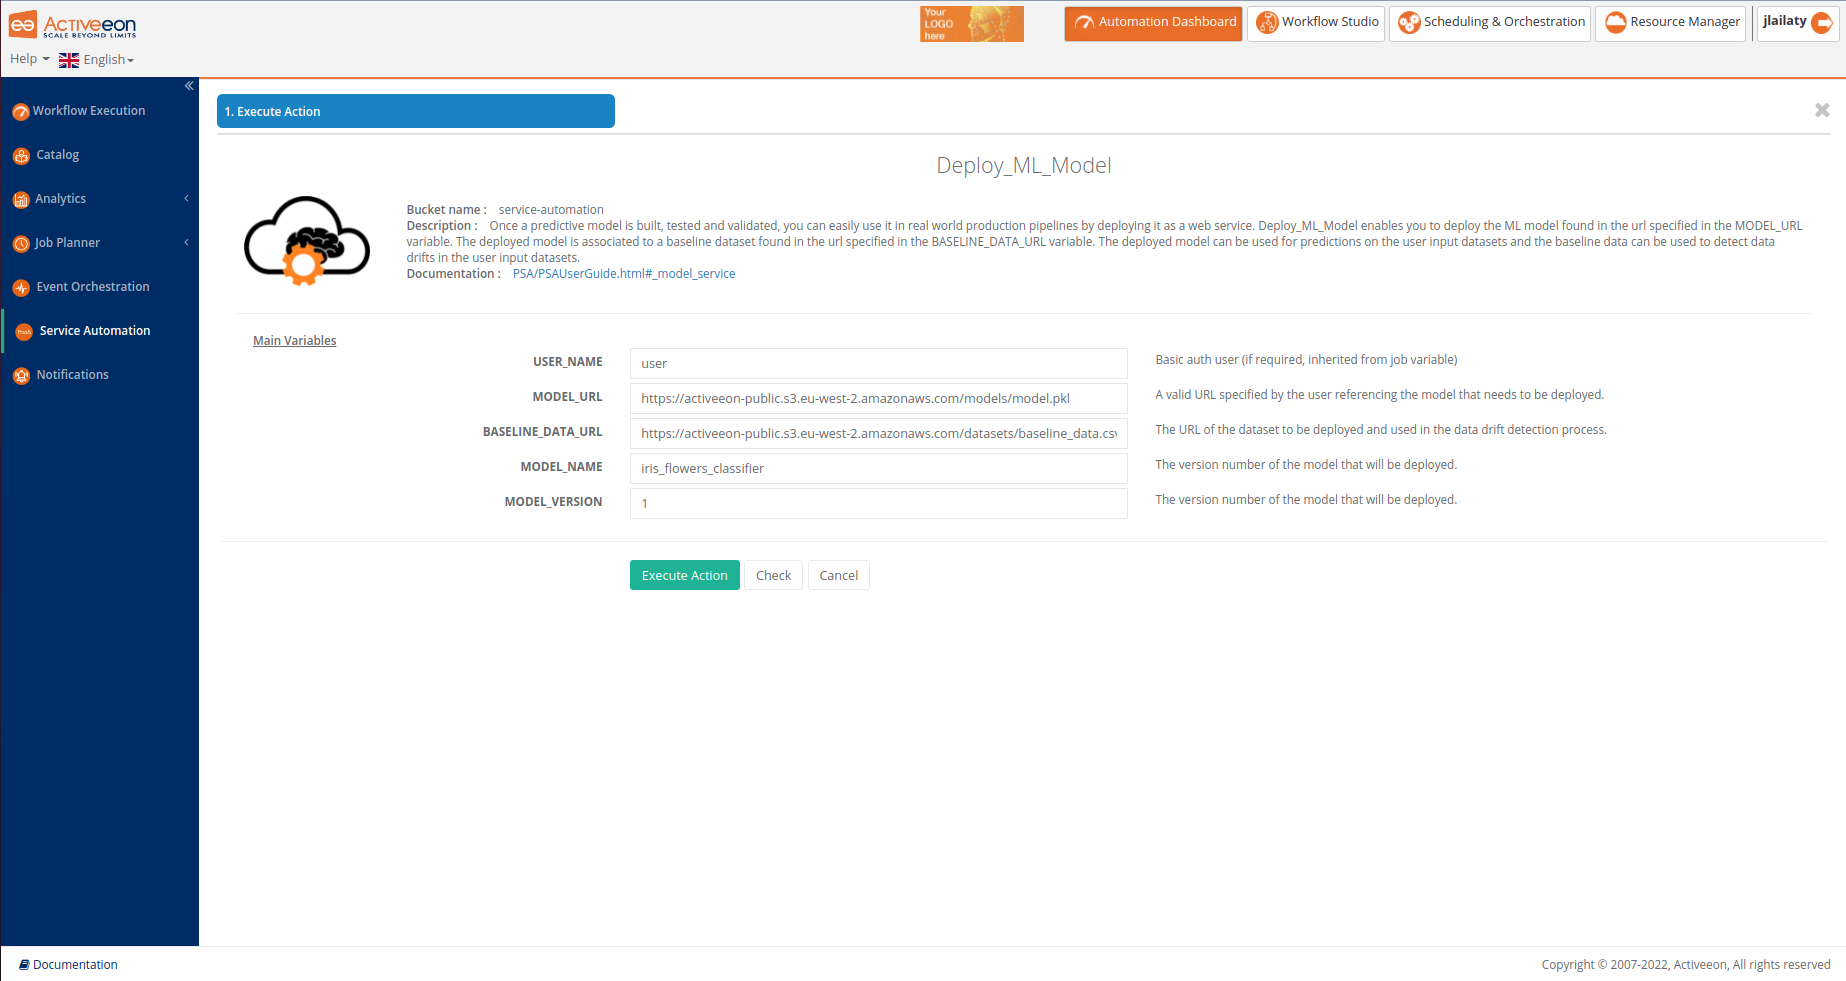
- Click on Deploy_ML_Model action.
- A window with different variables will appear. In order to deploy a trained model, set the following variables as follows:
For example:- MODEL_URL: https://activeeon-public.s3.eu-west-2.amazonaws.com/models/model.pkl. This is the URL where the trained model can be found.
- USER_NAME: user. A valid username should be provided in order to obtain a token that enables the deployment of the model.
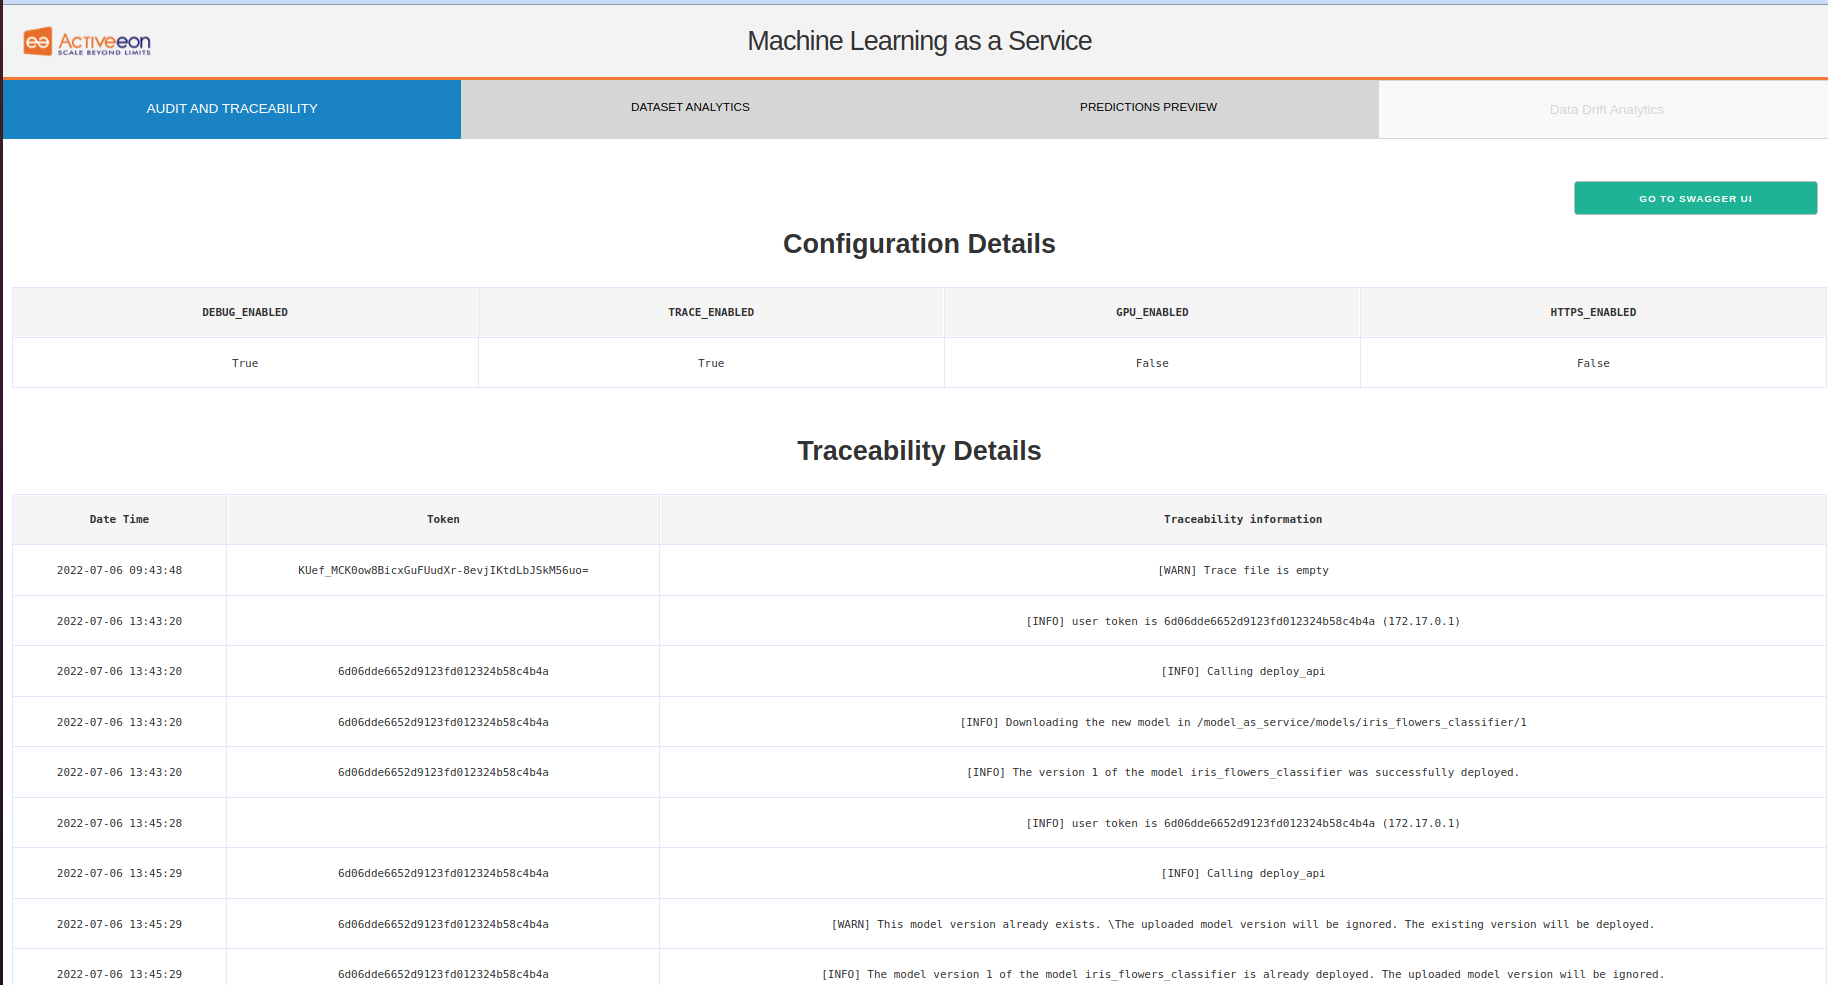
- Once the MaaS_ML model is succesfully deployed, click on maas_ml-gui to view the MaaS_ML Analytics page. This page includes 4 tabs:
- Audit and Traceability: In this tab page, you can check the different variables of the instance and examine its traceability information throughout different date/times(s).
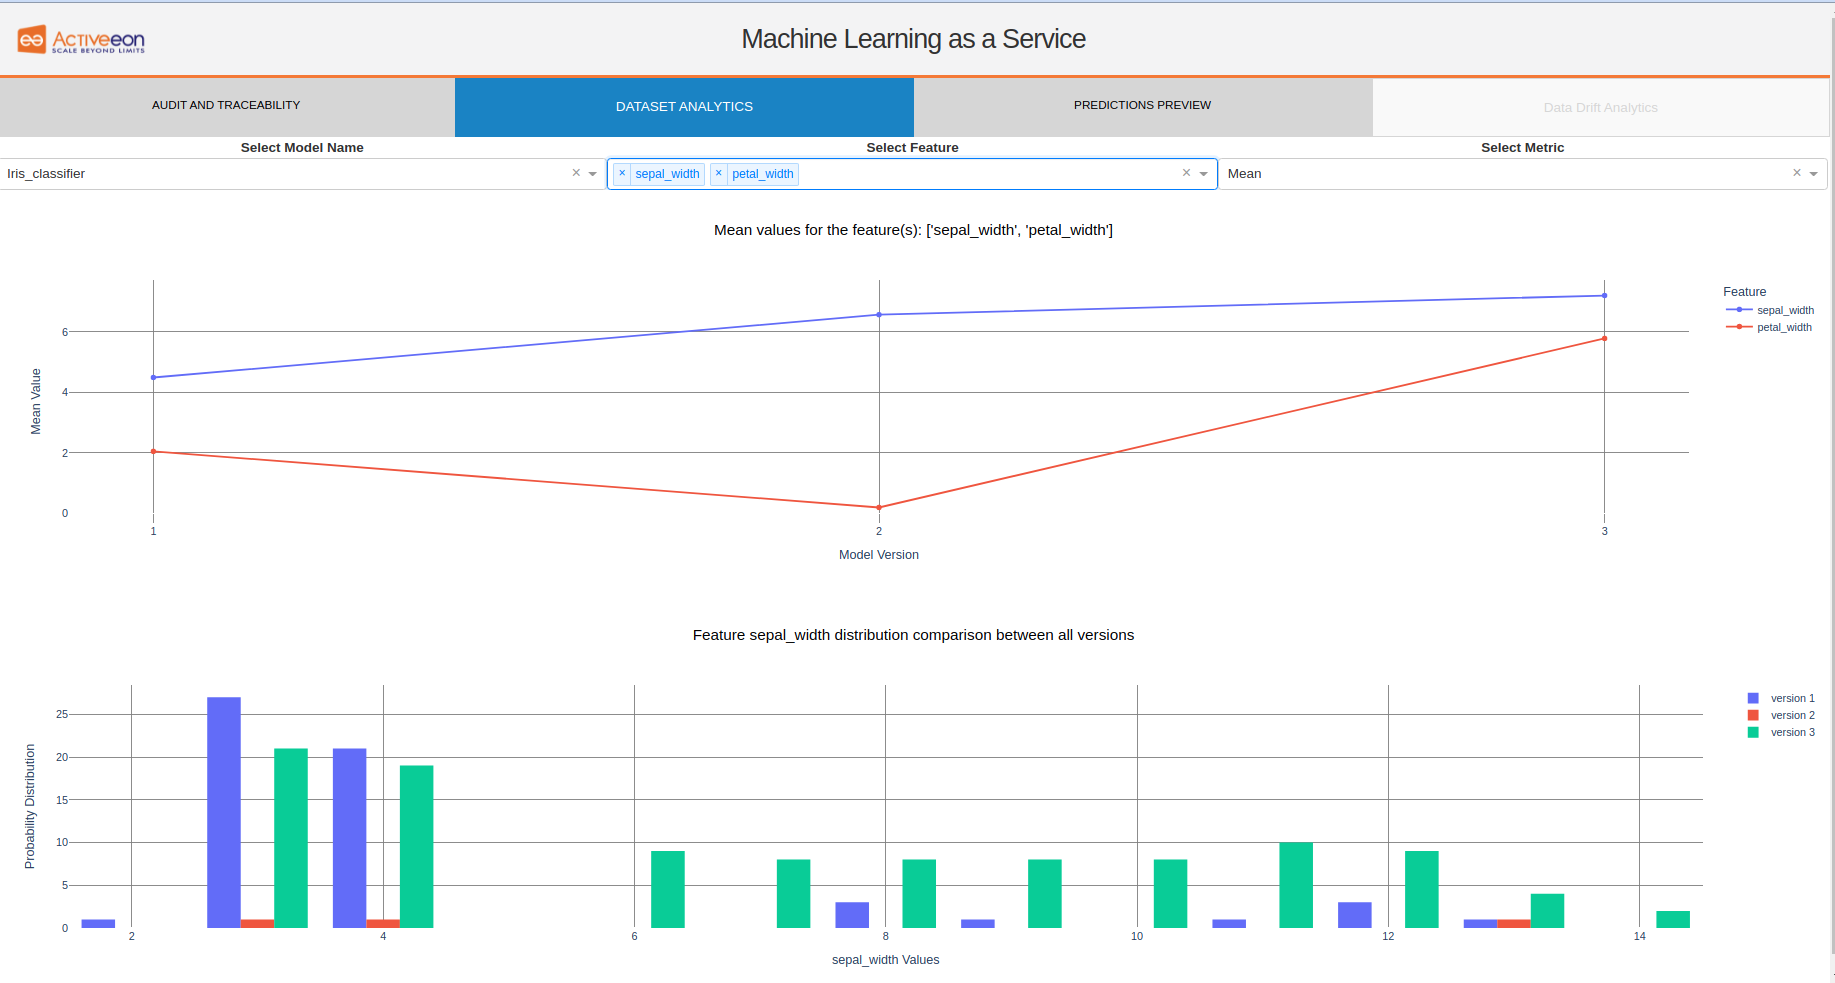
- Dataset Analytics: In this tab page, you can monitor ,using the first graph, the statistical evolution of the datasets values among different model versions by choosing the model name, feature name and the preferred statistical method. By clicking on one of the datapoints in the first graph, a histogram will appear in the second graph which shows a comparison in the probability density distribution of the data values of the selected feature among all the deployed model versions.
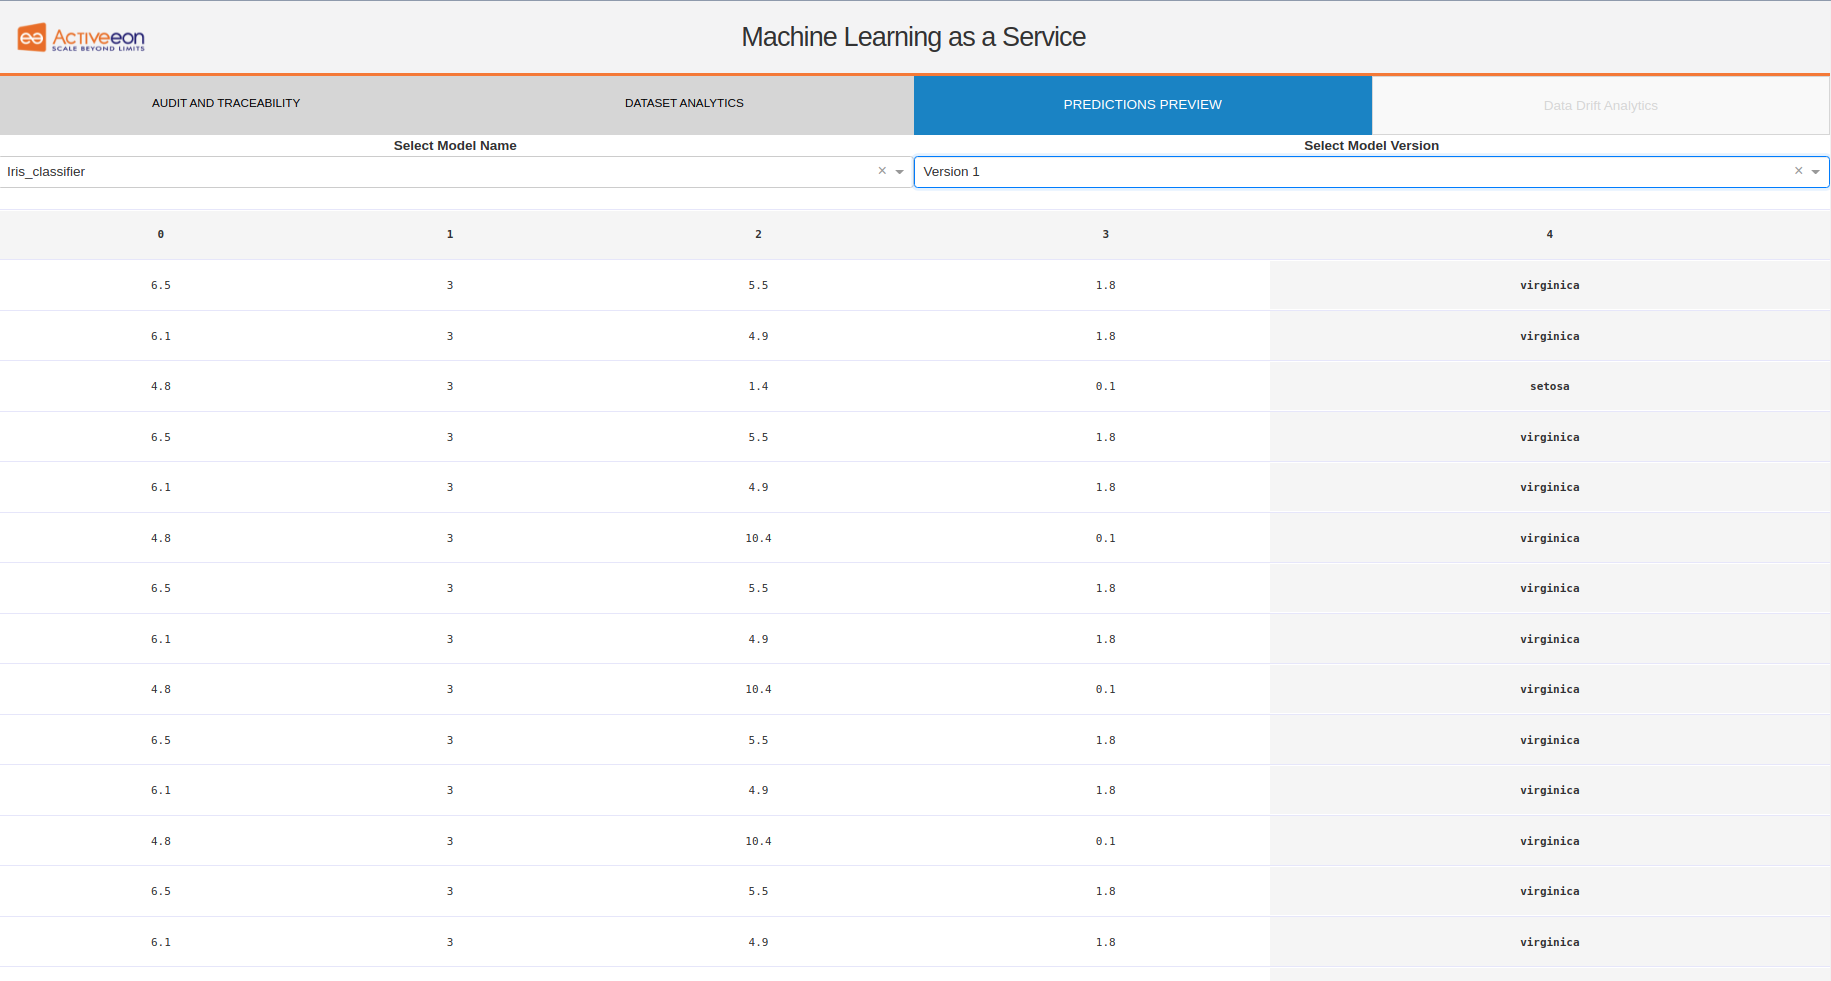
- Predictions Preview: In this tab page, you can preview the predictions applied for a specific model type and version.
- Data Drift Analytics: In this tab page, you can monitor all the information corresponding to the drifts occurring in the datasets. (under development)
- In the drop list of Actions, there is Update_MaaS_ML_Parameters action that you can use to update the deployed model parameters.

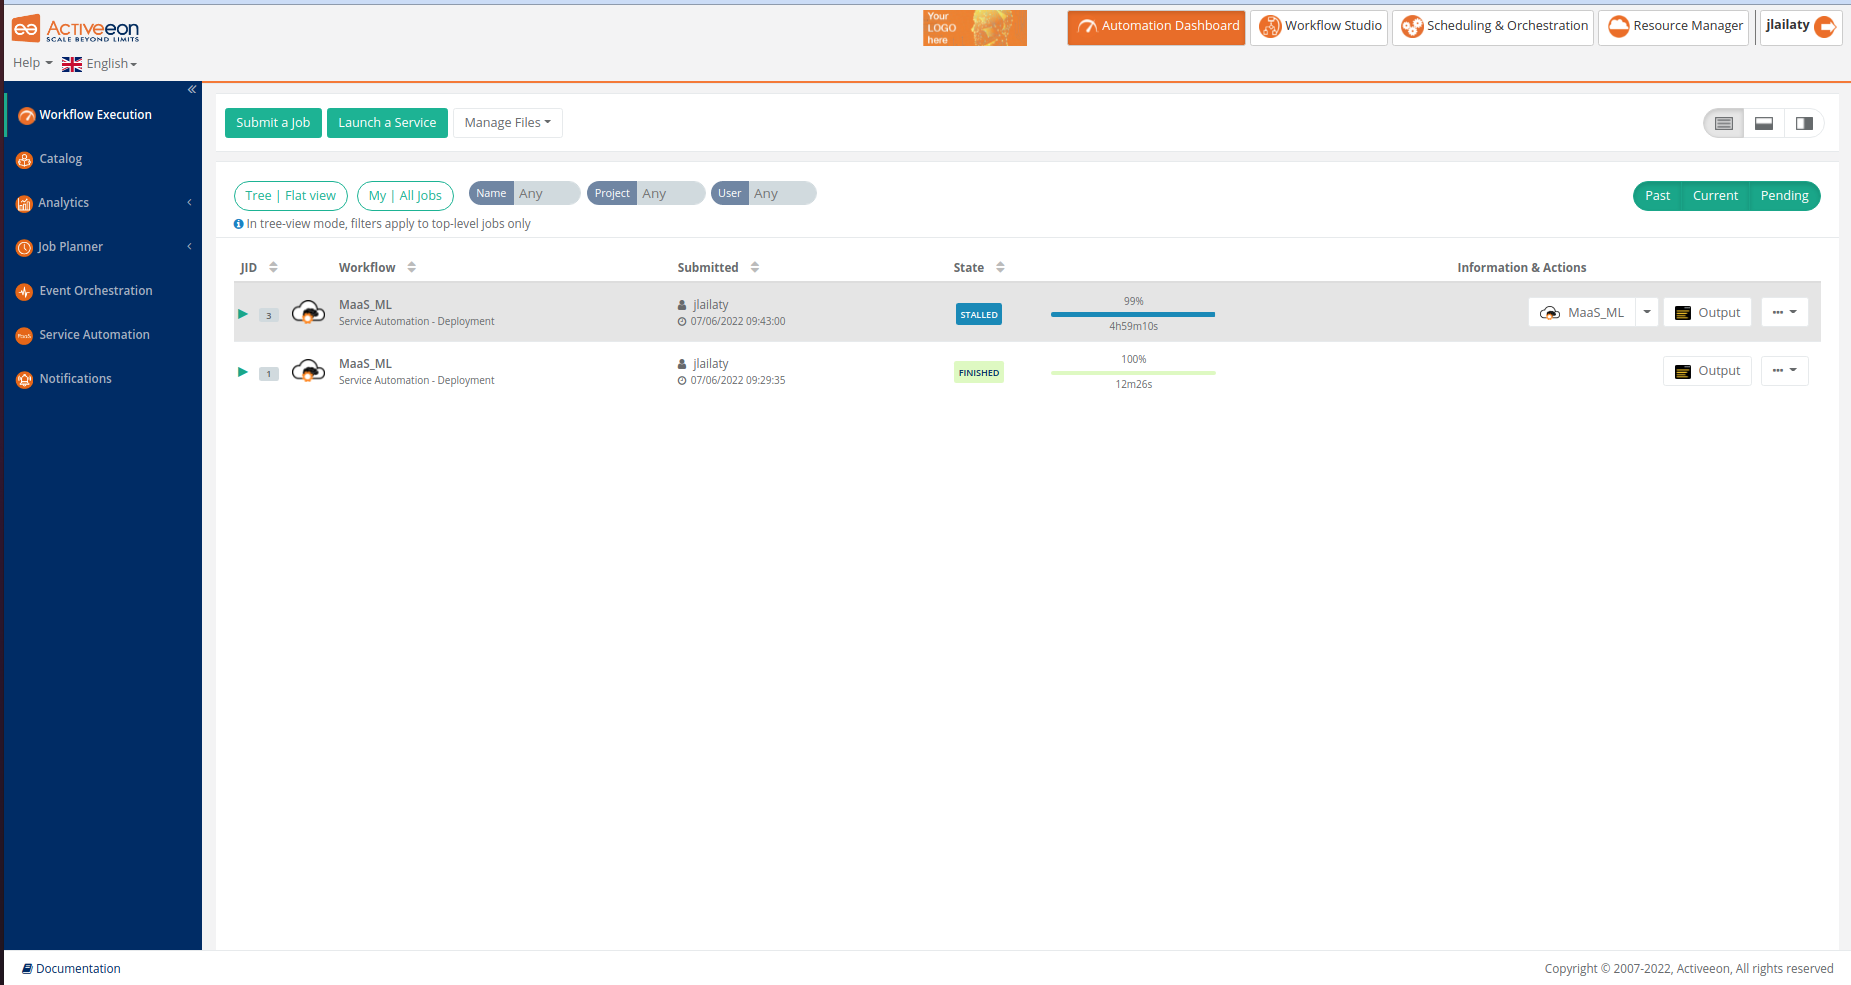
3 Management of a MaaS_ML Instance Using the Workflow Execution Portal
MaaS_ML instance lifecycle can be also managed using the Workflow Execution Portal by following the steps below:
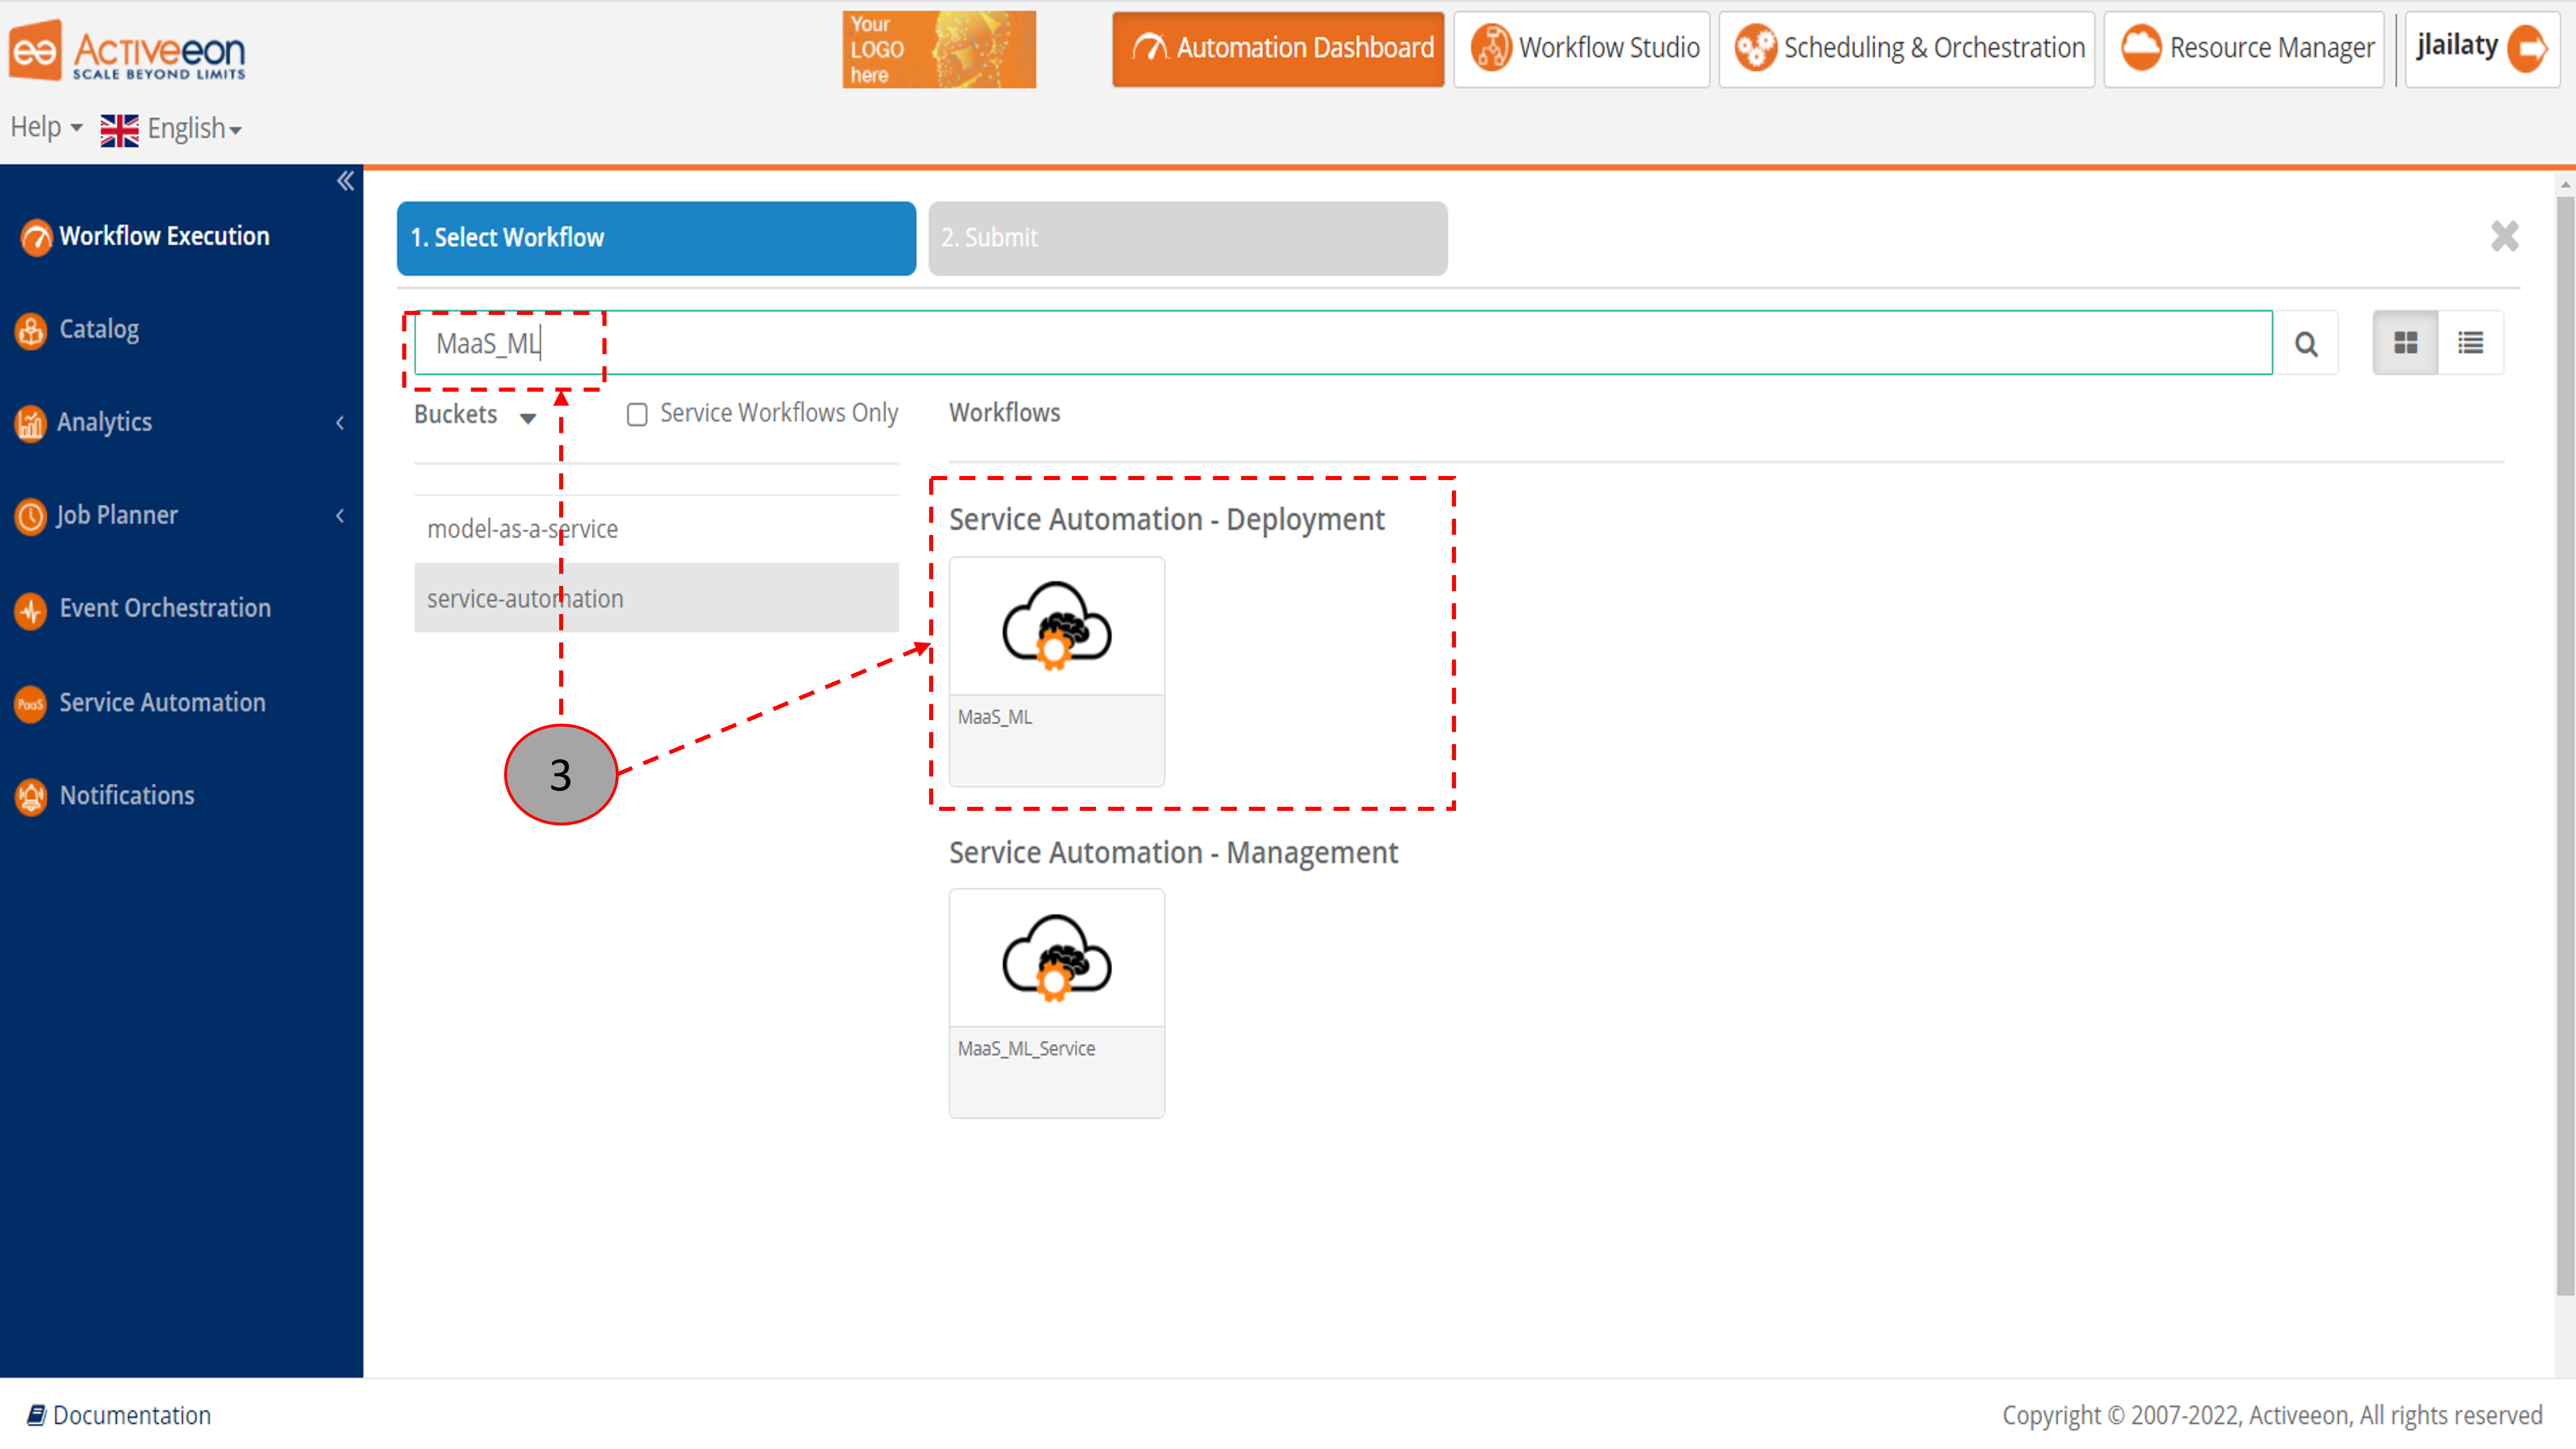
- Open ProActive Workflow Execution Portal home page.
- Click on Launch a Service button.
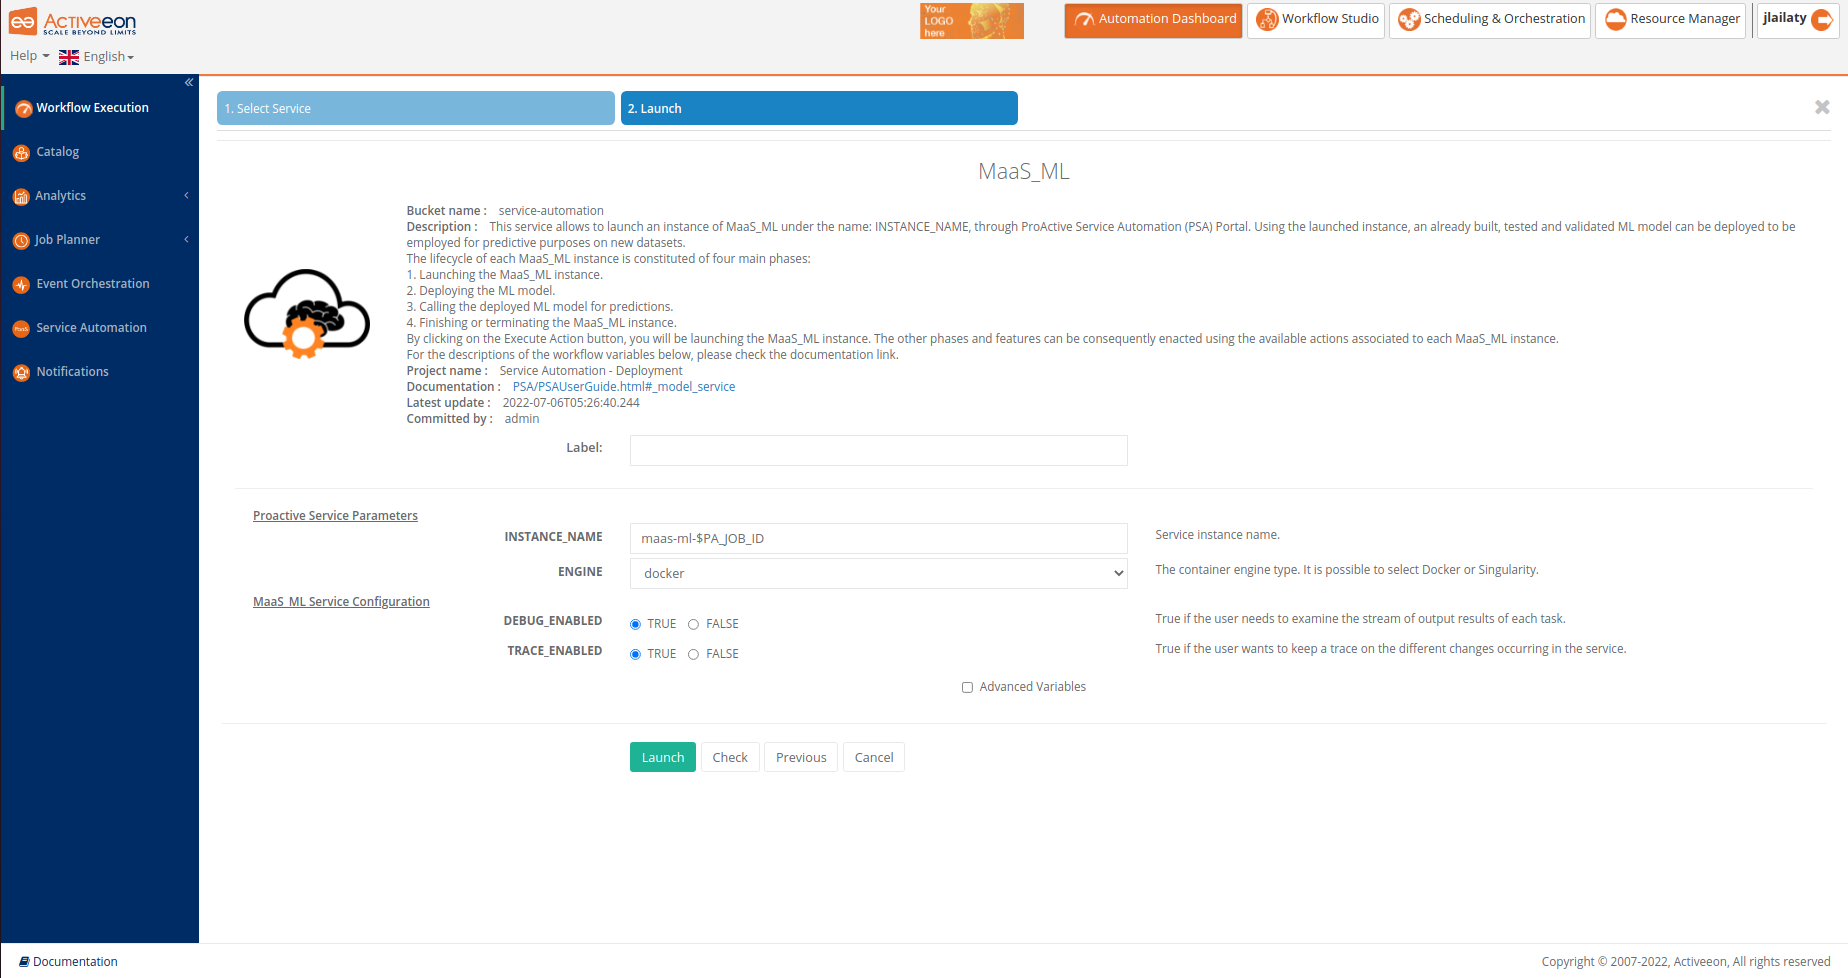
- In the Service Name search for MaaS_ML. Then click on MaaS_ML under Service Automation - Deployment.
- A window with several variables will appear. In order to run the service, you need to set some variables as follows:
For example:- INSTANCE_NAME: In this variable, you provide a name for the instance to be launched.
- TRACE_ENABLED: If True, you will be able to track the MaaS_ML instance information and applied operations.
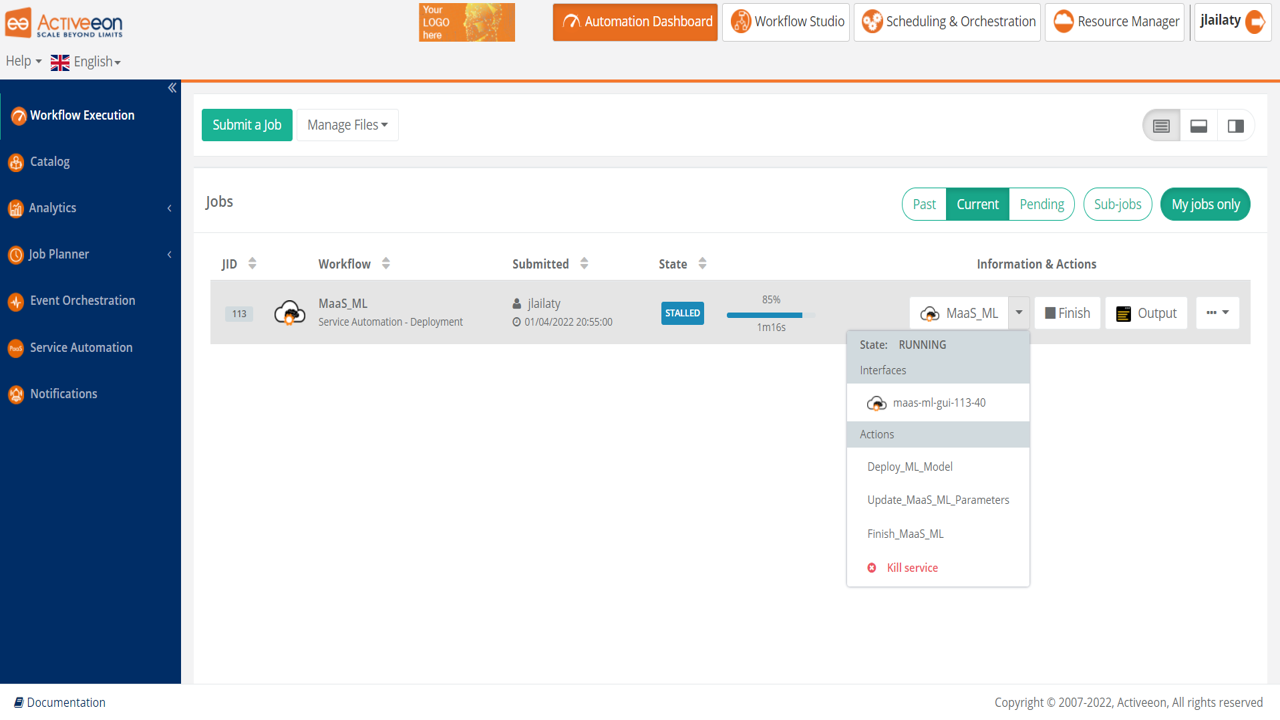
- Once submitted, the MaaS_ML instance will appear under Jobs with its State as Running. If you click on the arrow near MaaS_ML, you will find a drop list of interfaces and actions that can be accessed and applied on the running MaaS_ML instance. If you click on maas_ml_gui_xxx_yy, you will be redirected to the MaaS_ML endpoint as explained in the previous subsection. There are also the different MaaS_ML actions: Deploy_ML_Model, Update_MaaS_ML_Parameters and Finish_MaaS_ML. When clicking on the Output button, you will be able to track the progress output of the different actions applied on the MaaS_ML instance.
- For more information about the Workflow Execution Portal, please visit the Workflow Execution Portal documentation web page.
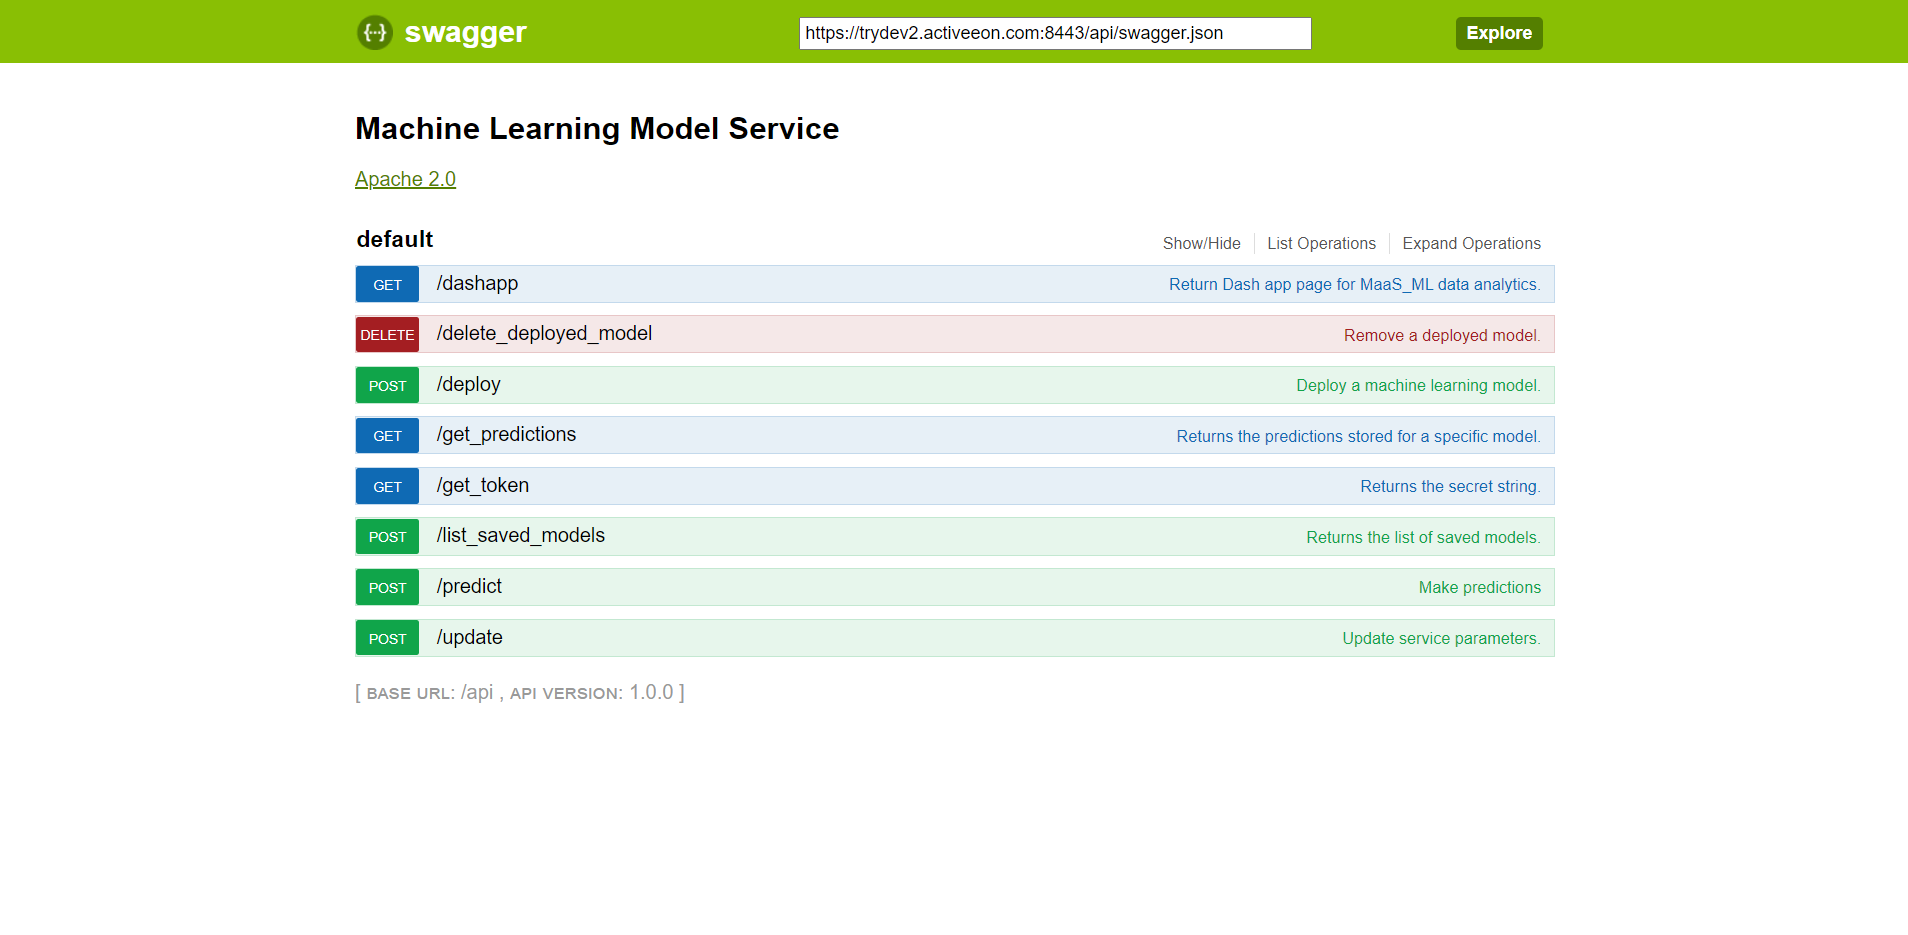
4 Management of a MaaS_ML Instance Using the Swagger UI
Once the MaaS_ML service is launched and running using in Service Automation Portal, click on the maas_ml-gui under Endpoint. In the Audit & Traceability page, click on the button provided in the top of the page to access the Swagger UI. Using the Swagger UI, a user is able to deploy a machine learning model as a service. When the ML model is deployed as a service, it can be called to apply some predictions for input datasets.
- Open the Swagger home page by clicking on the button GO TO SWAGGER UI on the top of the Audit & Traceability page.
- In the Swagger UI, you can find several operations to manage a MaaS_ML instance.
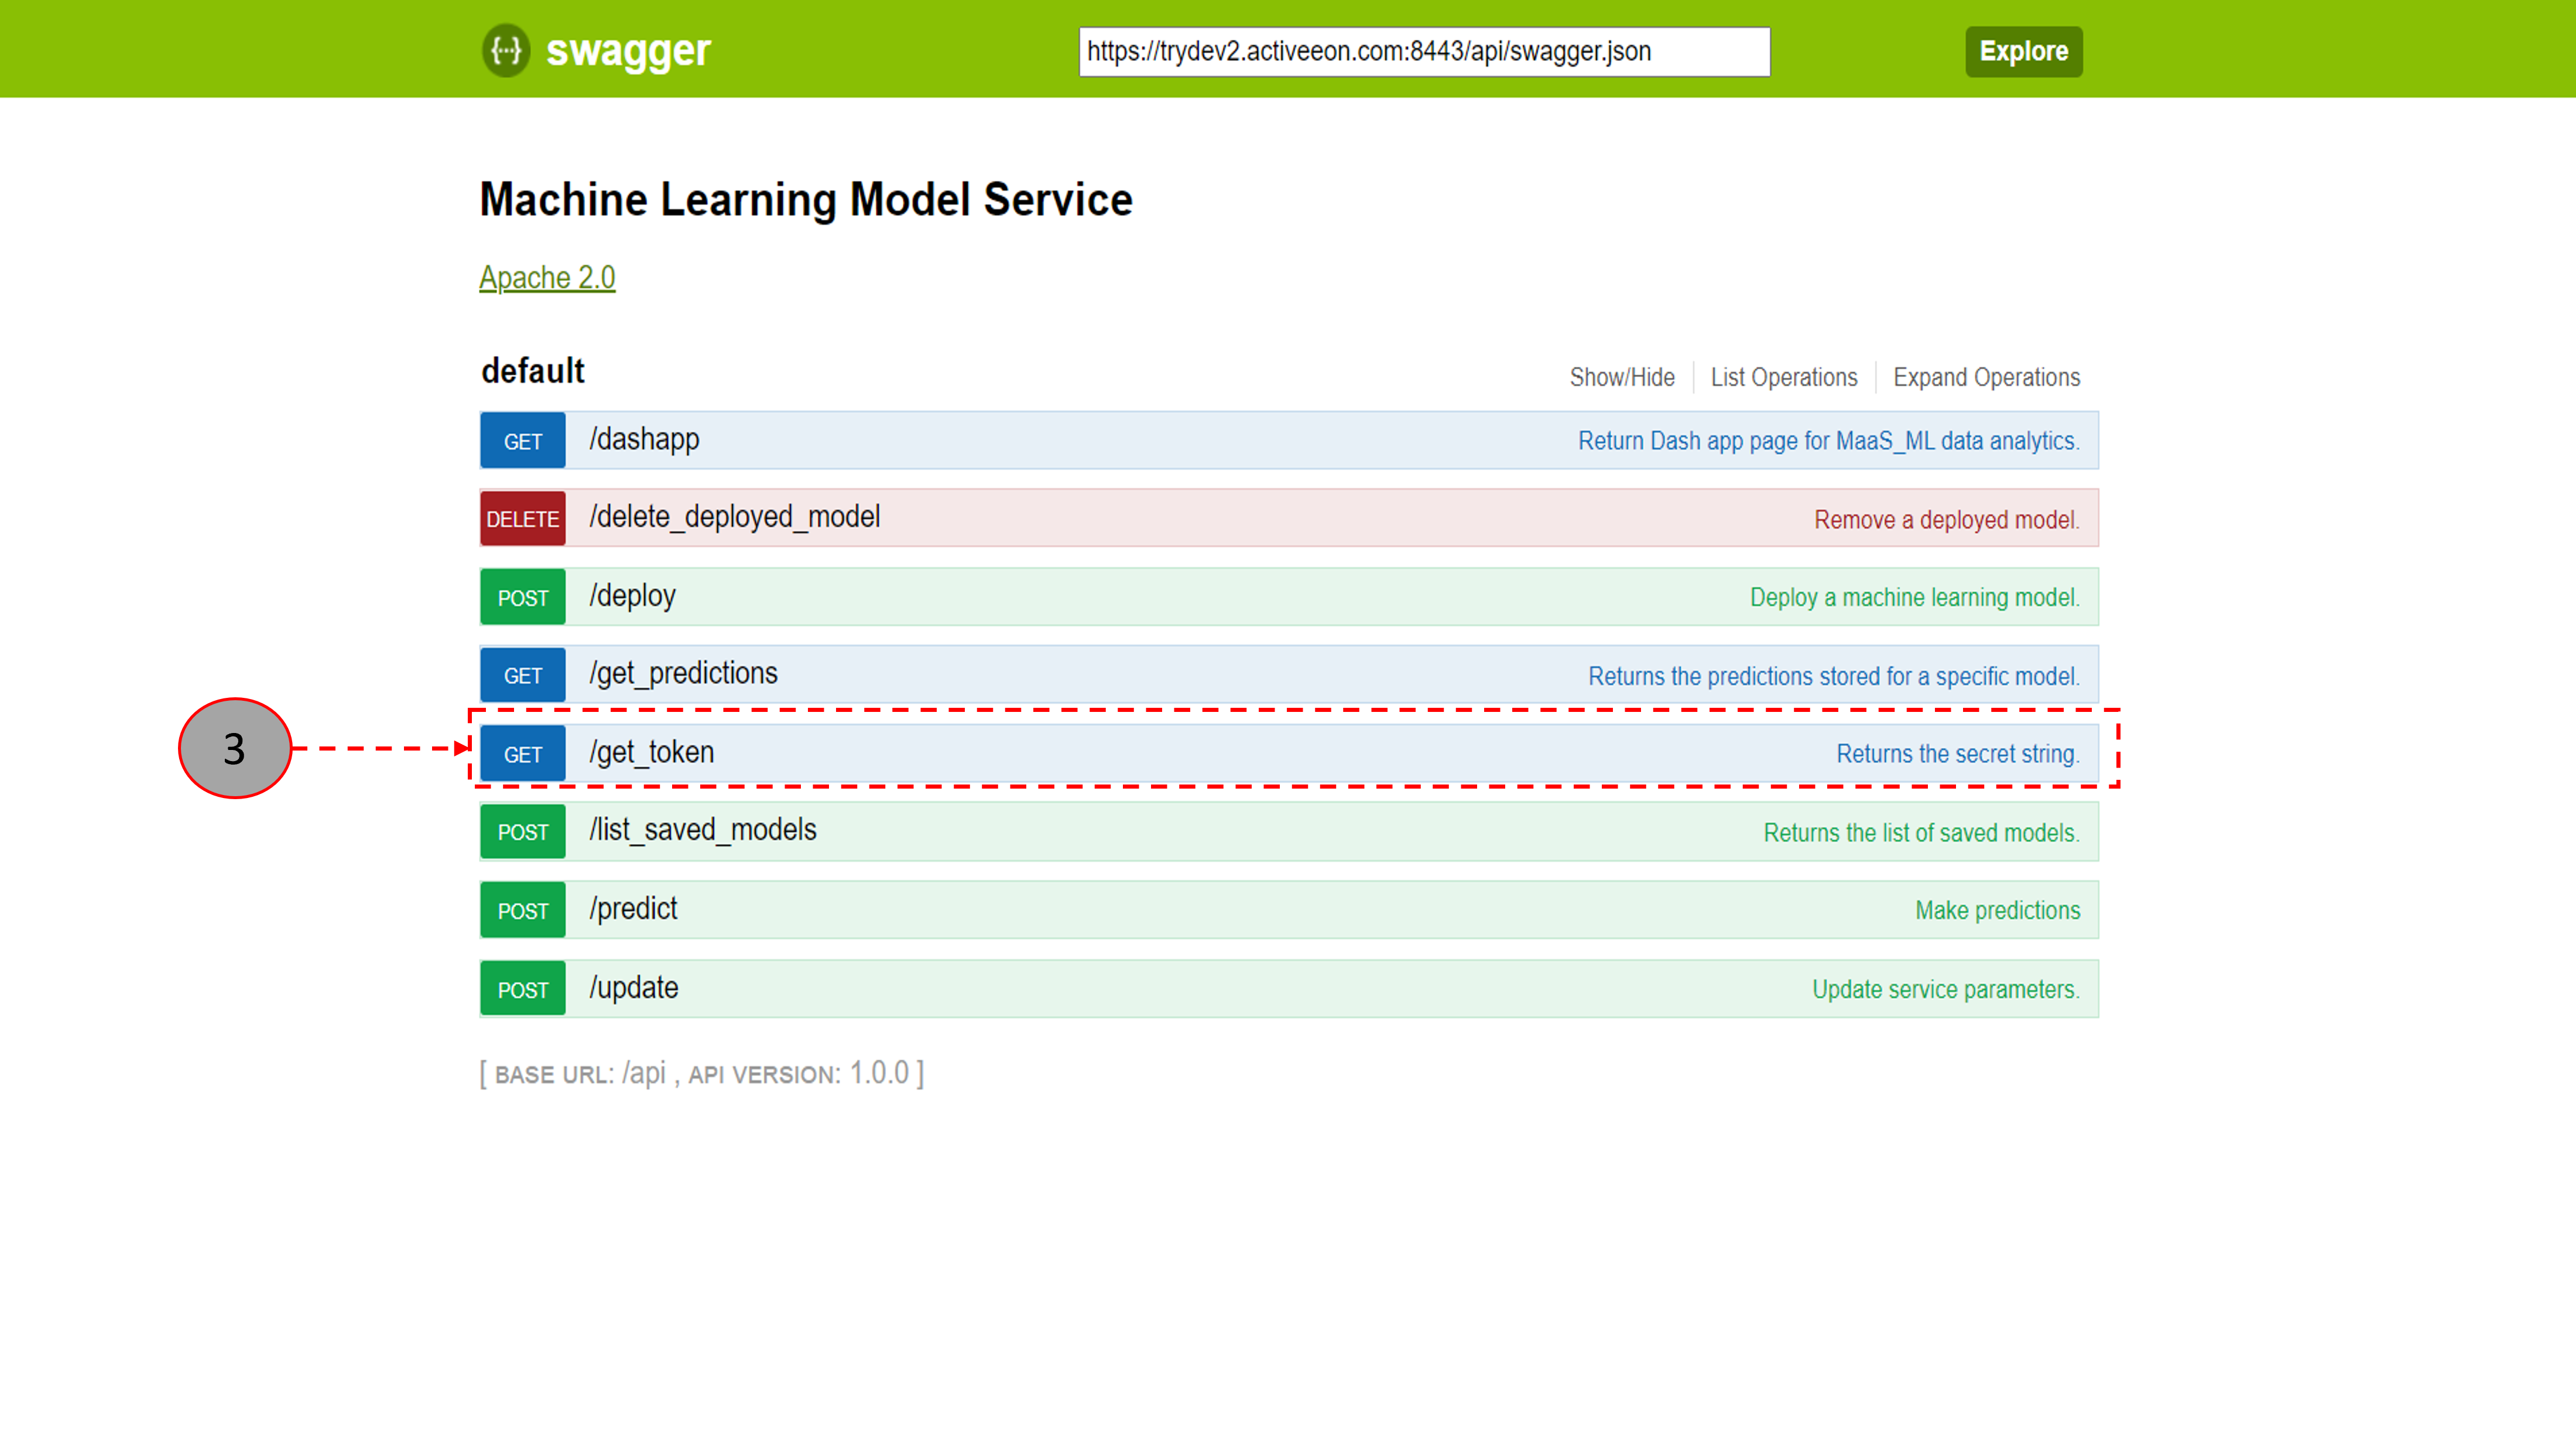
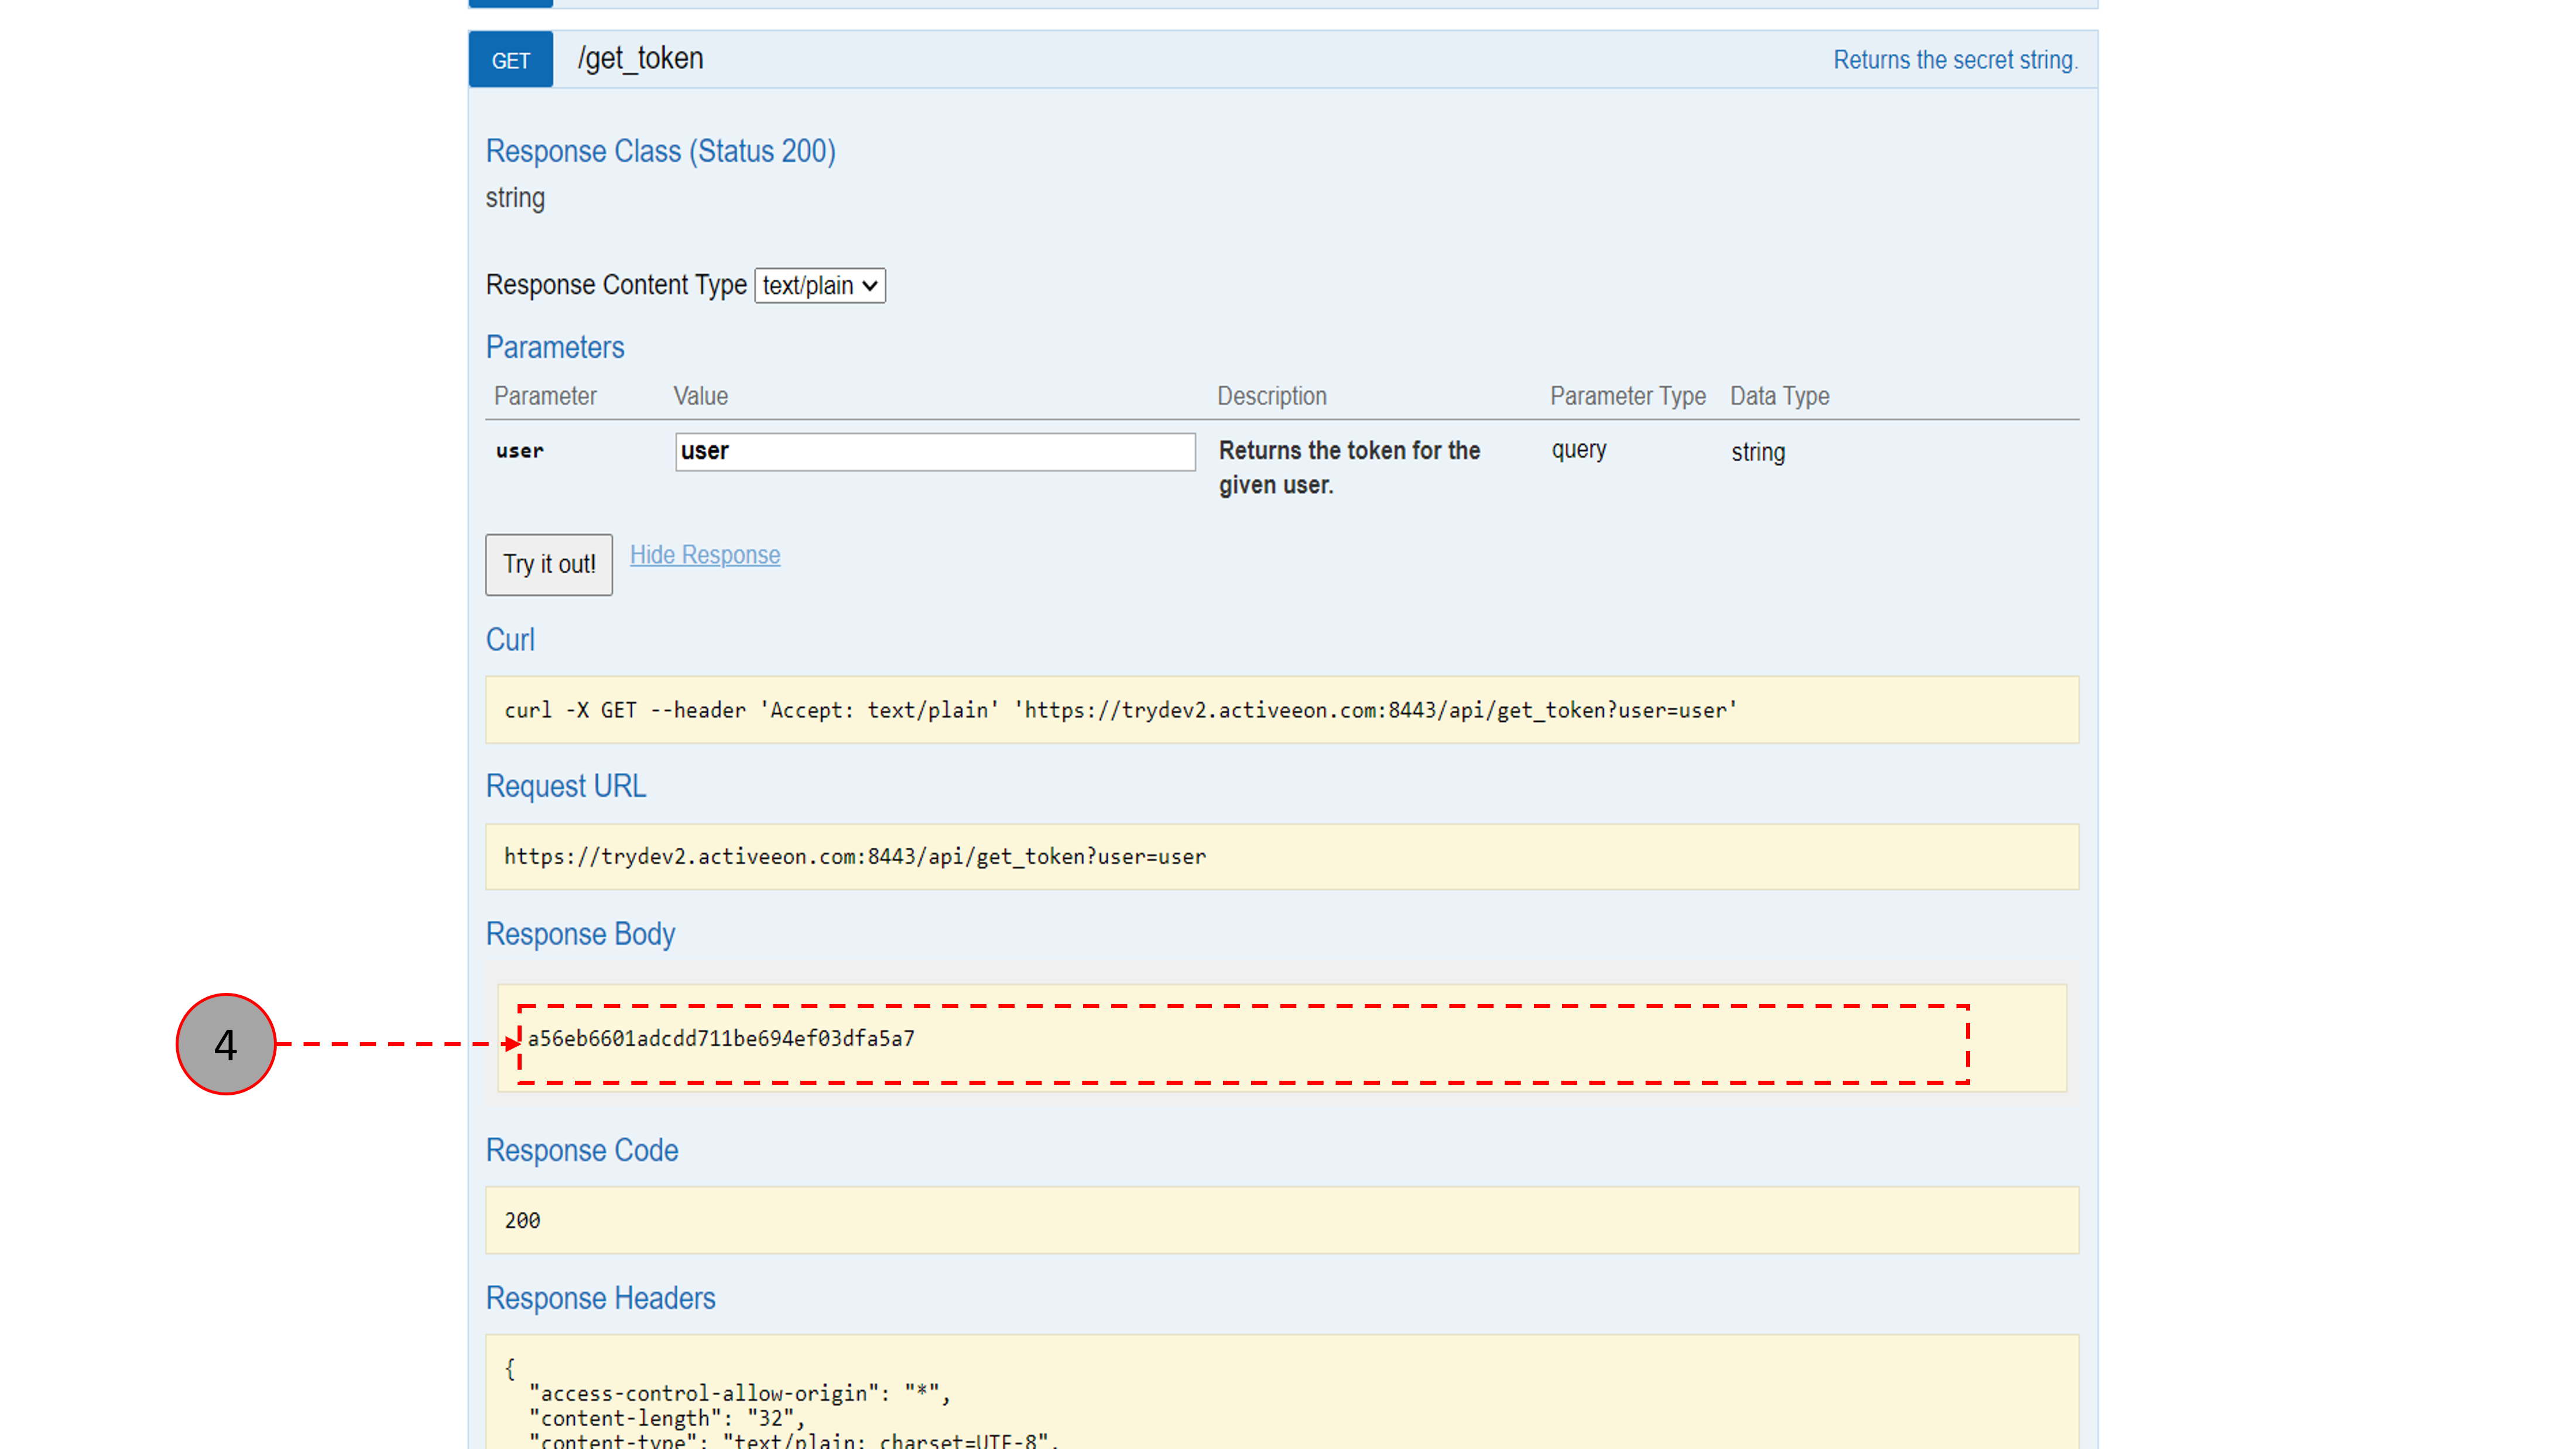
- Start by clicking on the /get_token operation to obtain a token for your service.
- The token ID appears in the Response Body section. Copy this token ID.
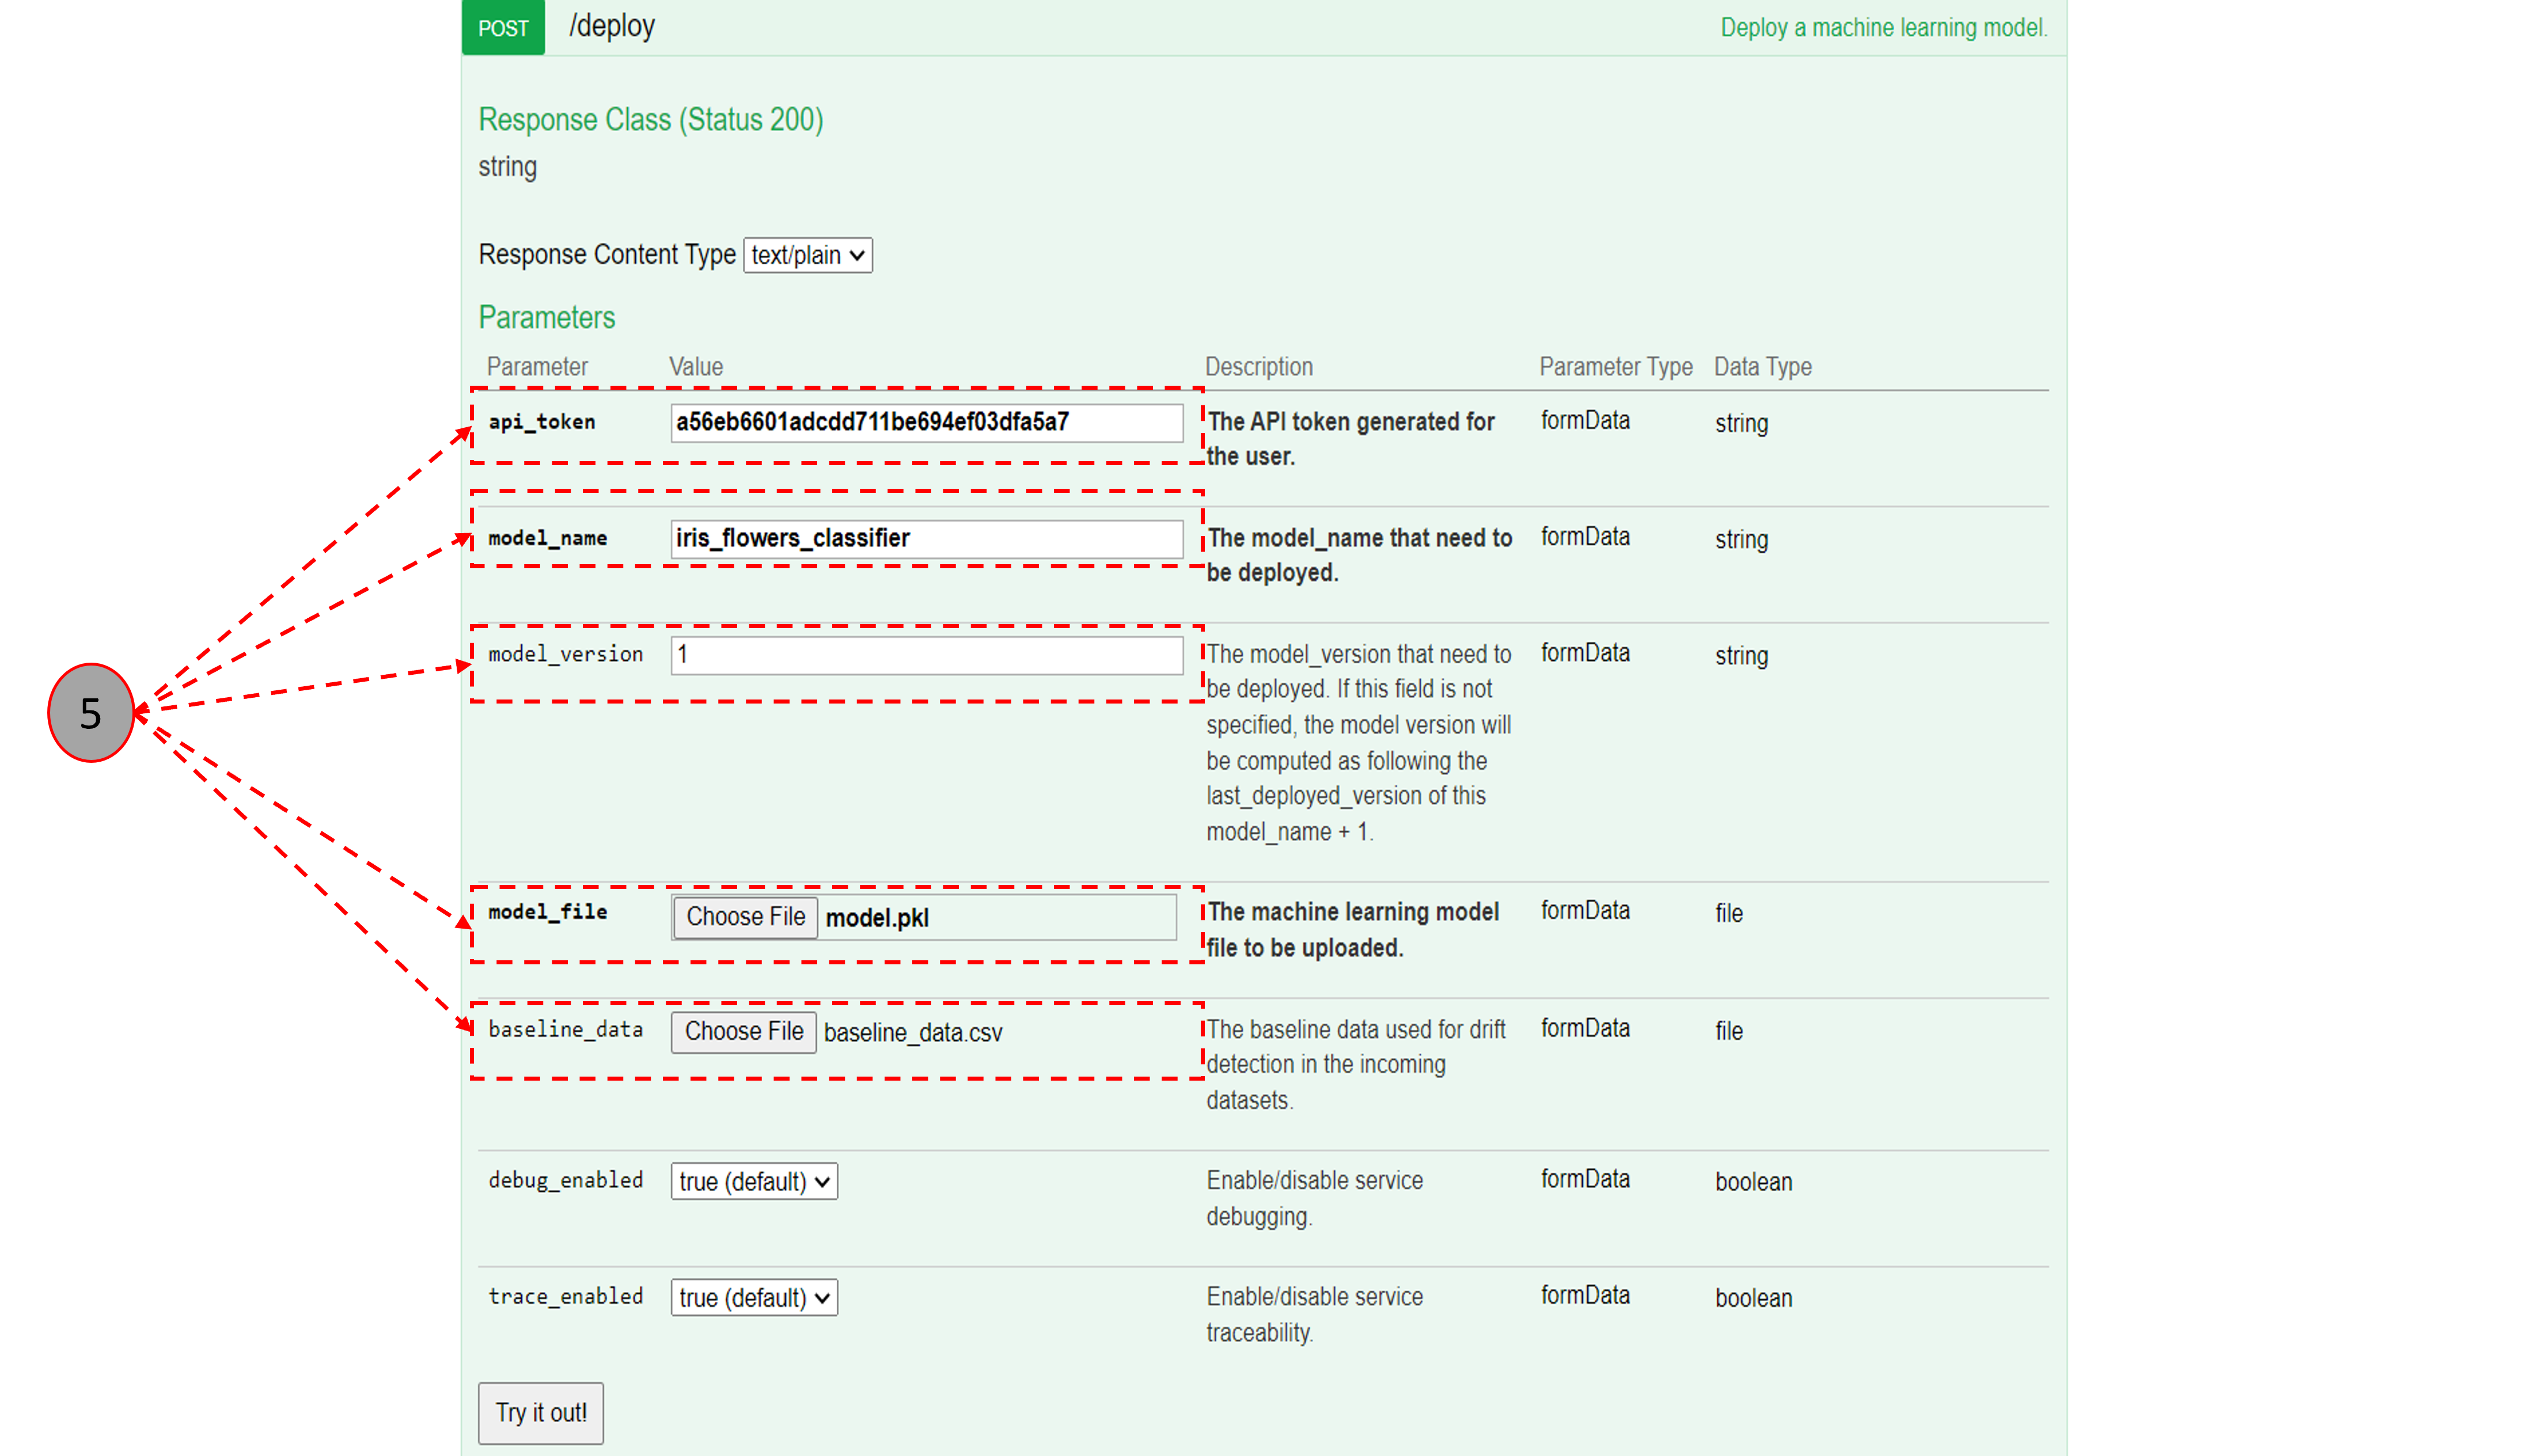
- Click on the /deploy operation, choose your machine learning model file to be uploaded in model_file and its name in model_name. As MaaS_ML supports model versioning, you can specify the version of the model to be deployed in model_version. If you have chosen drift_enabled as true, you should upload a baseline dataset in baseline_data containing a part of the data on which the model was trained. This will be used in the data drift detection (DDD) process. For more information about the variables, please visit the MaaS_ML (Data Drift Detection) documentation web page. Paste the copied token ID in api_token and click on Try it out! to deploy the model.
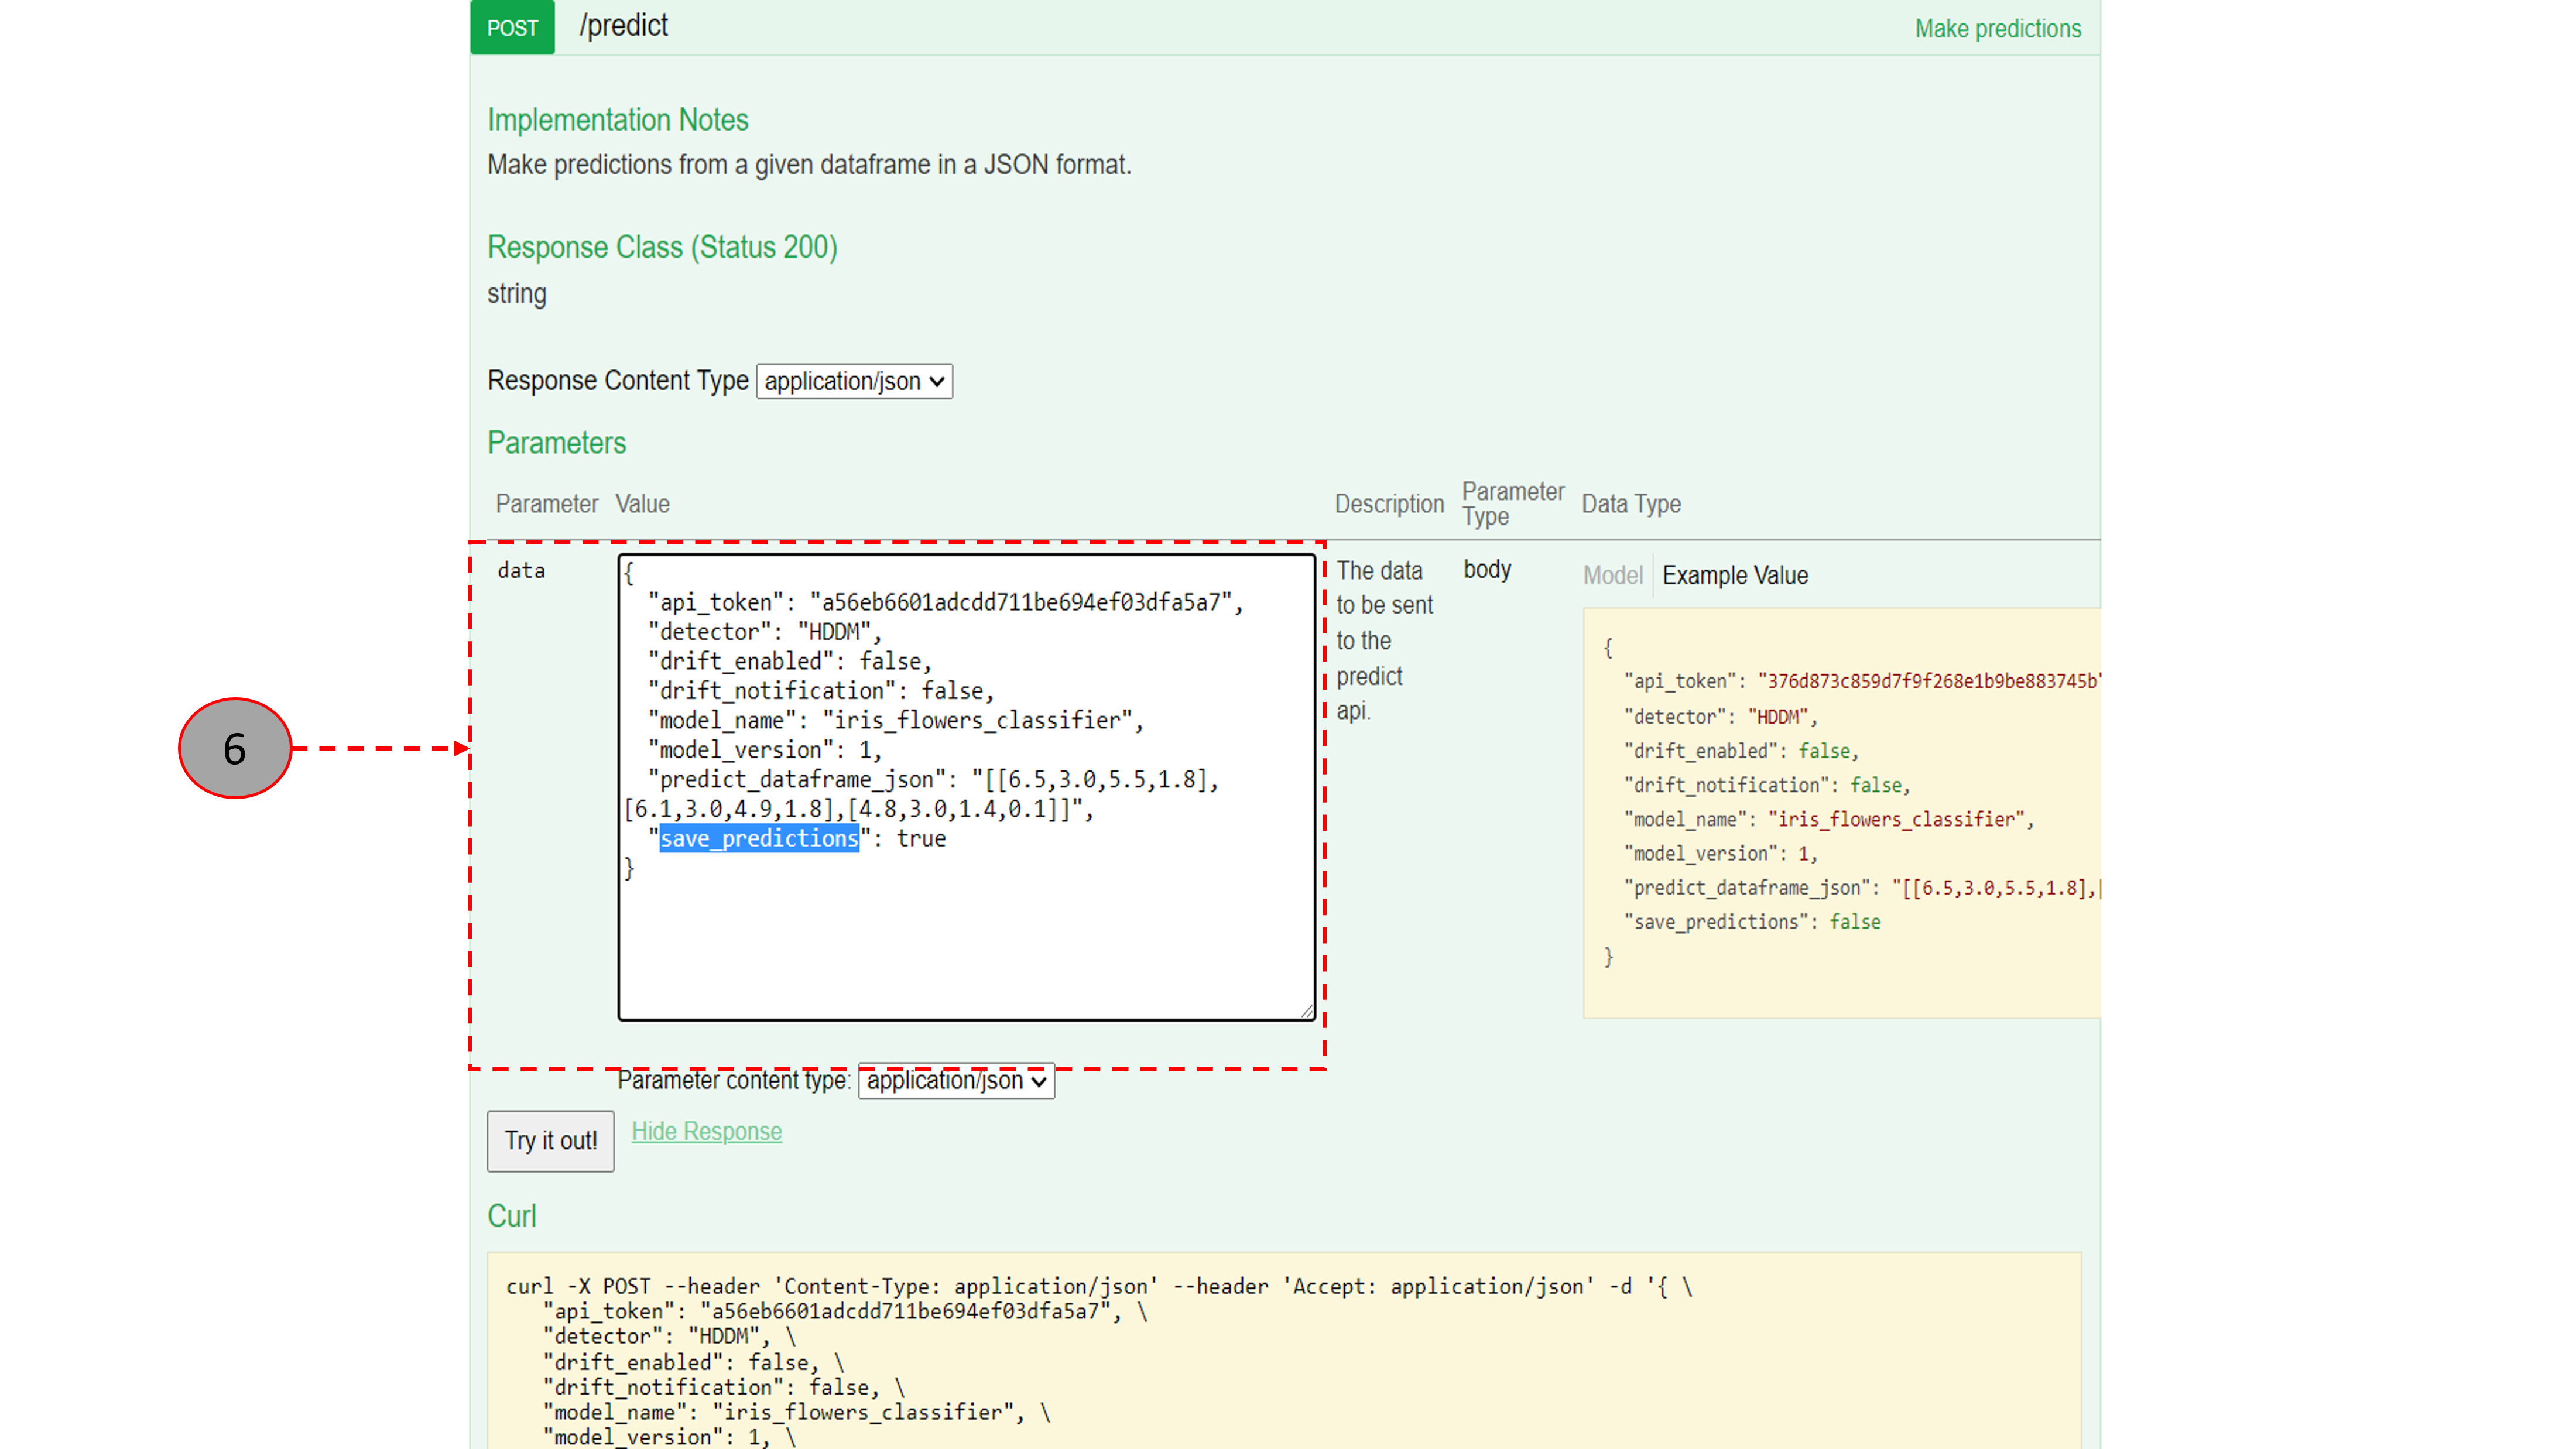
- Click on the /predict operation. Paste the token ID in the api_token. Specify the model_name, model_version, drift_enabled, drift_notification and predict_dataframe_json. Here you can choose the data drift detector you want to use. In the provided example HDDM is used. You can also try Page Hinkley and ADWIN. You can also choose if you want to save the predictions or not in save_predictions(saved predictions can be later previewed in the Predictions Preview tab in the MaaS_ML endpoint) Click on Try it Out!
- The predictions and the drifts (if they exist) will appear in the Response Body section.
- For more information about the Swagger UI, please visit the MaaS_ML (Via Swagger UI) documentation web page.
- watch paio demo video
- the tutorial on jupyter proactive kernel
- go through our documentation for more details