ProActive Quickstart Workflows In-depth
In this chapter we will go more in-depth into workflow semantics and will address more complex workflow examples. We will also show the syntax and semantic differences between various scripting languages like groovy, jruby.
1 Variables
Job Variables
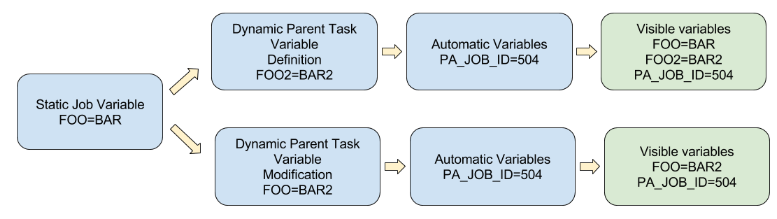
Job variables are workflow variables which can either be defined statically at
the workflow-level or dynamically inside a task.
They are similar to a dictionary (HashMap).
When they are defined statically, they are accessible in any task.
When they are defined dynamically, they are only accessible in children tasks.
Statically-defined job variables can as well be modified dynamically inside a task.
In that case, the modification will be visible in children tasks only.
Some variables such as PA_JOB_ID, PA_TASK_ID, PA_USER, are automatically set by the
system.
The following diagram illustrate this behavior:
The complete list of system variables can be found in the ProActive documentation: https://doc.activeeon.com/latest/user/ProActiveUserGuide.html#_variables_quick_reference
Let’s show how variables work by an example. Create a new job and call it Job variables.
Click on Variables tab on left panel. Then on button Add.

Create a Groovy Task and replace the Task Implementation (i.e. the task script) by the following code:
Inside the task script, the job variables are accessible as a HashMap called variables (its exact type is language-dependant).
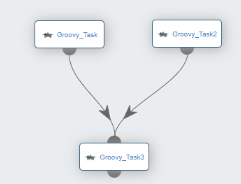
Create a second groovy task and connect it to the first task as a child.
Replace the child task script by the following:
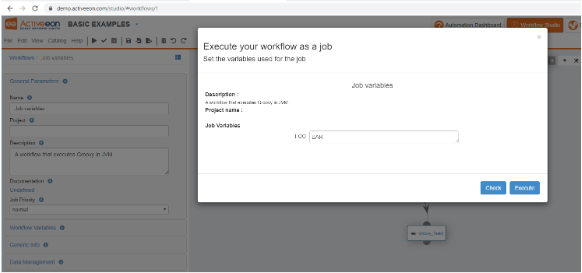
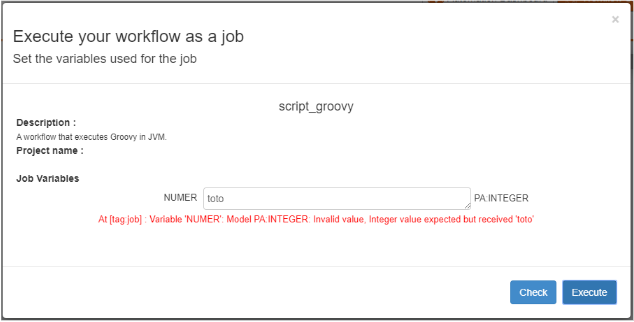
This lets the user change statically defined variables on-the-fly at submission. You can observe that dynamically-defined variable FOO2 is not in the list. Click on Execute to leave the original value for now. Observe that the job output displays the expected behavior:
In Bash scripts, job variables can be accessed by the following syntax: $variables_FOO. Variables in bash scripts are read-only. Even if they can be modified by the bash script itself, the modification will never be propagated to the children tasks.
Let’s add a third task to our Job variables workflow, choose a Bash task.
Connect this task as a child of the last groovy task.
Modify the script content with the following:
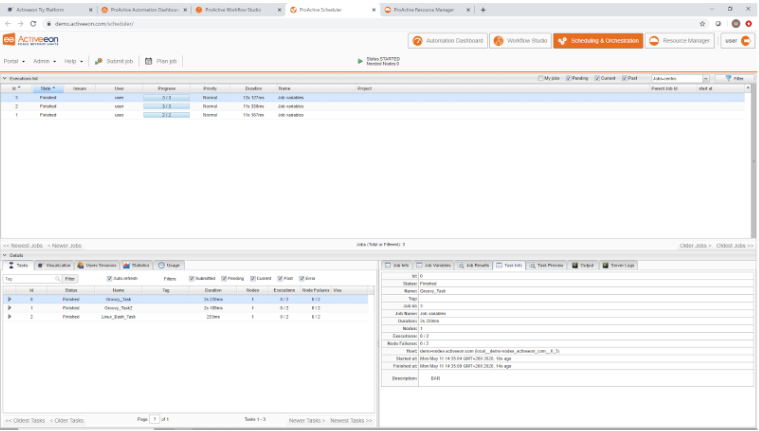
For example, click on the first task, then open the panel General Parameters. In the description field, enter : ${FOO}
Do that for the two others tasks and execute the workflow.
In the scheduler interface, click on the job, then on the first task in the task list, and then open the Task Info panel. You see how the variable has been replaced. If you click on the other two tasks, you will see the same value. At this level, the variable replacement is performed statically, i.e. at the workflow parsing.
Variables Model
When used inside tasks, Job variables are of type String.
It is possible to control the syntax of a variable, through the Model
attribute.
When the Model attribute is used, the variable will still be of type String, but the
variable definition will be controlled.
This can make sure that a user does not enter a wrong value which can fail the
workflow.
For example, create a new workflow with a groovy task and define the following job
variable (unselect the task before)
Task Variables
Task Variables are similar to Job Variables, with the following differences:
- They are defined at the Task level (Select the Task > General Parameters > Task Variables).
- They can be used only inside the task scripts, some task parameters, but cannot be used directly in the Task XML definition.
- They are not propagated to children tasks.
- They have a specific extra attribute inherited which defines their behavior relative with job or propagated variables with the same name.
- They cannot be redefined when submitting the workflow, but they can use redefined job variables through the ${} syntax or the inherited attribute.
Result Variables
Another way to transfer information between tasks is by using the task result
variables.
Inside each task, it is possible to set a result by doing an affectation to a
variable called result.
The direct child task will be able to access this result by another variable called
results (with “s” since it can have multiple parents).
The exact type of the results variable is language-dependant, but always an
aggregate type such as array or list,
as it aggregate results from several parent tasks.
Let’s illustrate this by an example.
Create a new job and call it Job results.
Create two Groovy Tasks, position them on the same line, and replace the scripts by
the following:
-
Left task :
result = "a" -
Right task:
result = "b"
Let’s now have a look at the type contained in list results, replace the child task script by the following:
In order to access the real result object, you need to call the value() method. Replace again the child task script by the following:
Important: In R language, it is not necessary to use the value() method inside the results object as the R script engine do that automatically.
The ProActive documentation contain detailed information about variable usages in different context:
- Variables concepts: https://doc.activeeon.com/latest/user/ProActiveUserGuide.html#_variables
- Variables quick reference: https://doc.activeeon.com/latest/user/ProActiveUserGuide.html#_variables_quick_reference
We are now going to use what we’ve learnt about variables and results to fix the Replicate job used previously. This job was failing because we increased the number of replications without changing the different tasks semantics.
Open again the Replicate job, open the Split task’s script content:
- results[0] contains the result of the split task. All Process tasks have a single parent, so the results list contains only one TaskResultImpl object.
- results[0].value() returns the map as defined in the split task.
- results[0].value()[replication] returns the element in this map which this Process task must handle.
We see that the Merge task displayed a list containing all converted string values, in the correct order. But now, let’s say we want to print a single string containing “ABCDEFGHIJ”. Before we modify the Merge task accordingly, we need to notice that, unlike the Process task, the results list will not contain a single value, but actually ten values (the Merge task has ten parents). This simply prints the content of the received results variable. We modify the Merge task, by writing a simple loop, iterating over the results list:
Do not forget to consider language specificities. Indeed in R, each array index starts at 1. The process Task would be:
2 Resource selection
Resource selection allows to choose specific ProActive nodes to execute tasks. It is
useful when the resource manager controls different machine groups,
with different libraries installed, or even different operating systems. It can be
especially useful, when heterogeneous machines are connected to the
scheduler. Selection is done by writing selection scripts able to determine
if a task
can be executed on the ProActive Node or not.
Let’s show by an example how we can select a specific machine for execution.
Create a new job in the studio named Selection job with a single groovy
task
Open the Node Selection panel and click on Add
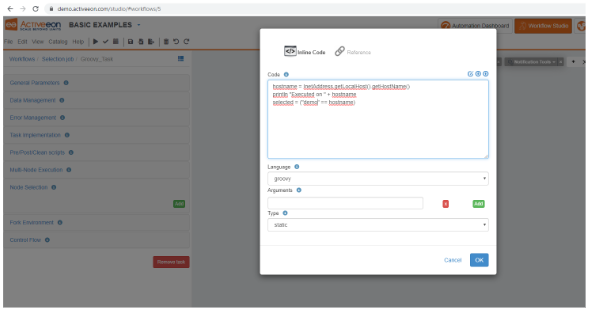
This will open the following dialog:
- Enter language : groovy
- Enter Type : static
-
Enter script:
hostname = InetAddress.getLocalHost().getHostName() println "Executed on " + hostname selected = ("trydev" == hostname)
Let’s decompose this code:
- The first line is a java/groovy command allowing to get the hostname.
- The second line simply prints this value.
- The last line affects to the selected variable a boolean value, which is true if hostname is “trydev” and false otherwise.
- Static scripts are only executed once on any Node. The result of the script is remembered by the scheduler in its cache. If another task uses the same script, the result stored inside the cache will be used as the node answer and the script will not be executed again on the same node. Static scripts are useful to check a fact that is not going to change overtime (like the hostname, the operating system, etc).
- On the contrary, dynamic scripts, are always evaluated, and are useful to check volatile facts like CPU usage, available RAM etc.
You parametrize your selection script, by setting the Arguments field, and retrieving its value from the selection script code using the variable args.
Submit the workflow now and observe that it’s executed on trydev.
Open the job output, and look for the message “Executed on ...” : it does not appear.
The selection script output is not printed in the task logs, in order to find it, you need to open the Server Logs.
You can access the server logs, by opening the Server Logs tab on the scheduler and clicking on Fetch Output.
Even if the server logs are debug logs difficult to understand, you will see in the middle the desired output such as:
3 Data management
When we create a file in a task, the file will be located in the working directory
of
the task. This directory is called in the ProActive terminology the Local
Space. This directory is volatile and will be deleted after the task is
finished, so it’s
mandatory to transfer any output file produced.
To illustrate this, let’s create a new job called LocalSpace job with a
single
Windows cmd task.
Replace the script content with the following and execute the job:
- LocalSpace : temporary space created on a ProActive node when a task is executed.
- GlobalSpace : a shared space stored on ProActive server machine, accessible to all users.
- UserSpace : a space stored on ProActive server machine accessible only to the current user.
- InputSpace : a private space manually started by a user (read-only).
- OutputSpace : similar to the InputSpace but in read/write mode.
- CacheSpace : a unique and shared space for all tasks and all ProActive Nodes deployed on the host.
Let’s create a new job and call it Userspace job.
Create two dependant groovy tasks.
In the parent task, replace the script content with:
In the child task, replace the script content with:
You can execute this job now and observe what happens ...
The second task is faulty and the following error appears in the task logs:
As the second task needs this file, we must find a way to transfer it.
In order to do that, we are going to transfer the file to the UserSpace at the end of the parent task execution, and transfer again the file from the UserSpace to the second task.
Click on the first task and open the Data Management panel.
Under Output Files, click on the Add button. This will open the following dialog:
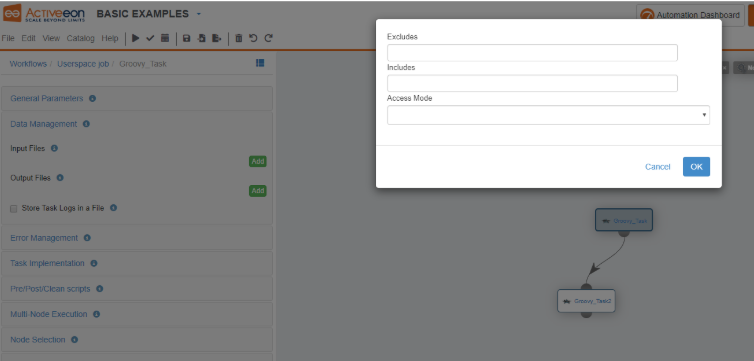
This allows to include or exclude files to/from the transfer.
Enter a_file.txt in the Includes fields and choose transferToUserSpace in the AccesMode list. (includes / excludes patterns support as well wildcards such as **/*.txt).
Similarly, in the second task, open the DataManagement panel and click on the Add button under the Input Files category.
Enter a_file.txt in the Includes fields and choose transferFromUserSpace in the AccesMode list.
Execute the job and verify that you see in the job output:
4 Control structures
As we already saw previously with the replicate example, Control structures allow to
build dynamic workflows with control flow decisions.
There are three kinds of control structures:
- Replication : The replication allows the execution of multiple tasks in parallel when only one task is defined and the number of tasks to run could change.
- Branch : The branch construct provides the ability to choose between two alternative task flows, with the possibility to merge back to a common flow.
- Loop : The loop provides the ability to repeat a set of tasks.
All control structures are directly defined in the XML format of the workflow. Using the studio allows to drag/drop predefined structures, but it is sometimes necessary to edit directly the XML workflow to write complex scenarios. The chapter Workflow Concepts in ProActive documentation covers the necessary knowledge for editing XML workflows: https://doc.activeeon.com/latest/user/ProActiveUserGuide.html#_workflow_concepts
Each control structure rely on the execution of a Control Flow script. The execution of this scripts allows the structure to be dynamically and not statically defined. For example, in the branch structure, the control flow script allows to dynamically choose if the flow should go through the IF or through the ELSE block.
Thus, subsequent runs of the same workflow can go through different flow of executions, depending on the context. The control flow script is executed immediately after a task script. It has access to the task script result variable.
For each control structure, the control flow script must return a specific variable which determines the behavior:
-
Replication : the replication flow script must return the variable
runs, which contains the number of times the child task will be executed
in
parallel. Example :
runs = result % 4 + 1 -
Branch : the branch flow script must return the variable branch, which
can
contain either the string values “if” or “else”. Example:
if (result % 2) { branch = "if" } else { branch = "else" } -
Loop : the loop flow script must return a boolean value inside the
loop variable. If the loop variable is true, then the flow iterates one
more
time. If false, then the iteration stops. Example :
if (result == 4) { loop = false } else { loop = true }
In addition to control flow scripts, loops and replications use specific variables called iteration and replication indexes. These indexes allow to identify a task which is executed inside a structure. For example, inside a loop, the first time the loop is executed, the iteration index will be 0, the second time 1, etc… These indexes can be used inside scripts as internally defined variables:
-
Iteration index :
variables.get(‘PA_TASK_ITERATION’) -
Replication index :
variables.get(‘PA_TASK_REPLICATION’)
Similarly, tasks inside a loop are named Process, Process#1, Process#2, etc.
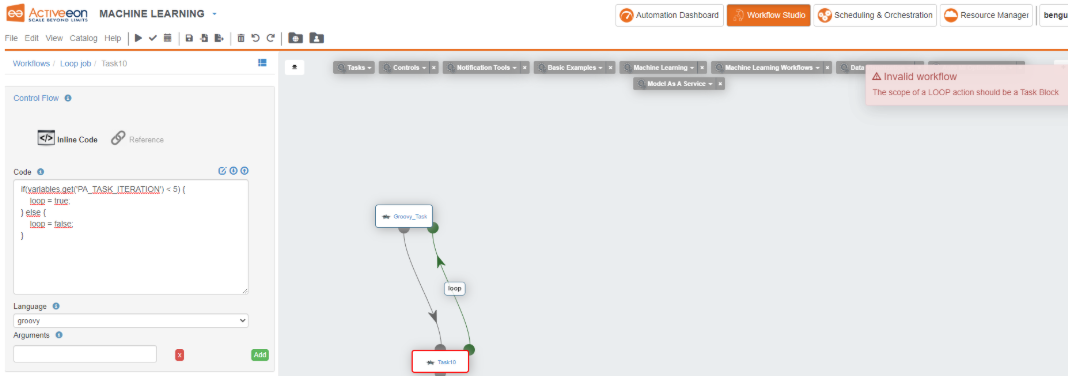
Let’s try to write a loop workflow. Create a new job and call it Loop job.
Create two dependant groovy tasks, then click on the child task and open the Control Flow panel.
In the top list, choose loop. A new green icon will appear on the task.
Click on this icon and drag the arrow to the corresponding icon on the parent task.
Now click on the loop box, and add this groovy script to loop until the iteration index reaches 5:
Click on the parent task and open the Control Flow panel. In the block list, choose start block.
Similarly, click on the child task, and choose end block in the same list.
Now click on the Check button in the top menu. You should see “Workflow is Valid”.
Now that we have a valid loop syntax, we must work a bit more to make the loop actually do something.
Edit the parent task script with the following:
You should see at the end the following job output:
There is also another useful feature with ProActive loop workflows, it is CRON expression loops.
CRON loops are defined exactly like standard loops except that the loop variable, instead of receiving a boolean value, receives a string CRON expression.
This expression tells the loop at which time it should execute next. The loop is paused until the expression is met.
To illustrate this, edit again the loop script, and put the following code instead:
Execute the job and observe how it’s handled by the scheduler.
5 Multi-Node Tasks
We already saw briefly that a ProActive Task can reserve more than one ProActive
Node for its execution. The reason behind this feature is that not all tasks simply
execute a basic script, but often tasks will call an external program. That
program can be multi-threaded by using multiple cores on
the machine. In that scenario, it’s important to precisely match the number of
ProActive Nodes used by our task with the machine resources actually used by the program.
Otherwise, the scheduler could dispatch on the same machine more tasks that the machine
resources can handle.
Open again the Multi node job, click on the task, and open the Multi-Node
Execution panel. Open the Topology list, there are many choices in it,
but we are going to focus on the two most useful ones:
- Single Host: this topology setting tells the scheduler that the task will reserve multiple Nodes on the same machine. The number of nodes reserved is determined by the Number of Nodes parameter.
- Single Host Exclusive: this topology setting is similar to Single Host, but also it tells the scheduler that the whole machine will be reserved to execute the task.
Execute the job, and observe on the Resource Manager interface how the whole machine is reserved.
6 On-Error policies
Through this course, we run many failing jobs, and each time we observed that the
scheduler tries to execute a failing task several times, then continue the job
execution with other tasks. This is the standard behavior for failing tasks, but
each workflow can define its
own failover policy.
Let’s open again, the Result job which was creating an error.
Click on the desktop outside the task to open the job parameter panel.
Click on the panel Error Handling.
Here you can see the Maximum Number of Executions Attempts (2 by default),
and
two other settings:
- On Task Error Policy : this tells the scheduler how it should react when an error occurs. The scheduler can choose to cancel the whole job if all executions attempts were made, suspend the job after the first error occurs, etc
- If An Error Occurs Restart Task : this tells the scheduler where to restart the task if an error occurs. By default, it is unspecified, but we can ask the scheduler to restart the task on a different ProActive Node than the one used already.
As you can see, after the error occurs, the job is paused in a state called In-Error. This state let the user investigate what went wrong before resuming the job. In the current ProActive version, the task script cannot be modified, but for example, databases or files used by the task could be checked and fixed, etc.
In order to resume the execution, right-click on the job and choose, for example Restart All In-Error tasks. If the task fails again (here it will), the job will be paused again and will need to be resumed, until all execution attempts were tried.
7 Fork Environment
When a ProActive Task is executed on a ProActive Node, a dedicated Java Virtual
Machine is started to execute the Task.
The forked JVM parameters are automatically configured by the ProActive Node, but
sometimes it may be necessary to provide additional configurations to the JVM. This
configuration can be performed thanks to a Fork Environment or Fork
Environment Script.
Let’s demonstrate this by an example. Create a bash Task containing the pwd command
to
display the current directory.
Execute this task, you should see in the output something like:
8 Containers
ProActive natively supports containers (Docker, Kubernetes,..). As a first approach,
let’s run a simple bash command from a basic Linux
container.
From the Studio, drag’n drop a Dockerfile task
(Tasks->Containers->Dockerfile).
Open the Task Implementation view to see the script: It simply prints “Hello”
from a freshly running Ubuntu container.
Execute the workflow. In case the docker image is not present locally (here Ubuntu
18.04), you will see image-pull-related logs in the job output.
Beyond the fact Docker is natively supported as ProActive task, Docker is natively supported as execution environment of any ProActive task.
Suppose you want to run a R script (statistics) and do not want to mess your system with a R installation. Try this.
Drag’n drop a R task (Tasks->Languages->R).
Click on the task, then under Fork Environment->Environment Script, click on
 to import the
fork_env_docker_rbase_datadir script.
to import the
fork_env_docker_rbase_datadir script.Click on
 to see the script
content: this groovy script build the docker run command (with required
mounted dir, environment variables,..) to wrap the ProActive task script
execution.
to see the script
content: this groovy script build the docker run command (with required
mounted dir, environment variables,..) to wrap the ProActive task script
execution.Now, go to the Task Implementation view and replace the existing R script by this one:
9 Generic Information
Generic Information key features:
- Similar to variables, can be used in a dictionary-like fashion inside ProActive Tasks.
- A predefined set of generic info is interpreted by the scheduler, the studio or the node, to customize some functionalities.
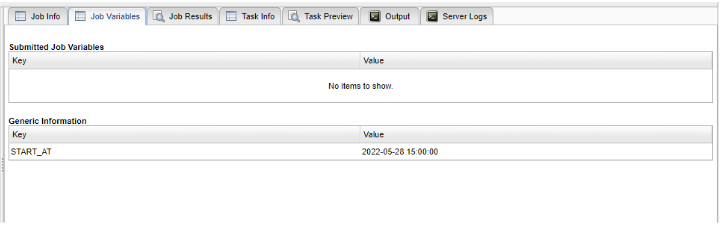
- START_AT : a date which defines when a task or a job is scheduled (interpreted by the Scheduler).
- PYTHON_COMMAND : the path to the python command to execute in CPython tasks (interpreted by the Node).
- TASK.ICON : Interpreted by the Studio to display a custom icon for the task.
Let’s show an example of the START_AT generic info. Create a Workflow with a single task and add this generic info at the job level (Generic Info menu):
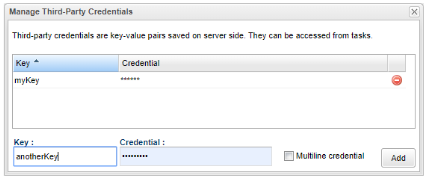
10 Third-Party Credentials
Third-Party credentials key features:
- Similar to variables,can be used in a dictionary-like fashion inside ProActive Tasks.
- Encrypted inside the scheduler.
- Defined for each user, each workflow run by this user can use the same private set of credentials.
- Can be defined using the Scheduler Portal or the REST API.
Let’s create a credential data. From the scheduler portal, open Portal->Manage Third-Party Credentials.
In the bottom form, enter myKey / somevalue and click on Add.