ProActive Quickstart Web portals walkthrough
In this tutorial, we will guide you step-by-step through the web portals: the Studio, the Scheduler, the Resource Manager and the Automation Dashboard portals.
1 Your first single task job
The easiest way to build your workflow is the online Studio portal which is
accessible here.
The main components are:
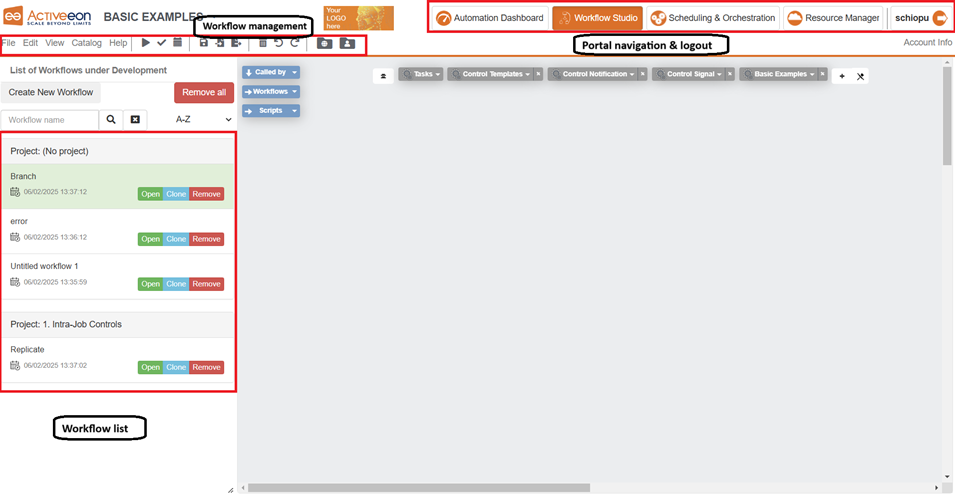
In the workflow list, click on Create. Then click on Open. This opens the workflow edition interface:
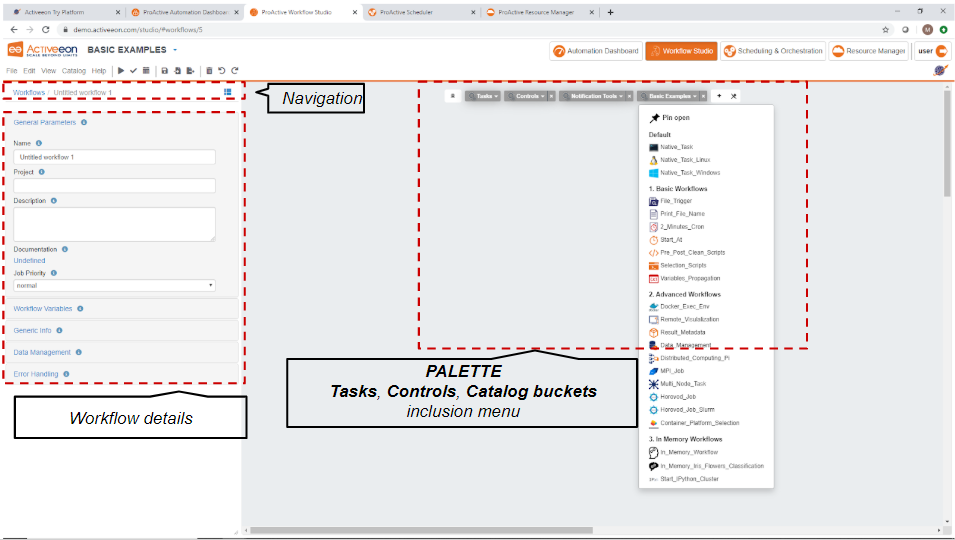
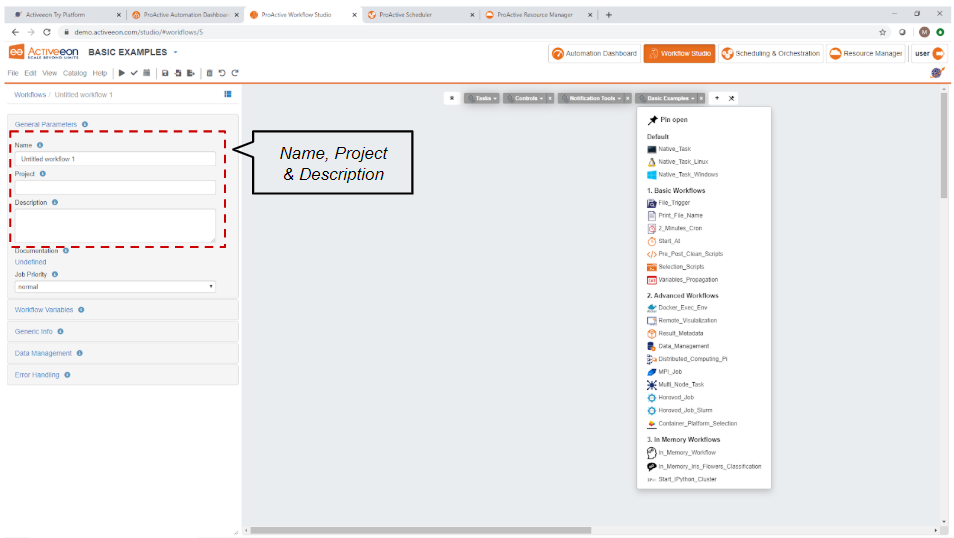
You can create a workflow and assign it to a project. Under General Parameters edit the Name and Project fields.
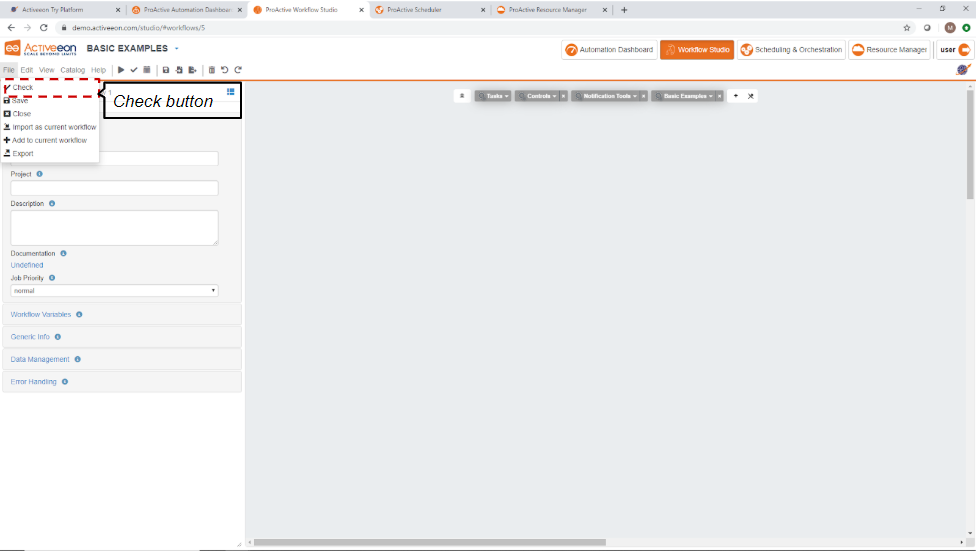
An important button is the Check button, which semantically validate/unvalidate the workflow. Validity checks are also automatically run by the Studio. Checking an empty workflow displays an invalid workflow message.
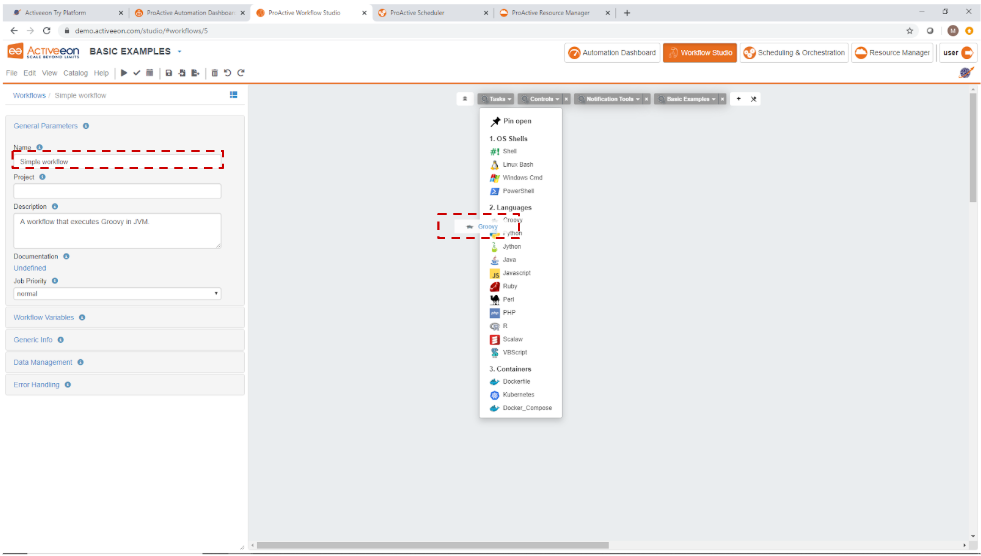
Edit the workflow Name and create a Groovy task using drag & drop or a simple click.
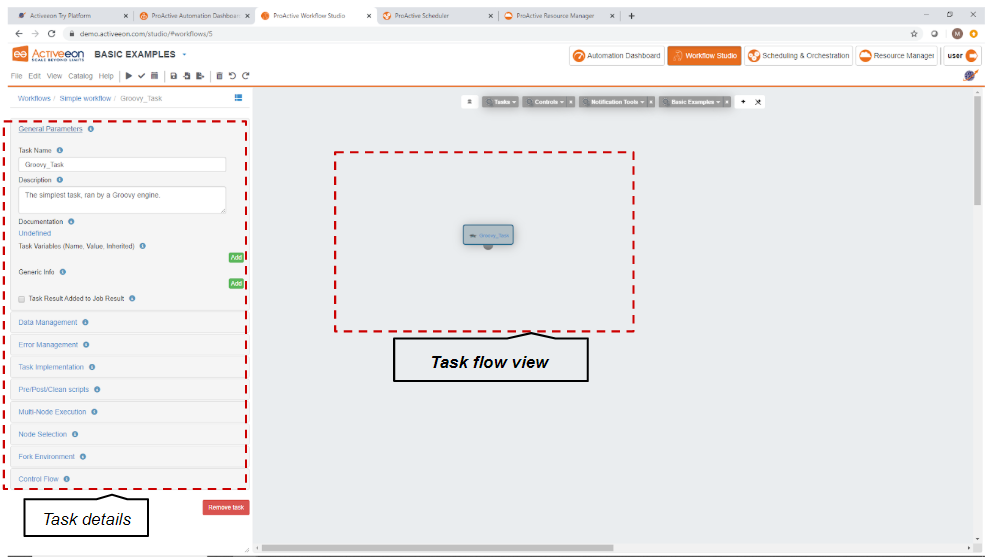
Click on the Groovy task to open the Task details interface.
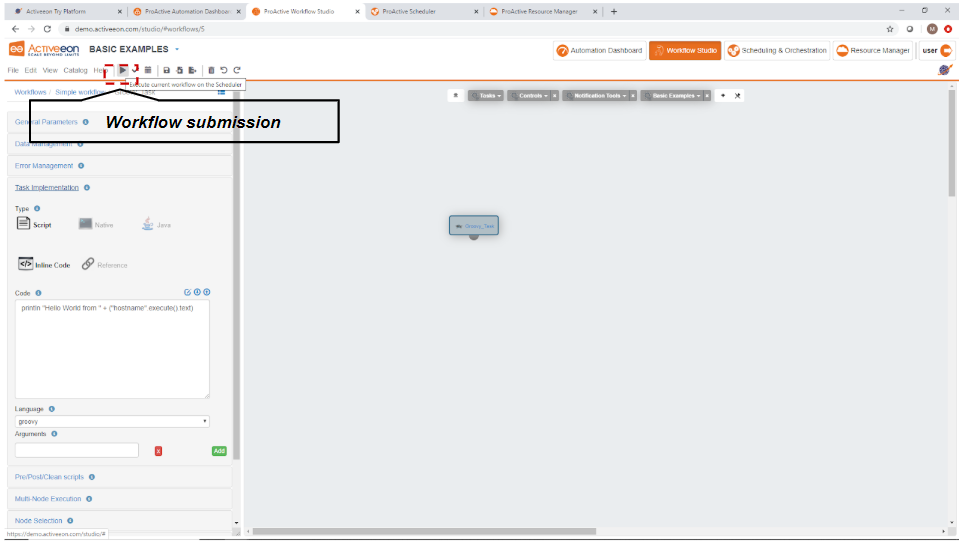
Click on Execute to submit the workflow. Click on Scheduler & Orchestration to open the scheduler interface.
From the Scheduler & Orchestration portail, follow the job execution. Click on the job in the job list.
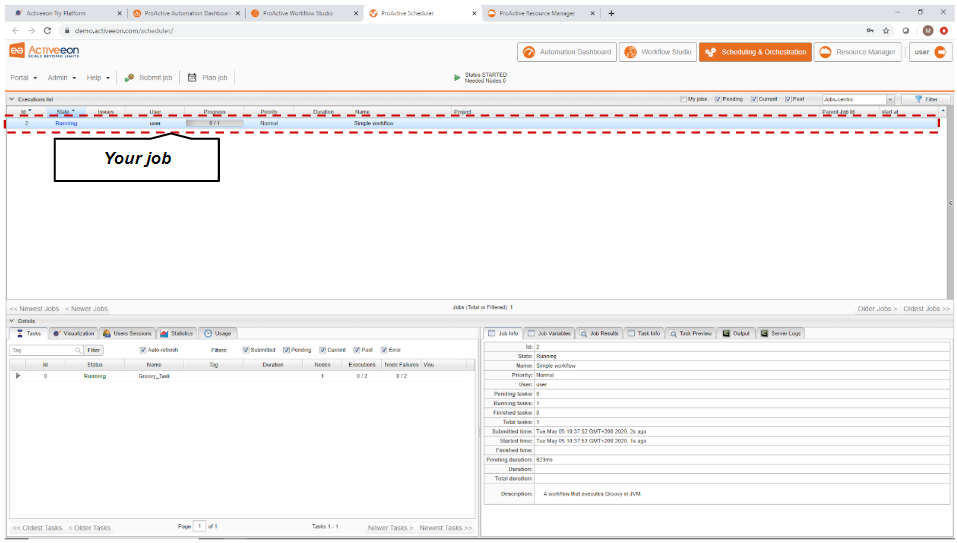
You can look at the job logs by Selecting Output->Finished Tasks Output. Or in streaming mode via Output->Streaming.
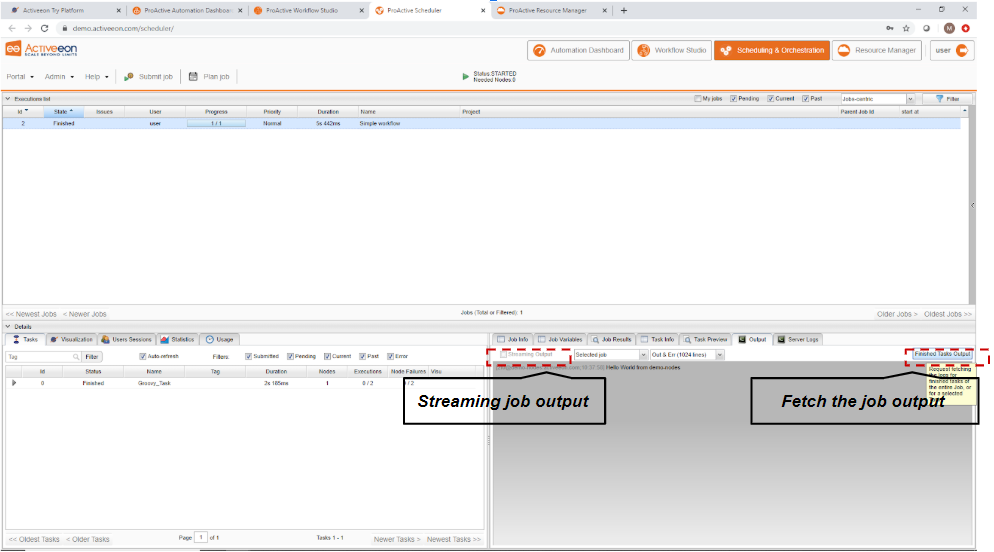
In order to fetch the job output, the job must be finished. Streaming can be used while the job is running. You can choose multiple options (Selected tasks, Selected Jobs, Out & Err, Std Out, Std Err, or download Full Logs if the output is bigger than 1024 lines).
2 Your first multi-task job
Click on the Workflow Studio button to open the studio interface.
Click on the File->Close button to show the workflow list.
Click on Create to create a second workflow, and Open it.
Edit the workflow name and enter Parallel tasks.
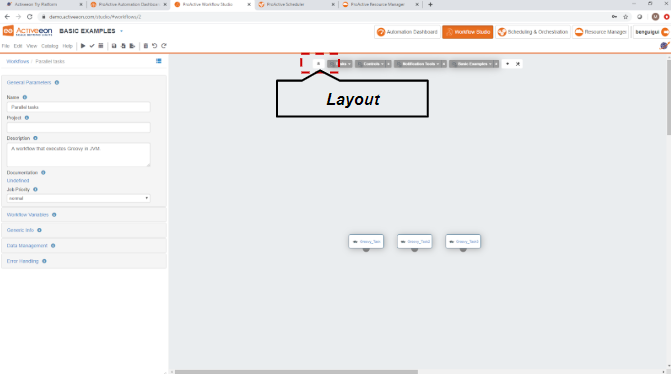
Drag and drop a few tasks.
You can click on the Layout button  to reorganize the
layout.
to reorganize the
layout.
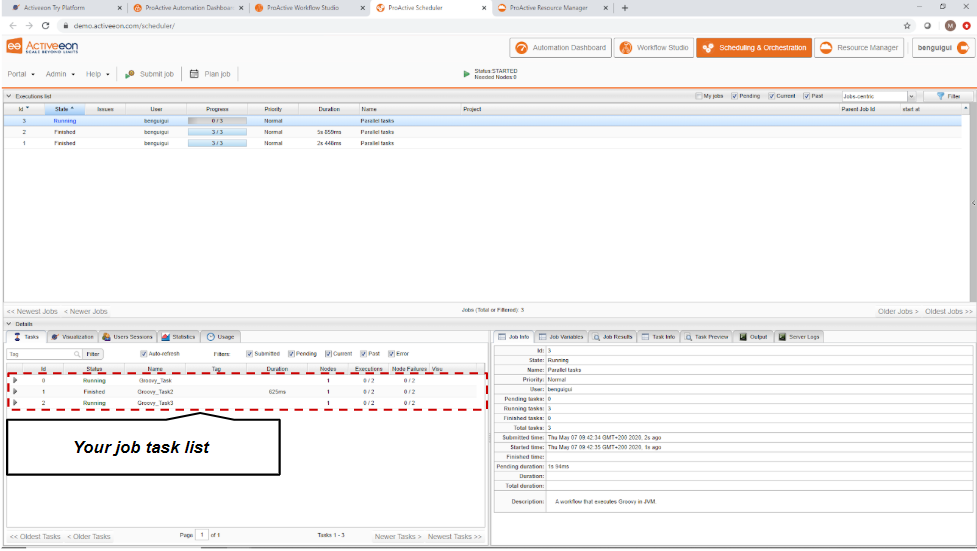
Execute the workflow, and open the Scheduler portal, the tasks will run in parallel.
Create a third workflow and name it Dependent tasks.
Drag & drop two groovy tasks and position them vertically.
Click on the
 icon at the bottom of the top task and
hold the mouse button to drag the dependency arrow button to the opposite
icon
icon at the bottom of the top task and
hold the mouse button to drag the dependency arrow button to the opposite
icon  on the second task.
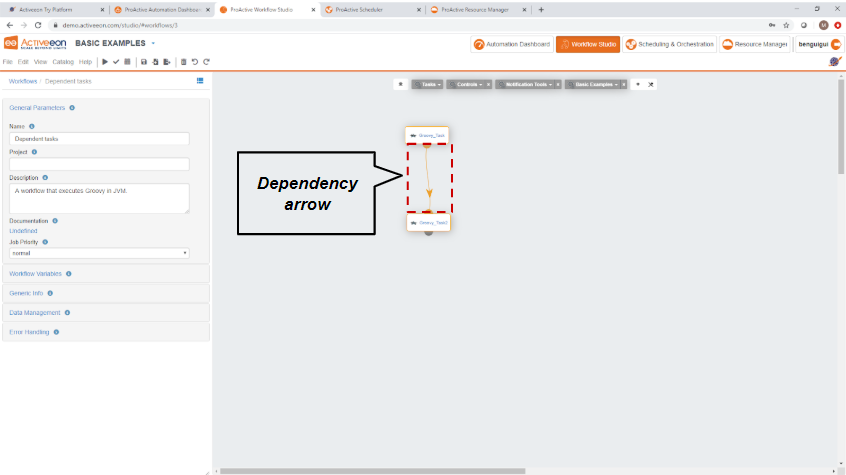
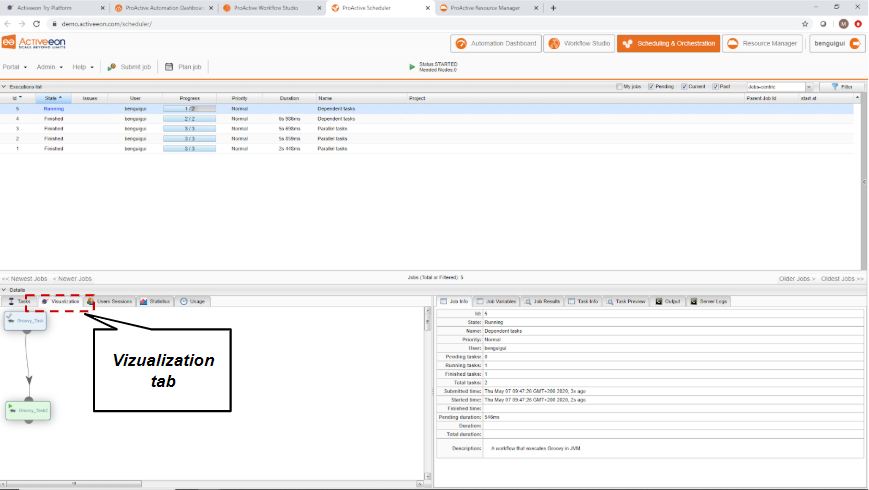
When you submit the job, the tasks will be executed sequentially.
You can visualize the task being executed in the graph by clicking on the Visualization tab.
3 Your first replicated tasks job
Control structures
Create a 4th workflow and name it Replicate job.
Drag & drop the Replicate control from the Control Template menu.
Click on the replicate script and set the number of runs to 10:
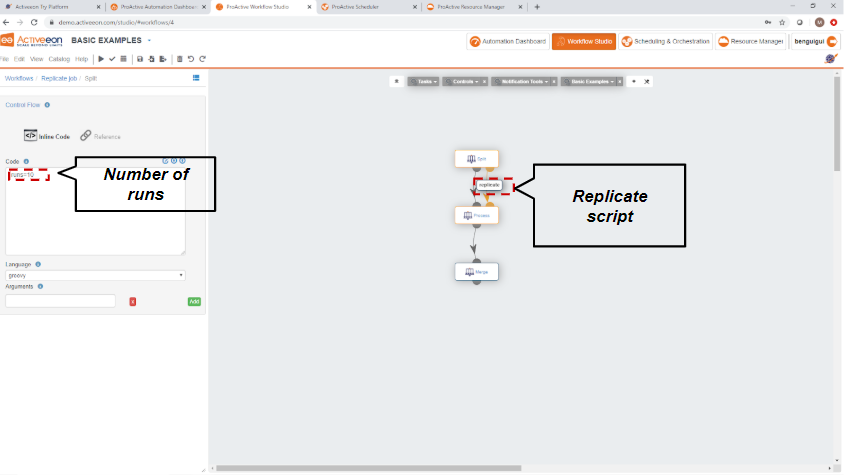
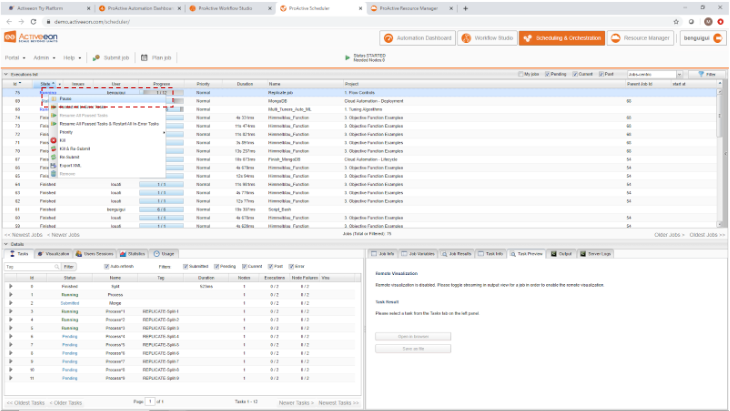
When you select the job, after the first task split is finished, you can watch in the Task list how the Process task is replicated 10-1=9 times (Process*1, Process*2, etc). Some Tasks Processes will be Faulty because the workflow semantic was not modified to include more than 2 replications.

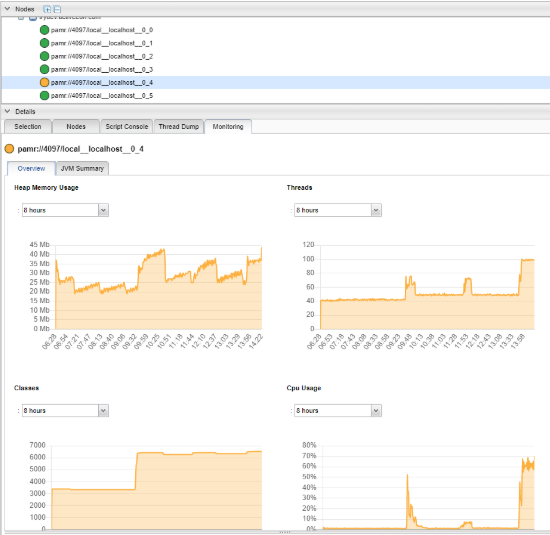
Watch Resources
Click on Resource Manager to open its interface. Execute the replicate job again, and watch how ProActive nodes are used to execute the tasks.
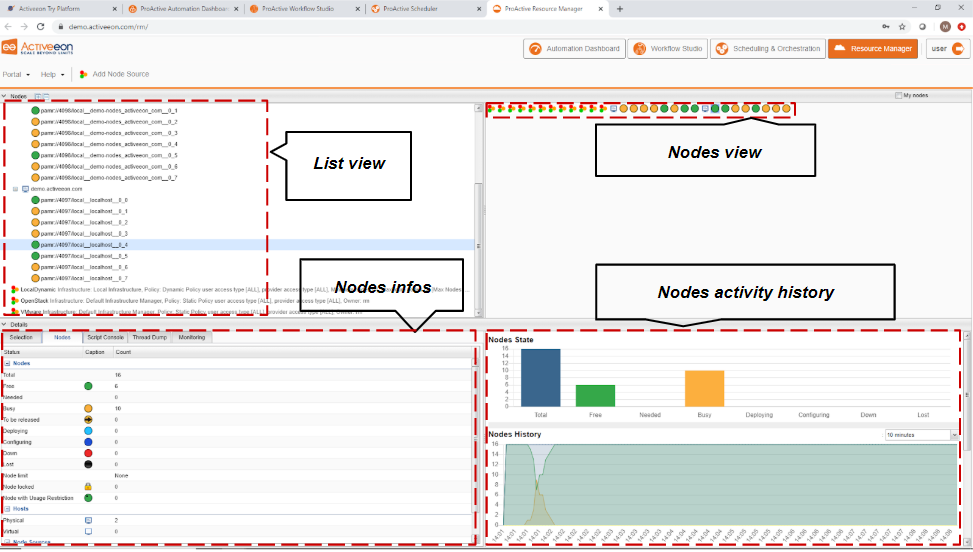
When you select a host, under the Monitoring tab, you can have access to various monitoring information of the machine.
4 Your first multi-node job
Create a 5th workflow and name it Multinode job.
Drag & drop the Multi-Node Task from the Basic examples menu.
Select the task in the diagram, then click on Task Multi-Node Execution.
Set the Number of Nodes to 4.
In the Topology list, choose single host.
Execute the job and watch on the Resource Manager how multiple ProActive
Nodes are
used by the task.

5 Import and Export your workflow
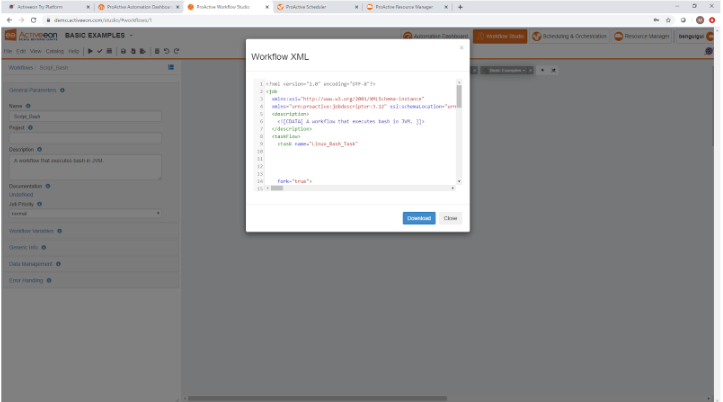
Workflows are represented in XML format, such as:
General documentation about workflow concepts and the XML model is available in the ProActive documentation https://doc.activeeon.com/latest/user/ProActiveUserGuide.html.
While workflows are generally created inside the studio, it is sometimes useful to have access to the XML version, this is done by Exporting/Importing.
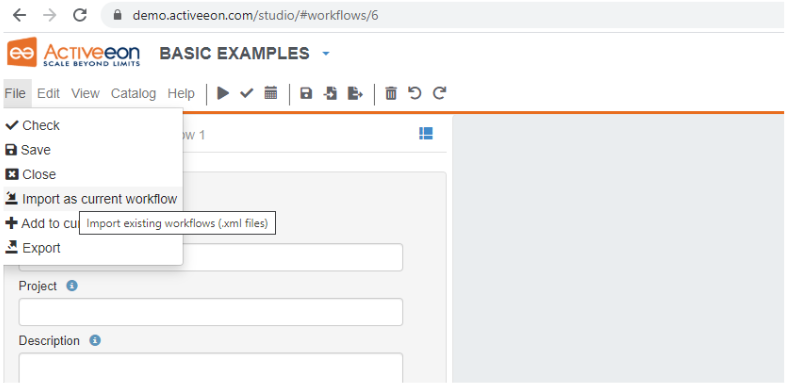
In the Studio, open a job, and click on File->Export.
Click on download to save it as a file.
Create a new workflow, open it, then click on File->Import as current workflow.
This new empty workflow will be replaced by the imported one.
6 Customize your task
Editing Task code
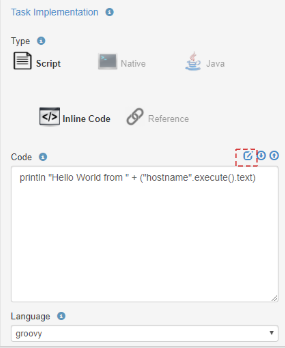
Tasks can be defined using various script languages. When a task is drag & dropped
from the Tasks menu,
it contains a default code such as print ‘Hello World’. Let’s see how we can edit
the provided code.
Create a new workflow and call it Script job, create a Groovy task and
click on it.
On the left panel, in the Task Implementation tab, you can edit the script
content. You can use the  button
to open an editor with syntax highlighting.
button
to open an editor with syntax highlighting.
Task results and errors
The Scheduler Portal allows to see task results and errors (when they don’t appear in the task logs). Create a new workflow and call it Result job, create a Groovy task and replace the script code by the following:
Click on the Task Preview tab on the bottom right. Then on the Open in browser button.
This will open a new browser tab containing the textual value of the result:

Edit now the groovy script again, and enter the following:
This will open a new browser tab containing the textual value of the result, which now contains a Java Stack trace containing the error:
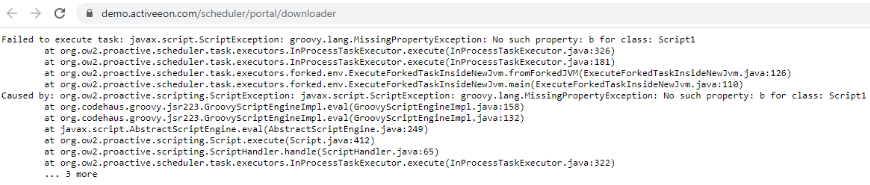
Note that the task has been executed twice. This is because, by default, a failing task is re-executed once. In the scheduler portal, on the task list, you can see the number of Executions for this task : 2 / 2.
This setting is user-defined and can be changed for any workflow.
In the studio, click on your task, and open the Task Error Management Policy tab on the left. In the Number of Execution Attempts field, enter 5, then submit the workflow again.
You will see how the number of executions changed on the scheduler portal:

In the task list, next to the number of Executions, is another value called the number of Node Failures.
Tasks can be restarted in two cases:
- When an error happen in the user code (or an internal error).
- When the scheduler lose the connection with the ProActive Node executing the task. In this case, it is called a Node Failure.
Script languages
Script languages which can be used on any machine are Javascript, Groovy, Ruby,
Jython, Scalaw, …
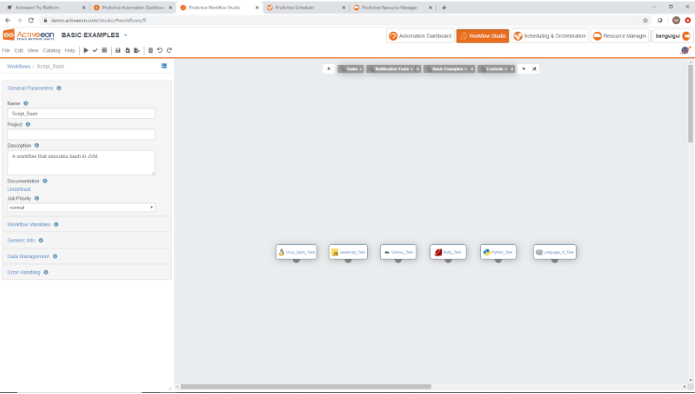
Create a new workflow and open it. Drag and drop the corresponding script languages
Tasks. Execute
the workflow and observe that all tasks are executed successfully.
Some tasks from the task list require specific environments in order to be run :
- Docker_Compose : allows writing a Docker-compose yaml description file which defines a docker container and execute it. This usage requires docker and docker-compose to be installed.
- Dockerfile : allows building a container through a docker file and execute it.
- Java : the Java task executes a Java class, which must be imported first into the scheduler class path.
- Windows Cmd : this task executes a DOS command (does not work on Linux).
- Bash : this task executes a bash script (does not work on Windows).
- Shell : this task runs a script in a linux shell specified using a shebang notation.
- Kubernetes : allows writing a kubernetes scheduler yaml description file. This usage requires kubernetes to be installed.
- Perl : executes a perl script, requires Perl to be installed.
- R : executes a R language script, requires R to be installed.
- Python : executes a cpython script, requires python to be installed.
- Powershell : executes a windows powershell script, requires windows and some specific windows features.
Beyond task implementation scripts, here are a couple of other scripts available in ProActive workflows:
- Pre scripts are executed just before a task script and can be used to do some initializations, copy input files, etc.
- Post scripts are executed just after a task script and only if the task succeeds. Similarly to pre scripts, they can be used to copy output files, or update variables used by children tasks.
- Clean scripts are executed after the task is finished, whether the task failed or not.
7 Job lifecycle
The user has some control over the job execution. Let’s illustrate the possibilities
by an example.
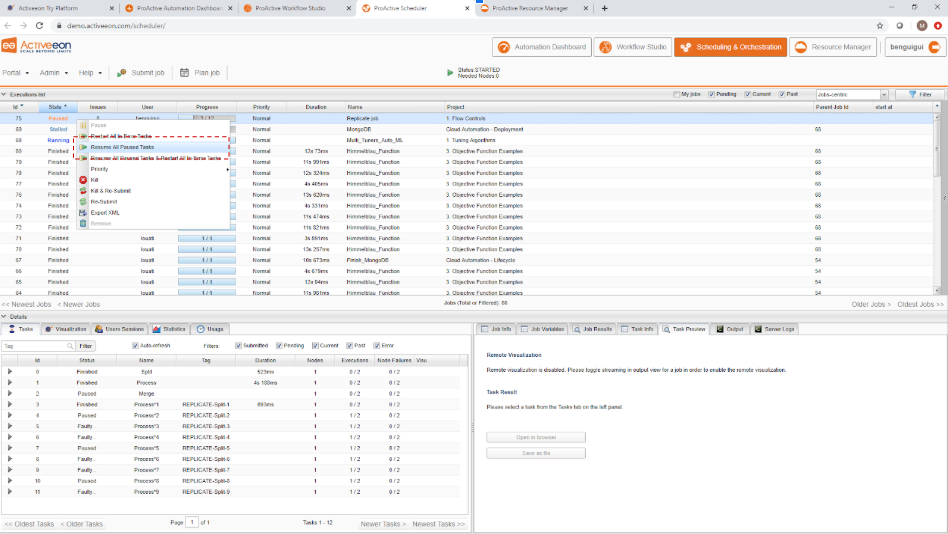
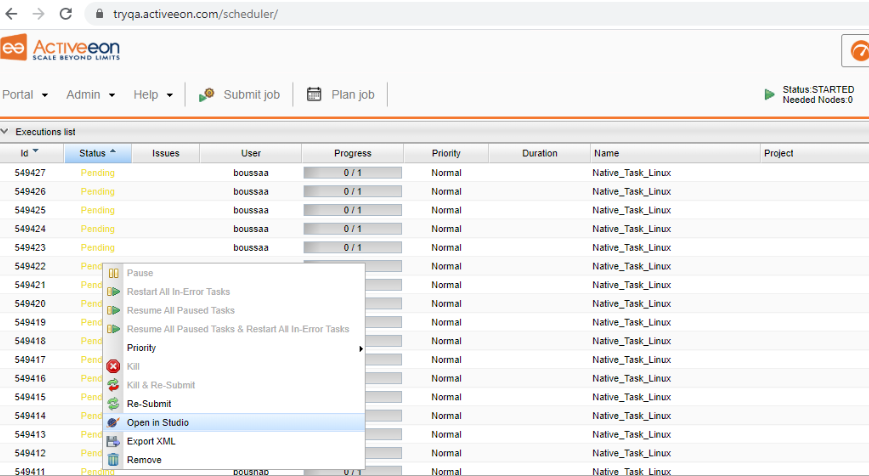
Open the Replicate job and submit it. Then open the scheduler interface.
Right-click on the job and select Pause.
The job will be then blocked in Paused state.
You can resume the job by selecting Resume All Paused Tasks.
You can also change the job priority during its execution. Resubmit the same job, and on the server interface, choose Priority->Low in the right-click list.
Your job will now have low priority and other jobs will take precedence over it. High or Highest priorities are only available to admin users. Job Priority can also be defined in the studio directly inside the workflow.
It is also possible to kill a job. Re-submit the same workflow and choose Kill in the right-click menu. All running tasks will be interrupted and your job aborted.
From the same right-click menu, select Open in Studio to be redirected to the Studio with the corresponding workflow opened.
8 ProActive Catalog
From the studio interface, users can publish their workflows into the ProActive
Catalog. Users can also import existing workflows to modify or execute them.
Multiple revisions of the same workflows are handled to follow the workflow
modifications.
Let’s modify the Multinode Job. Click on the task and rename it to myTask.
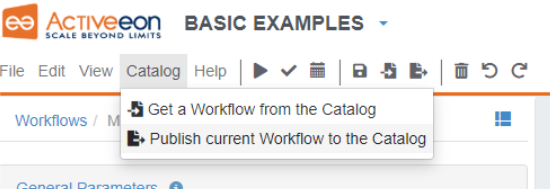
From the Catalog menu, click on Publish current Workflow to the
Catalog.
You should see the following dialog:
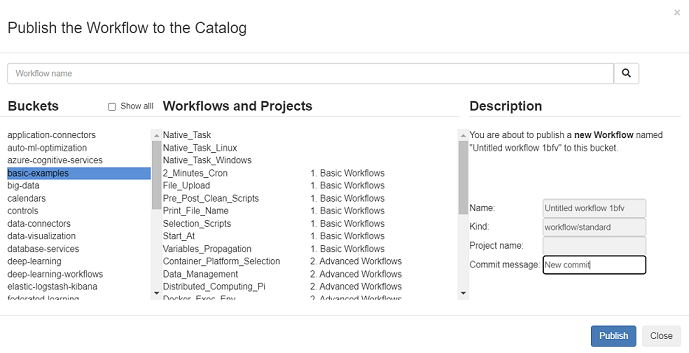
Enter a commit message (optional) and click on Publish to push it into the basic-examples bucket.
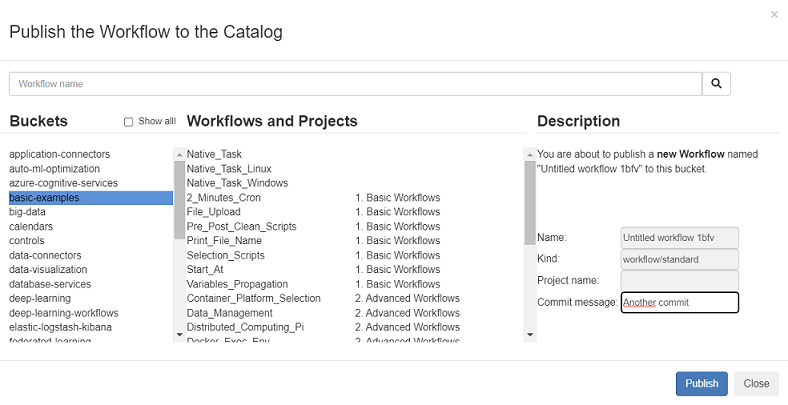
Now rename myTask to myTask2.
From the Catalog menu, click on Publish current Workflow to the Catalog.
Enter a commit message (optional) and click on Publish to push a new version of the workflow into the basic-examples bucket.
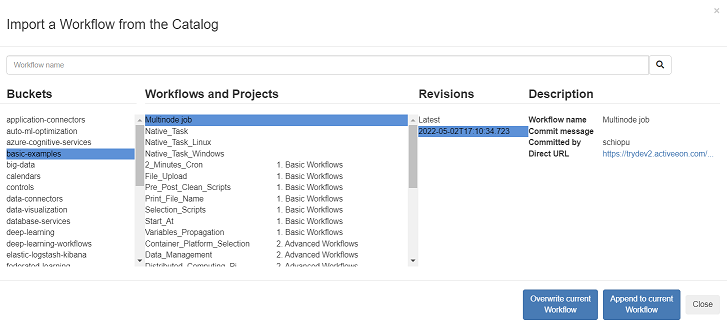
From the Catalog menu, click on Get a Workflow from to the Catalog.
Select the first revision of the MultinodeJob workflow and click on Override current Workflow to get its first version.
9 ProActive Automation Dashboard
ProActive Automation Dashboard gathers views for business people.
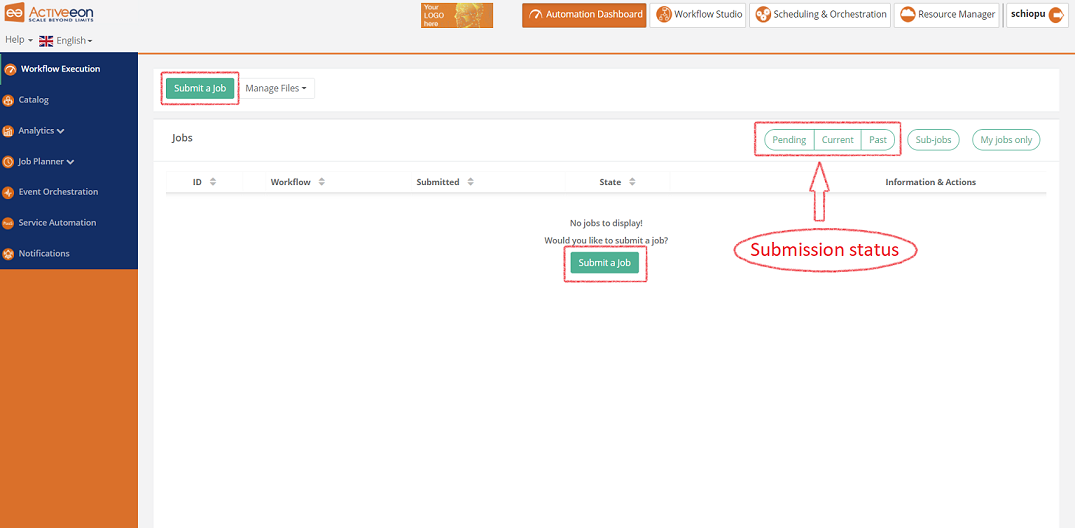
- The Workflow Execution is the entry point for end-users to submit workflows manually, monitor their executions and access job outputs, results, services endpoints, etc.
- The Catalog view displays all types of object that can be stored and versionned: workflows, scripts, rules, ..
- The Analytics views display job result plots, job gantt and node gantt.
- The Job Planner views allow job planning rules definition and association with jobs.
- The Event Orchestration view allows system monitoring and rules definition for automatic action triggering.
- The Service automation view presents workflows as services with their life-cycle management.
- The Notifications view centralizes all notifications triggered by user’s jobs.
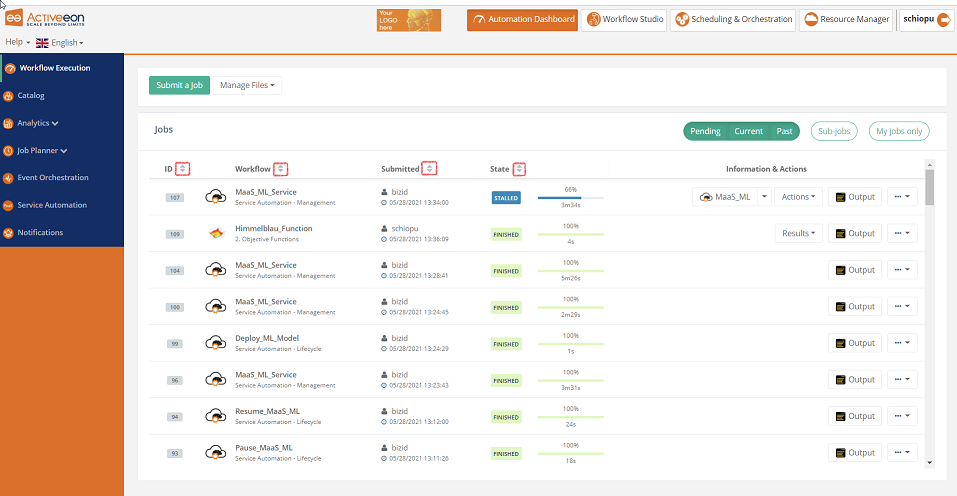
Workflow Execution
https://try.activeeon.com/automation-dashboard/#/portal/workflow-execution
Click on one of the submit buttons in order to submit a workflow.
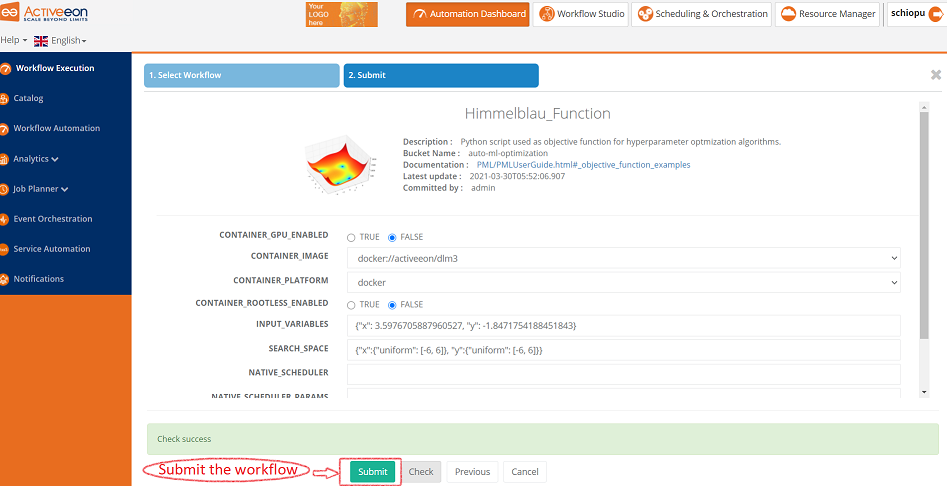
Click on a workflow icon to open a pop-up in order to launch a new workflow.
Click on the Check button to ensure the integrity of the variables.
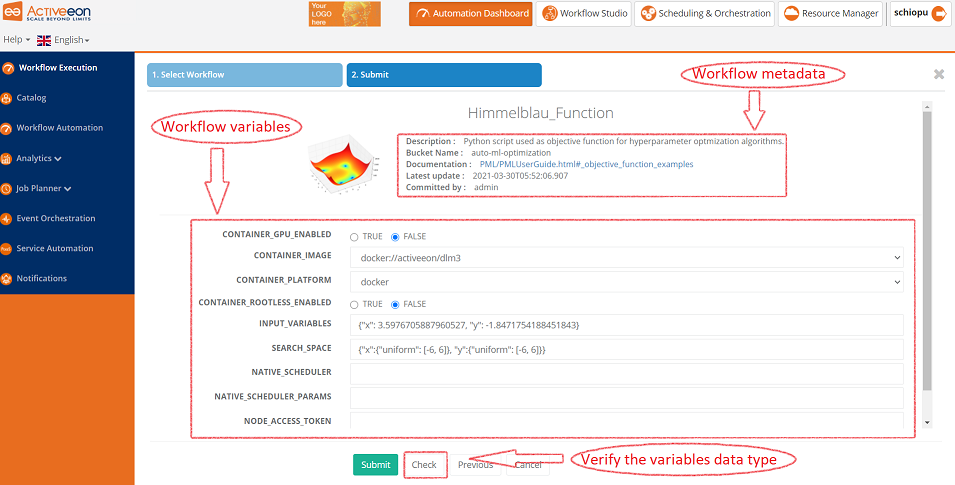
Click on the Submit button to submit the workflow.
You can sort the jobs by id, workflow, submitted (submit time) or state
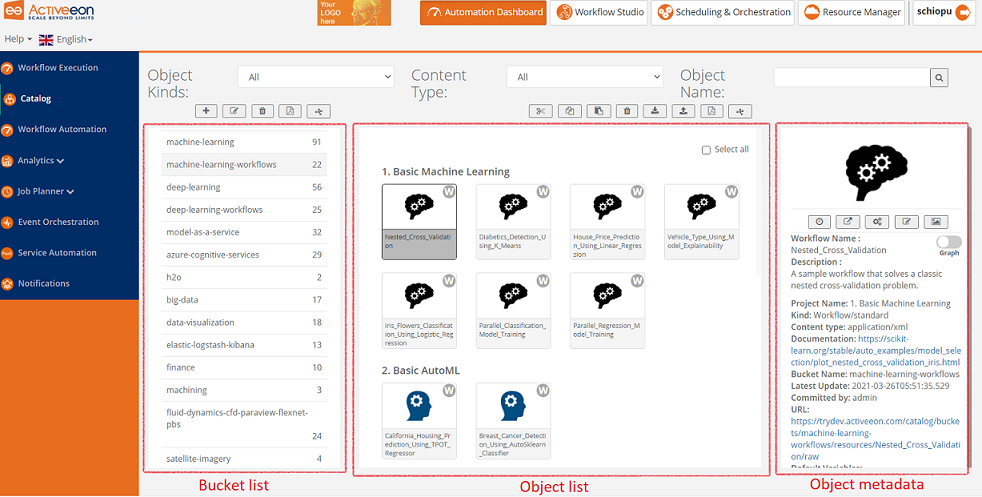
Catalog
https://try.activeeon.com/automation-dashboard/#/catalog-portal
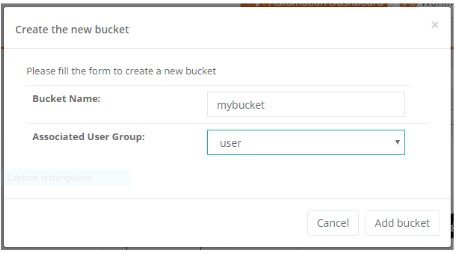
Click on the + button to create a new bucket.
Enter a Bucket name (i.e mybucket). Be careful, the bucket name format doesn’t allow uppercase. For more information look at the documentation here.
Enter the Associated User Group. If you select a group, only a user that belong to that group will be able to see the bucket. Moreover you can only select the group you belong to.
Select the basic-examples bucket.
Keep the ctrl button pushed and select the native_task and the 2_minutes_cron workflows.
Click on the download button
 . It will download a zip
file containing the selected workflows.
. It will download a zip
file containing the selected workflows.Select the bucket that was created.
Click on the upload button
 and select the zip
file. The archive workflow will be added to the bucket with their metadata.
and select the zip
file. The archive workflow will be added to the bucket with their metadata.Click on the bucket delete button
 at the top of
the bucket list and confirm the deletion. A popup will appear preventing to delete non
empty bucket.
at the top of
the bucket list and confirm the deletion. A popup will appear preventing to delete non
empty bucket.Remove workflows by selecting them (tick the select all box) and clicking on the object delete button
.
When the bucket is empty, click on the bucket delete button to remove the created
bucket.
Analytics
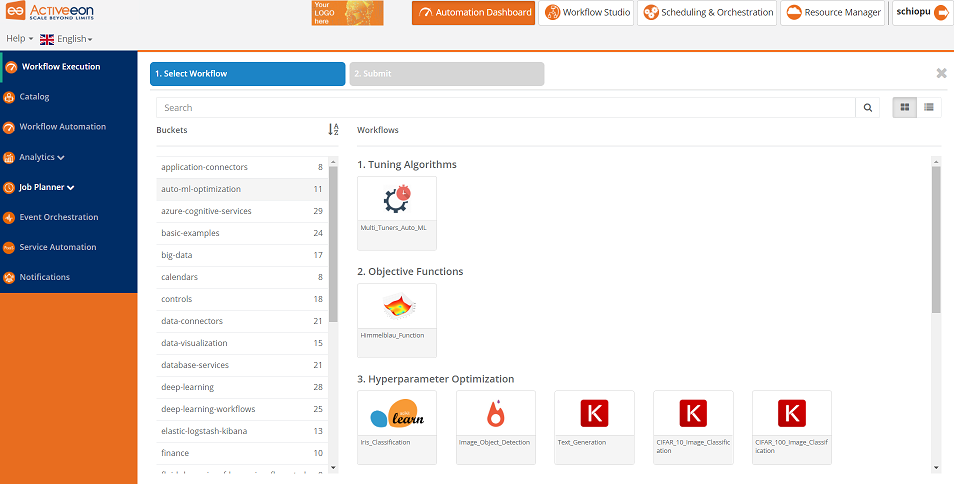
First of all, from the Workflow Execution view, submit 3 times the Himmelblau_Function workflow from the auto-ml-optimization bucket.
Wait until the jobs finished. You should see them in the Past jobs view section.
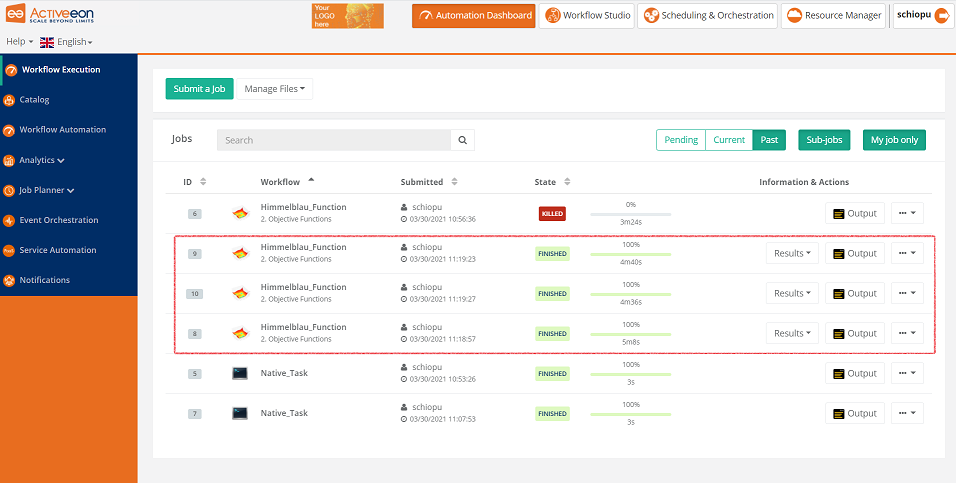
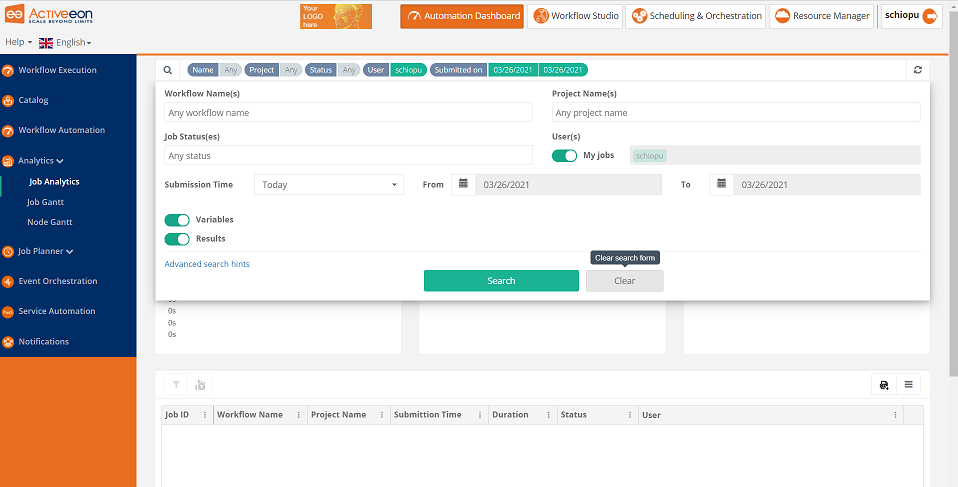
Go to Analytics->Job Anlytics, filter your today’s jobs, and click on Search to graphically explore job results.
Under Analytics->Job Gantt and Analytics->Node Gantt, try to find your job executions.
Job Planner: Calendar Definition
https://try.activeeon.com/automation-dashboard/#/portal/job-planner-calendar-def
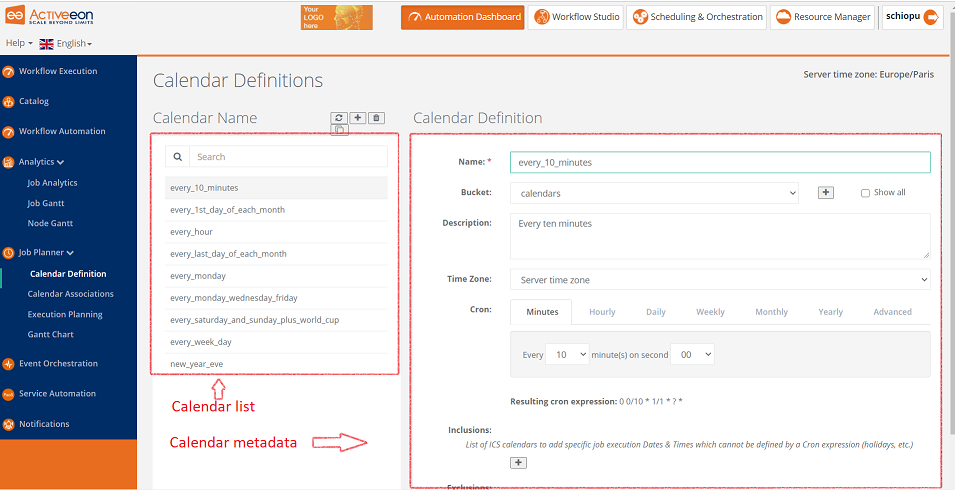
Click on the + button to create an new calendar. On the right panel you can update the calendar metadata.
The bucket should be calendars. By default only the bucket containing calendars are display. Clicking on Show all displays all buckets.
The cron will configure the execution of the calendar. For basic execution, the Minutes, Hourly, Daily, Weekly, Monthly and Yearly tab is enough. It will generate a cron expression that will be executed regarding the configuration.
Advanced tab enables users to directly insert a cron expression.
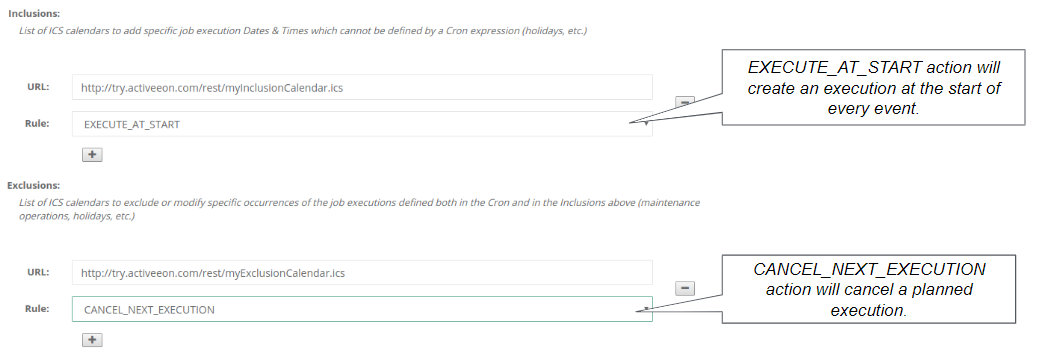
Calendar can also reference ICS files. When a referenced ICS file contains an event it will apply an Action. There is two kind of references ICS files: Inclusion which will add execution and exclusion which will modify and existing execution.
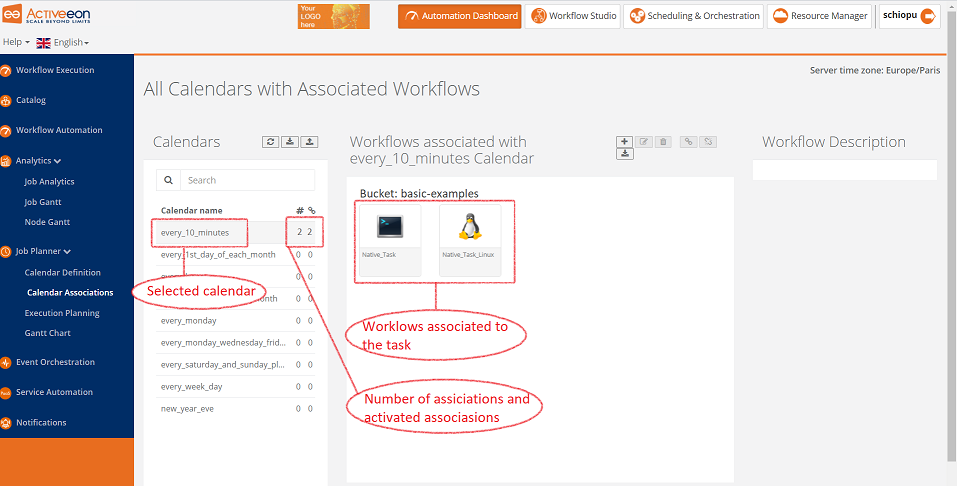
Job Planner: Calendar Associations
https://try.activeeon.com/automation-dashboard/#/portal/job-planner-calendar-def-workflows
You can associate any calendar definition with any workflow. Select a calendar
definition from the Calendars left panel and click on the + button to select
your workflow.
You can activate and disactivate your associations with  .
.
Job Planner: Execution Planning
https://try.activeeon.com/automation-dashboard/#/portal/job-planner-execution-planning
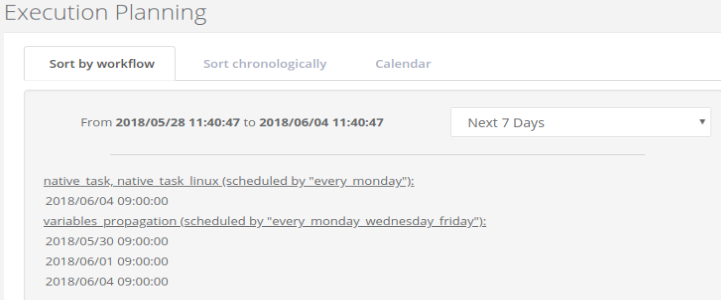
Click on the Sort by workflow tab.
Calendar tab shows the selected calendars executions time sorted by workflow.
Click on Next 7 Days drop down list to adapt the time granularity in order to have a clear view of the executions.
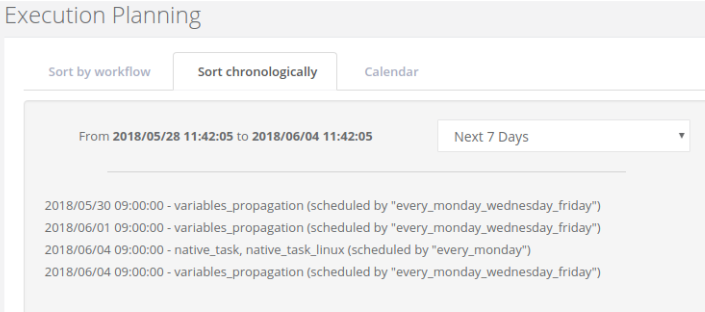
Click on the Sort chronologically tab.
Calendar tab shows the selected calendars executions time sorted chronologically.
Click on Next 7 Days drop down list to adapt the time granularity in order to have a clear view of the executions.
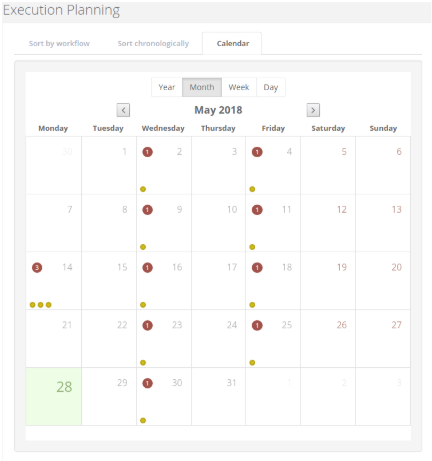
Click on the Calendar tab. This tab shows the selected calendars execution in a calendar view.
Click on Year/Month/Week/Day tabs to adapt the time granularity in order to have a clear view of the executions.
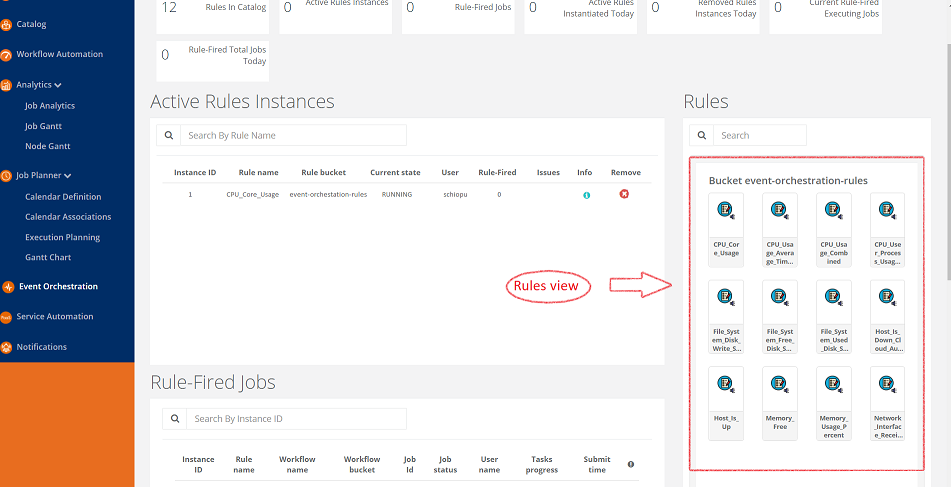
Event Orchestration
https://try.activeeon.com/automation-dashboard/#/portal/event-orchestration
Select one of the monitoring rules on the right panel.
Check/modify parameters (workflow to trigger,..) from the popup before clicking on
the Activate button.
To modify a rule: Right click on a rule and Edit.
Service automation
https://try.activeeon.com/automation-dashboard/#/service-automation
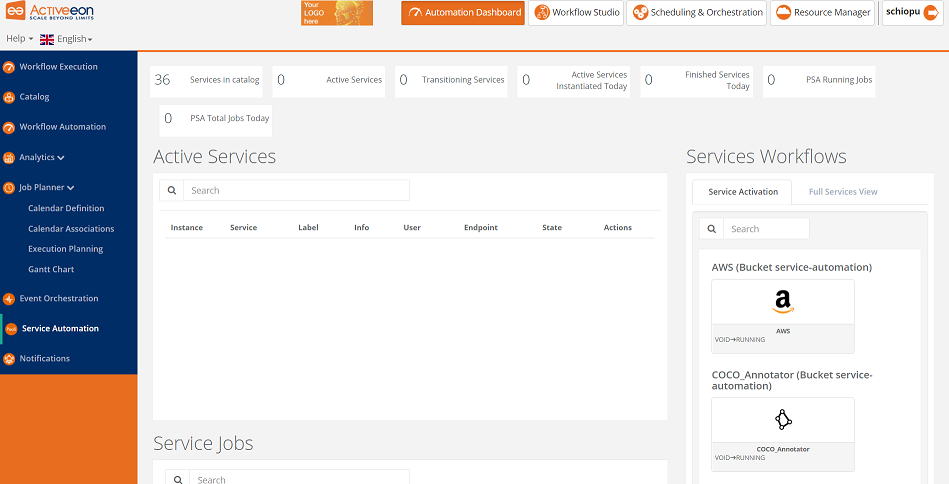
Here, you can easily deploy, undeploy, manage your platform. Let's deploy a HDFS-Spark platform.
Click on the HDFS-Saprk service on the right panel and click on the Execute Action button.
Congratulation, you made your first action (Reserve nodes) on the HDFS-Spark service! The service appears now under the Activated Services section. For each executed action, a workflow is triggered (as you can see from the Scheduler portal) and the service status changes.
Wait few seconds until your first action finished, before executing a new available action from Actions drop menu.

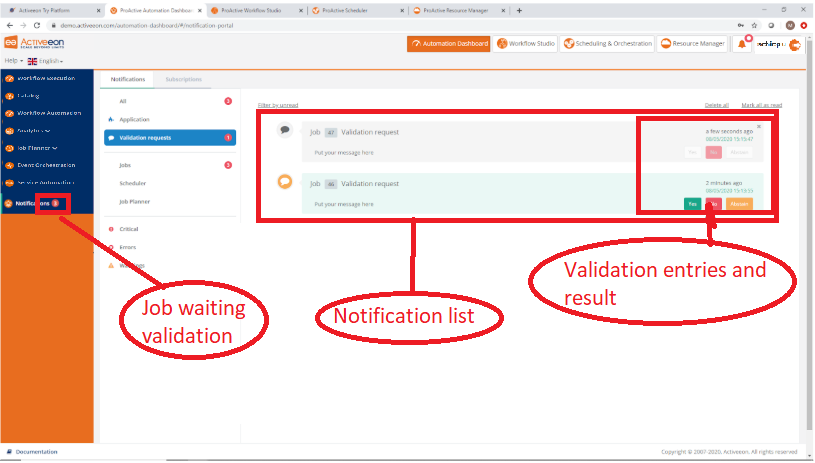
Notification service
https://try.activeeon.com/automation-dashboard/#/portal/notification-portal
This view centralizes all notifications triggered by jobs. Let’s trigger a
validation notification!
Go to Workflow Execution view, submit the Web_Validation workflow
from the notification-tools bucket.
Go to the Notifications view, select the Validation requests sub view
under the Notifications tab.
You can validate/unvalidate/ignore your validation notification by clicking on one
of these 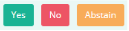 .
.
Following the same aproach, the Notification view handles Subscriptions
notifications (Subscriptions tab).